DIY Ice Candles Tutorial!

ice candles diy tutorial

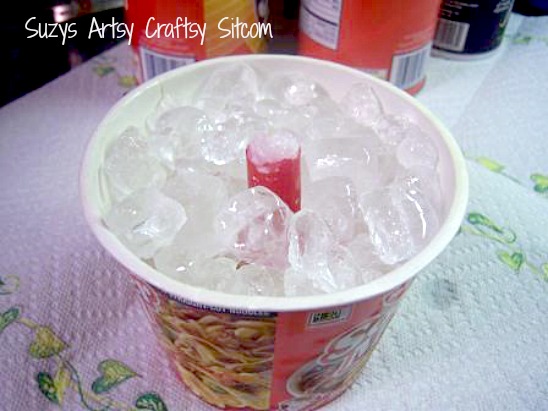
Center your taper in the middle of your container and fill around it with crushed ice. (Crushed ice gives a better look than cubed). Fill the container with crushed ice up to 1″ from the top.

Sitcom 2 step option

ice candles diy tutorial

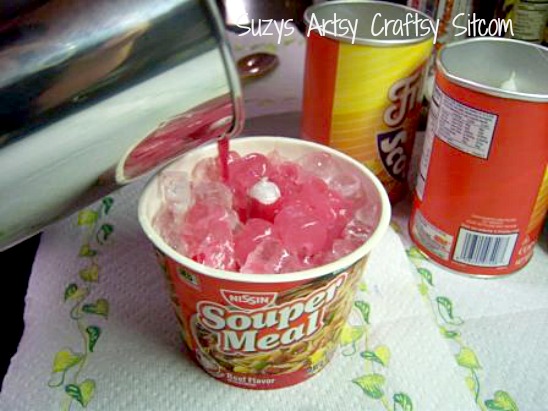
Now pour your melted wax over the ice, filling the container all the way to the top.

ice candles diy tutorial

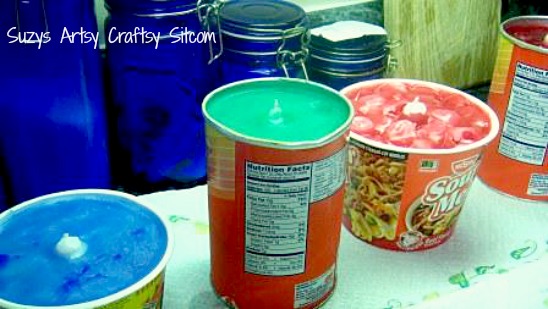
Patience, my dear. We now have to wait for the wax to get solid. Give it about an hour so that there will not be any “incidences”.

ice candles diy tutorial

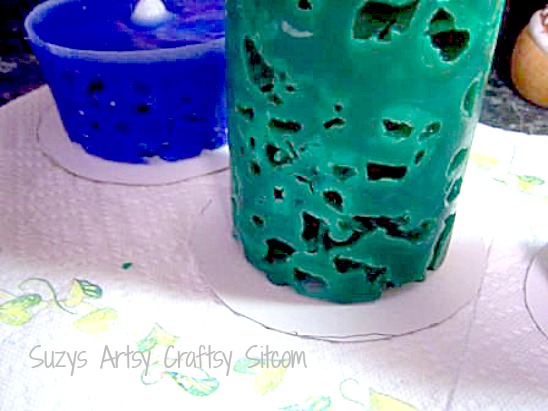
Hold your candle over the sink and gently peel the cardboard container off of the candle. Ice candles are fragile, so hold it gently as you peel. The melted water will run off into the sink.

ice candles diy tutorial

At this point, you should already have a pretty awesome looking candles. But wait! There’s more! But again, we have to be patient. There is still ice inside your candle that needs time to melt. Sit it on some paper towels and let it stand overnight before you go to the next step.

ice candles diy tutorial

Now we are ready to decorate it. Cut a scrap of cardboard for your candle base. I cut mine about 2 inches wider than the diameter of the candle. This leaves about an inch of cardboard showing on all sides. At this point, set the decorations that you would like to use near your work station.

ice candles diy tutorial

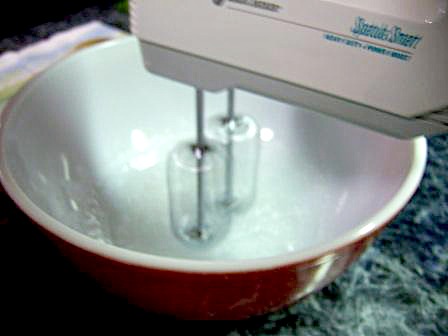
Using your double boiler method, melt 1/2 box of wax. Once it has melted, pour the wax in a small bowl and using your mixer, beat the wax just like you would beat egg whites. (Start off slowly at first so as not to splash hot wax on yourself). As the wax starts to cool, it becomes white and frothy. When it has reached the point where it is just beginning to hold its shape, spoon the wax around the base of the candle.

ice candles diy tutorial

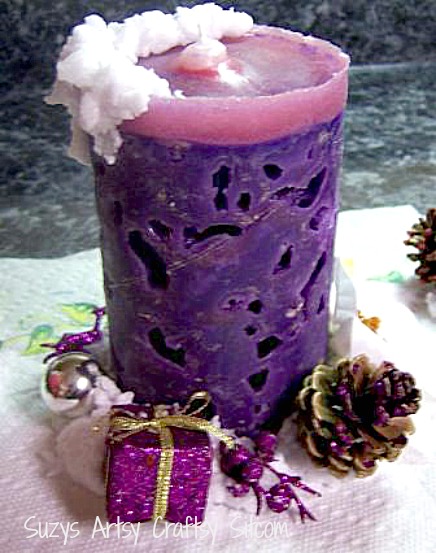
Mound it like snow. We also added some to the top to look like drifts. Working quickly, while the wax is still not set, push your decorations in. If the wax sets before you get them all in, add more melted wax to the decoration and re-apply. Believe me, it sets quickly. Clean up Tips:  Be sure to scrape off as much wax as possible before running under hot water.  This could clog your sink!!  You may want to consider cleaning your utensils in boiling water and then pouring the hot water outside.

ice candles diy tutorial

ice candles diy tutorialice candles diy tutorial

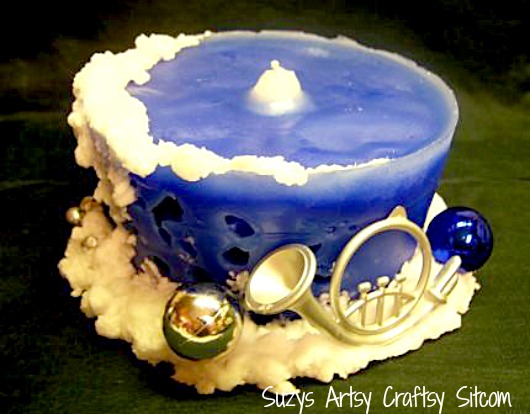
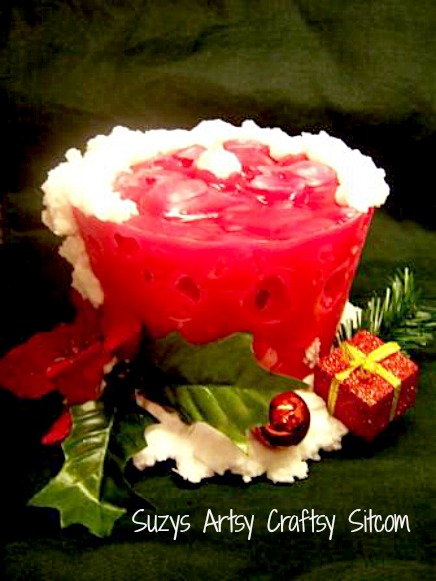
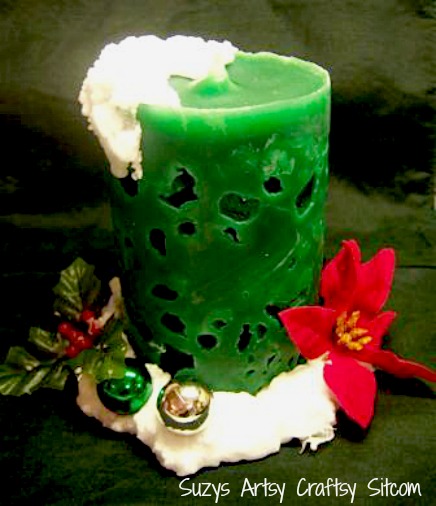
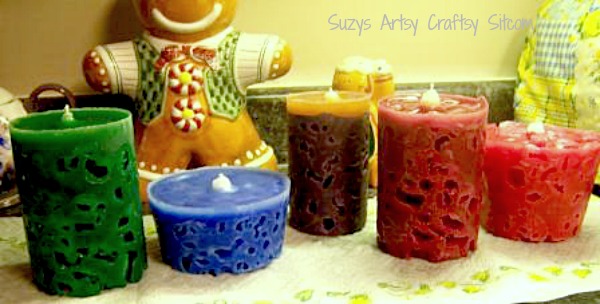
These candles make wonderful gifts. When you burn them, they will burn from the inside, pulling from the taper in the center. As they burn, you will be able to see all the variations of light through the holes in the candle. It is actually quite beautiful.

back page

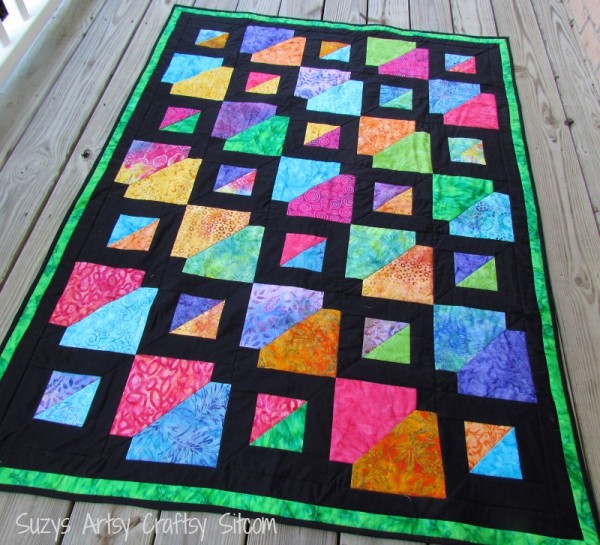
Want to try your hand at quilting?  My newest quilt Pattern- Batiks Gone Wild!  A great gift!

batiks gone wild quilt pattern

Are you new to the Sitcom?  Be sure to check out my Frequently Asked Questions Page!

For over 150 crafty tutorials for all ages, visit my Tutorial Page! 

44 Comments

  1. Nancy Jorgensen says:

    Where are you located? We have several bags of it we just acquired from a family friend whose dad just passed away. We won’t be able to use it all.

  2. Hi Jesi,

    I bought my wax from the grocery store. You can find it in the canning section near the canning jars. If you need larger quantities, you can check your craft supply store, or maybe purchase on the internet. Hope that helps.

    suzy

  3. Jesi Bulsara says:

    Where can I buy wax in bulk?

  4. Jesi Bulsara says:

    where can one buy wax in bulk?

  5. I loved making these as a kid! Thanks for a great tutorial- I’m definitely going to make these with my son. I loved your tutorial so much that I submitted it at Fun Family Crafts and it’s being featured! You can see it here:

    http://funfamilycrafts.com/ice-candles/

    Thanks again for a wonderful tutorial!

  6. Thank you, Marta! I’m so glad it brought back great memories for you! It does for me too.

  7. So enjoyed this tutorial ! My mom taught my sister and me how to make these in the 1950’s. We used milk cartons too. Our snow made with the mixer was lathered all over some of our candles. I still have the pots & pans, some old candles and crayons reserved just for candle making! Our grands have never seen it… will be great activity to do with them. Thanks!!

  8. I remember making these in the 70's! How fun! We used candle dye and wicks wrapped around a pencil, but I like the taper idea in the center better. Much easier I think than balancing the pencil on the paper cup that we used and I love the idea of all the different containers–that I don't think we had so many choices of back then.

    It's always fun when something from the past comes around again, because it can usually be improved upon in all sorts of fun ways. Thank you!

  9. I'm so sorry to hear that! Maybe I should edit in a special warning.

    I'm glad your candles turned out well. Hopefully if you decide to make them again, it will go better.

    suzy

  10. Warning! Do NOT rinse anything down your sink no matter how small it is! Maybe I'm just stupid, but the little bit that went down clogged my pipes and my garbage disposal locked up. Even though it was mixed with lots and lots of water, it still sits and gets stuck without going all the way through. Also, my refrigerator spits out a few big chunks of ice, which will leave huge holes in the candle. I learned to fish out the big chunks. This was my first time making candles and it wasn't the best experience. BUT… my candles turned out really pretty! And I was able to hide some big holes with extra snow drifts.

  11. OMG, these would make great gifts! What awesome tutorials! Thanks for sharing!

  12. Thanks for the tutorial! I haven't made ice candles in years. My older sister made them first with her kids one year at Christmas time. They make great gifts.

  13. Beth @ Wiccan Make Some Too says:

    Wow. I haven't made candles since I was a kid. I remember the crushed ice method. I love the way they turn out. The frothy "snow" wax is a great idea>

  14. I am so glad that you showed this I always wanted to know how to do it thanks so much.

  15. Yikes Suzie, how much cooler can this tutorial get, I kept thinking, as I was reading every word. Man, the end result is just too much. I can not believe how awesome those turned out. Found you from HOH feature. Great job, and FANTASTIC tutorial. I would LOVE if you came over to my place and joined my weekly party **Amaze me August**, dang to share these with my readers would be awesome. Hope, really hope to see these, and ANY OTHER awesome projects you wish to share, really soon. THANKS, and I am totally your newest happy follower. Bella 🙂

  16. wow this is so cool! thanks for sharing it at a crafty soiree…. hope you join us again tomorrow!

  17. Katie's Nesting Spot says:

    Ohmigosh this is such a superfun project, I love love love it! I've never made candles before but seeing this combined with all the fun holiday stuff is making me sorely tempted to give it a try. I didn't realize you can use crayons for color, although in hindsight it makes sense. Thanks for sharing with us at A Crafty Soiree! Please join us next time too!

  18. What a great idea & fun for the kids to help with too! Thanks for linking to Craftastic Monday:)

  19. Ashlee @ I'm Topsy Turvy says:

    very very cool~! Thanks for linking up to Topsy Turvy Tuesday's!

  20. Its So Very Cheri says:

    Wow that is creative.

    Thanks for entering over at its so very Cheri. I hope you have a fantastic weekend.

    Cheri

  21. Kathy@ Gone North says:

    WOW!! Thanks for such good step by step instructions. I will definitely be doing this one….
    ( stopping by from Me and my bucket )

  22. Wow, that was definitely a flash-back. I remember making these (although not so beautiful) when I was much younger. But I wouldn't have remembered the process. Thanks for sharing! Glad to have found you on Crazy Cute Thursdays!

  23. Army Wife Quilter says:

    I remember making candles in elementary school with the snow look. the ice candles look very wintery I love them.

  24. Tammy@ Not Just Paper and Glue says:

    Oh my word!!! I couldn't believe that I saw this tutorial. My mom and I used to make these – in the 70's lol – and give them for presents. This completely took me back to my childhood. Thank for bringing back such a wonderful memory.

  25. Very cute! Have a great week!

  26. Courtney McAulay says:

    So cute and super clever!

    Thanks for linking to Crazy Cute! Don't forget to stop by on 10/7 to see if you won the giveaway! 🙂

    http://www.betweenuandme.com

  27. so that's how they get that effect – thanks for sharing this technique. I am going to try it

  28. Michelle @ Sweet Something says:

    This is a great project! I've always wanted to try candle-making, TFS!

  29. Ingrid@morestylethancash says:

    This is GREAT! I help run a lot of charity garage sales and we always get loads of candles that we end up throwing out. I'm just going to remove the wicks from those candles and melt them down to make these. Great tutorial!

  30. jo for OttLite says:

    This is wonderful…easy instructions and photos…I may be using it as a tutorial for OttLite.com/blog..Thanks for the memories! Thanks mom!

  31. Creative Mind says:

    this is extra ordinary smart idea…you have done it nicely…keep it up…!!!!

  32. Anonymous says:

    You have so many great ideas on here, I will probably not get anything done today!! My girlfriend used to make these in white in milk cartons for a wedding gift by putting the wedding announcement (or invitation) on one of the sides with the whipped wax to frame it. Sometimes, depending on the Bride, she would add some iridescent glitter to the whipped wax. Thanks to your MOM this time for another great Christmas project!
    hAndiMom

  33. That is so neat! What a fun technique! Thanks for linking up to Show and Tell Saturday!

  34. Kristi Flanagan says:

    We have made ice candles – aren't they fun? Thanks so much for planting your creative seeds at Plant a Punkin Seed Party!

    Kristi
    Punkin Seed Party

  35. amyg @ My 3 Monsters says:

    I remember making these when i was young. Thanks for the walk down memory lane.

  36. Those are really cool. I'm thinking black ones for halloween. I may just do that with my boys this weekend.

  37. Susieqtpies says:

    Love it! Just saw your link on a follow friday link up! I'm your newest blog follower.

    Stop on in and link up!
    susie
    http://goo.gl/syX1

  38. Oh my, this brought me back…I,like your Mom made ice candles in the 70s! LOL! thanks for the memories…we used milk cartons for square candles! I can't believe I remembered that!

  39. tales from an oc cottage says:

    How very cool!

    m ^..^

  40. Those did come out great. I also really like all the different shapes you chose.

  41. katskraps4kids says:

    That is really neat – I am 40 and have never seen it. Of course, my mom, gosh i don't think anyone in my family ever, was crafty or made things so I missed out!

    I prolly have a kazillion crayons around here too so, I think we will definitely be making these. Maybe over Christmas break?….

    thanks for posting this and with such good directions and step by step pics!

Comments are closed.