How to Cast Leaves in Plaster
So, while perusing the web looking for crafty ideas, I came across several versions of leaves cast in concrete. Absolutely beautiful. But after checking out the cost of supplies at the Home Depot, I decided that maybe I could scale mine down a bit. I already had plenty of Plaster of Paris, so I decided to try my own version of plaster casted leaves.
For this project I used:

I began by covering my table in plastic. You can use trash bags for this or in my case, I used large plastic bags. Crunch up some newspaper to put under the upside-down leaf to support the center. (You don’t want your leaf to be flattened by the weight of the plaster).

Roll up more pieces of newspaper and put under the edges of the leaves in several places to create nice waves in the leaf. You will have to use one leaf for every plaster casting as the leaves lose a ton of texture if you try to re-use them.

Mix the Plaster of Paris with water in a plastic cup. Add enough water to make the plaster a consistency similar to yogurt. Then spoon the plaster over your leaf. Plaster does not stick to the leaf and in some cases will try to roll off, but be persistent. Try to spread it just to the edges of the leaf, creating a layer of plaster over the leaf that is about ¼ inch thick.
Now at this point, if you are smart, you will add a hanger of some sort into the plaster before it dries. Something like a pop can tab works great. I’m not that smart, so I did not do this and had to come up with a plan as to how to hang them after the fact. But live and learn.
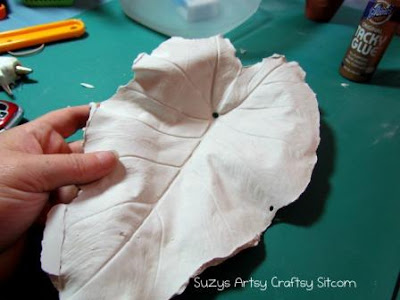
Now allow the leaf to dry for at least an hour. Don’t get all antsy like I did and try to unmold it before it is totally hard. These leaves are fragile and if the plaster hasn’t set completely, it will break into a bunch of leafy pieces. Ask me how I know.

Now, flip your mold over and peel off the leaf. Awesome.


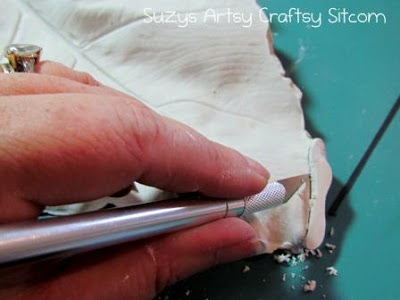
If you are messy like I am, you may have to do some trimming on the edges. Carefully use a craft blade to score the edges and then snap off the extra in little pieces. Keep in mind that these plaster leaves are fragile. “Fragilayyy! Must be Italian!” (My favorite line from “The Christmas Story”).

Since I wasn’t smart enough to put in hangers, I knotted some hemp cord and strung it through the hole created by the leaf stem and used that to hang them. Then I just arranged them in a nice little group on my wall. I totally would have done more, but I broke one when I couldn’t wait for it to dry, and the husband had a fit because I was cutting leaves off of his prized Elephant Ear plant. But three is a good number.

And his prized Elephant Ears are now preserved for eternity!
If you enjoyed this tutorial, you might like my Plaster Casting with Sand tutorial. Using my handy-dandy plaster, and sand as a mold, I created some sunny plaques.
Or check out my Faux Textured Chair Rail tutorial- another way to use plaster to create a great textured chair rail.
Be sure to check out the latest deals and tips. And while you are there, check out my post!
Are you new to the Sitcom? Be sure to check out my Frequently Asked Questions Page!
For over 150 crafty tutorials for all ages, visit my Tutorial Page!


Thank you so much. I look forward to crafting these.
That’s beautiful.! Thanks for sharing!
Great ideas!! Thank you! I hope to revisit this project next year, and I will definitely incorporate some of your suggestions.
suzy
To give it a bit more strength, you can ad that fiberglass reinforcement taper the sheetrock guys use. It looks like light yellow screening. Put it in the middle of the plaster, not near the leaf side.
I have used a vinyl base joint compound made by DAP. It dries a bit slower
and is a bit stronger than plaster, but it has worked for me.
Hi Carla!
I would use acrylic and then be sure to add a coating of clear sealant.
Hope that helps!
suzy
If I chose to paint the finished project could you recommend what type of paint?
Thank you.
On your plaster casting leaves how do you preserve them and can you do something to them so they can be keep out side. I have done them in concrete but you are correct they are not cheep.
Hi Suzy! Love your funny and entertaining tutorial on your Husbands missing Elephant ears. Maybe if the leaves are sprayed prior to the plaster coating with say hair spray it may make the plaster more Workable?
saludos desde Cali, Colombia. Excelente tutorial. GRacias
Am a little late to the ‘party’; but wanted to say how MUCH I love your leaves, and, I have a problem.
I’ve ruined 12 leaves trying to get this to work. I’ve made thick and thin plaster. The thin one runs off the leaf and UNDER it making a thick glob I can’t get off. That’s the biggest problem. If I make it too thick, it dries before I can spread it over the whole leaf. But again, the one where I try to make it the consistency of yogurt…it just runs off the leaf. Help? 🙂
Great work..they look lovely…thanks for the detailed tutorial
Hey Suzy, thank you so much for inspiring me! I was looking for something to do for a crazy college work with plaster and this tutorial will be very usefull for me! Thanks again 🙂
Hi!
I have never tried this with joint compound, however, I have worked with joint compound on other projects. I found that it cracks easily and is not nearly as sturdy. Even with plaster of paris, this particular project is a delicate one and you need to use at least an inch of plaster to get a sturdy mold of the leaves. You can try joint compound, but an additive may be necessary. Let me know if you decide to do it and how it turns out.
Thanks so much for your kind words!
Hi Suzy,
Your ideas are amazing and simple enough to be done with my three year old.. I just have one question though. Can we do this leaf pattern using joint compound? If yes then do I need to mix some kind of glue in it? I have some joint compound lying at home wonder if I can use it instead of plaster of Paris???
Cheers
Hi Julie,
I’ve never worked with pottery plaster before, but I would think it would work. Mix it to yogurt like consistency and pour over your leaf. Be sure to make a layer of plaster at least 1/2 inch thick and allow it to dry fully before pulling off the leaf. Let me know how it goes!
suzy
Hi!
Love the plaster leaves! I saw your tutorial and raced out to the store to get the plaster. I only found pottery plaster, is there a difference between this and Plaster of Paris? Can I use the pottery plaster?
Thanks!
Hi Gina,
I have a couple suggestions that I hope help you out. First of all, be sure you aren’t trying to do this in a humid environment. Second, you need to put a thick coating of plaster on top of the leaf- about 3/4 to 1 inch thick. Your plaster needs to be of a thick yogurt like consistency. (It will not spread easily). Third, be sure to allow your leaves to dry thoroughly before handling them. At least several hours.
Hope that helps.
suzy
HELLO- I have tried this 6 different time… all of the leaves have fallen apart. With the most delicate touch or pressure to even take leaves out it cracks and falls apart. I am left with a mound of un usable plaster. I even tried adding the glue to make it stronger and they all still fell apart. When I had one that stayed together… trying to get the excess off, which is impossible not to have, it work crumble… help!!
Penso de gesso de Paris pode ser um nome de marca. Gesso em pó vai trabalhar para este projeto. Certifique-se de colocá-lo sobre grossa para a força.
suzy
Olá !!!
Gostaria de saber qual a diferença deste gesso Paris para o outro ? e a diferença de preço um do outro ?
Obrigada
That really IS SO COOL, Suzy!
I have never worked with plaster of Paris. I’m looking forward to trying to play with it now though.
beautiful and looks like a great project for my art camp at work!
Featuring these this week! 🙂
Very cool. Love all the detail in the leaves. Thanks so much for linking up!
Ooo…wonderful! I could imagine doing this for a miniature birdbath or something. Also, I don't know about your elephant ear but I know ours stand up to PLENTY of cutting and chopping; unless it's an indoor plant, it'll probably be fine. (We have several just due to them sprouting and having to chop them in half so they aren't too large!)
I love, love, LOVE it! Definantly will have to try this! I'm now your newest follower. 🙂 Your blog is such an inspiration to me, as a newbie. Looking forward to reading more!
http://www.RusticCharmDesign.blogspot.com
Found you through the Rhinestone Beagle… I have seen this done on a larger scale, using concrete, to make a bird bath. I like your take on it–nice to see a different option. The wall display looks lovely!
What a cool idea!!
Thank you so much for linking it up to {nifty thrifty sunday} last week!
Hope to see more of your creativity tonight! 🙂
xoxo,
Vanessa
The Creative Bloggers' Party & Hop has grown for the better because of your participation. Thanks for linking up this great post!
Suzy, I love, love, love this! Great idea! I am featuring it this afternoon!
These are awesome! Thanks for sharing the tutorial. As soon as I can figure out where I would put these, I'll be making some for myself. In the meantime, I've pinned it.
I found you through the party at momnivore's dillema and I'm your newest follower. Would love a follow back if you're interested. 🙂 –> Carissa's Creativity Space
They look fantastic! I saw this on the MS show one day and thought they were cool. Awesome job. Thanks for linking up to this week's Catch a Glimpse party.
Those are really amazing! so impressed!
gail
So beautiful ~ I want to make some too now!
What a wonderful and lovely creation! I love these! I don't have an Elephant Ear Plant but I'll be checking out my yard for something to use!
Thanks for sharing at Thrifty Thursday!
gorgeous! next time give it a try with cement for some gorgeous leaves to put in the garden……been wanting to try that myself, it was featured on a Craft Schooling Sunday last year some time. thanks for sharing on Craft Schooling Sunday!
Hi there- found you through the Thrifty Thursday hop and am a new follower. I love these. They somehow remind me of my childhood and finding leaf impressions in the concrete side walk. They look so easy to make. I hope you have time to follow my life in South Africa by http://withoutcomplexities.blogspot.com
Have a great weekend!
Beautiful! I can totally see these on a wall or smaller leaves made into Christmas ornaments! Thank you for linking to Handy Man, Crafty Woman's Wicked Awesome Wednesday!
These are beautiful and look great on your wall! Great tutorial, thanks!
This is the coolest most unique project I have seen in ages! Love it! I am so excited to peruse your blog and see what other fantastic ideas you have here 🙂
Kindly, Lorraine
What an amazing project! Thank You for sharing your experience!
Cheers from Bangalore ,India
Dr Sonia S V
http://cardsandschoolprojects.blogspot.com
Oh, wow! I've never even seen that before. I do Art Adventures every Tuesday where I show how to teach a project to kids and I just did Sand Casting. I see now that you have a post on that as well. 🙂 I may have to try this technique. Following now. I hope you will visit me.
These are SO pretty! People pay so much for these in stores! Reminds me of the ones I tried to make in ceramics class in college, but yours are much nicer!
Following from Not Just a Housewife. Love how those turned out! 🙂 Would love to have you link this up to my {wow me} wednesday link party going on right now over on my blog. The most view link will receive a set of fancy rectangle chalkboard labels from my etsy shop. Hope to see you there.
Ginger
gingersnapcrafts.blogspot.com
They turned out great!
I love this! The leaves look like sculptures.
These are so beautiful, thanks for sharing the tutorial!
Lovely post, thanks for sharing.
New follower, please pop by Karima x
http://www.karimascrafts.com
Love these! Pinning this idea!
SO pretty!! Really — this is a great tutorial with so many possibilities — how cute would LITTLE leaves be scattered around an arrangement of books, etc.!? Thanks for sharing this with us!
These look amazing!
Hey Lovely Suzy..i like your tutorials & always speechless to see..you are a super talented awesome friend 🙂
Well i have lots of types palm plants in garden & i will definitely try this one soooon
Lots of Love!!!
Khadija
Wow! I would love it if you would link up to my Tuesday Confessional link party going on now: http://www.craftyconfessions.com/2011/06/tuesday-confessional-link-party.html
~Macy from Confessions of a SAHM
Beautiful!
Ingenious idea! I love this beautiful project, opens up so many creative possibilities. Thanks for sharing this amazing tutorial. Visiting from Motivated Monday, and you have inspired me. I'm going to try this.. Have a great week!~Poppy
http://withadashofcolor.blogspot.com/
I love this idea! Amazing!
these are crazy awesome!! LOVE it!
Thank you for joining me at my blog party Simply Creative! Stop by this Thursday and we'll party again!!
Angela
http://365days2simplicity.blogspot.com
They look really good.
Absolutely stunning!
Would love for you to share at Calling All Crafters!
http://allthingsfee.blogspot.com/2011/06/calling-all-crafters-13th-edition.html
What a great idea!
Oooooh! They look great! Looks like a good thing to try with my kids!
Thanks for linking to a Round Tuit!
Hope you have a great week!
Jill @ Creating my way to Success
http://www.jembellish.blogspot.com/
Quite gorgeous! I love them in pure white, such a cool look!
Marilyn,
Excellent idea!! I wish I had thought of it while putting these together! Next time for sure. Thanks for the tips!!
suzy
Hi Suzy,
LOVE your SitCom. Great ideas all the time and lots of sharing the limelite with others as well.
To make your beautiful leaves more sturdy, try patting a layer of gauze on the back after you put the finishing touches on the plaster. And the purchase of a package of good silver colored hairpins would make wonderful hangers. Smaller and lighter than pop tops from drink cans.
These are so stunning! My father in law has a HUGE elephant ear plant so I'm going to have to snag some leaves from him to try this. Thanks for linking up!
These are great – it doesn't look too hard to do either… I've never tried it before, may have to though! Too funny… I stopped over from the Answer is Chocolate BFF Link Party where I've linked up too… pop on over if you get a chance.
Hugs, antonella 🙂
http://quilling.blogspot.com/2011/06/wondrous-wednesday-patriotic-printable.html
That is so cool. How do you come up with all these great ideas? You are amazing!
Really nice! It would be fun to paint them, too.
These are really cool! What a great idea!
I saw your link at 504 Main!
Wow! They came out beautifully! I can't believe the level of detail that the plaster picked up.
So glad I saw your link-up at Hodgepodge Life!
Jenn/Rook No. 17
Genius. But I am learning to expect nothing less from you. 🙂
wow… they are simply beautiful
What a great idea! I love how you used the rolled-up newspaper to create movement with your leaves! Thanks for sharing!
I love this! What a beautiful project. I have an elephant-ear plant too. Thanks so much for linking up to Finished for Friday.
Those came out GREAT!!!! Love the final look.
I love this project! Will you share this at my Blog Party Simply Creative? I'd love it if you did!!
http://365days2simplicity.blogspot.com/2011/06/simply-creative-blog-party-2.html
Any time my project supply list includes something I can get from my yard, I am happy 🙂 Cool idea.
I love this. And I love the words 'Plaster of Paris'. Well done!
Suzy these are lovely! 🙂