Feature Friday- Quilled Aluminum Snowflakes
On December 5, 2012, my Quilled Aluminum Snowflakes were featured in Crafts ‘n Things Weekly! Be sure to go check it out along with the other great projects that they are offering!
Crafts ‘n Things Weekly is an on-line division of Crafts ‘n Things Magazine. They offer thousands of digital craft projects every year for easy print out, with new craftiness coming out each week. It is one of my favorite places to check out on the internet.
I am very honored to have one of my projects chosen! My quilled aluminum snowflakes are a beautiful addition to your tree. Easy to make, with nothing more than a disposable aluminum pan, they are just pennies to create!
Want to know how to make them?
When I first started to learn how to quill, all the instructions that I found on line suggested that I purchase quilling paper strips for my projects. Being the cheapskate I am, of course I did not. I bought some big packs of colored cardstock that I found on sale and have been cutting them myself with a little paper cutter. Worked great for me. Then I moved onto toilet paper tubes. Because, why limit myself to cardstock? And then it occurred to me after perusing the dollar store one day, that cutting those cheap aluminum pans into strips just might be another way to move along with my quilling experience. So there you have it. Quilled aluminum pans. Can’t say I didn’t warn you. Ha!
Of course the natural shiny-ness brought to mind a sparkly snowflake, so I decided for my first quilled aluminum project to create some snowflake ornaments.
You can find FREE patterns for this tutorial on my Free Pattern Page.
For this project I used:
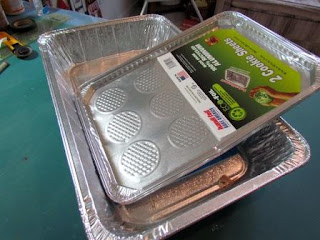
Several large disposable aluminum pans
Hot glue
Small paintbrush handle (for quilling)
Cheap pair of scissors
Begin by cutting up your aluminum pans into strips that are approximately 3/8” wide. Due to the fact that we are cutting metal, of course we are not going to be able to use a paper cutter, so just guestimate the size of the strips. Also, be sure to use a cheap pair of scissors as you most likely will dull the crap out of them.
And be particularly careful not to cut yourself with the aluminum. Granted, it is cheap flimsy metal, but it can still cut. I wouldn’t recommend this project for the younger set.
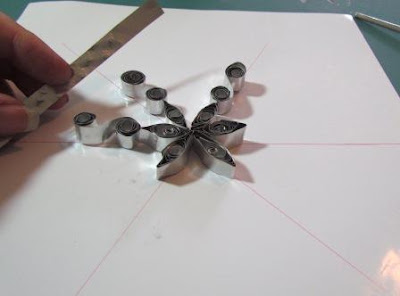
For relatively even snowflakes, I drew a rough line drawing of a six pointed star to use as a template.
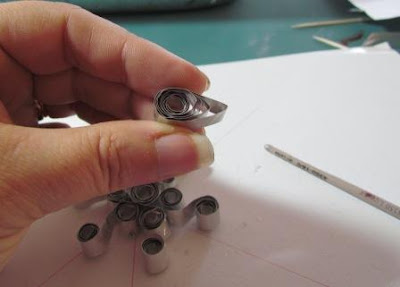
To begin coiling a strip of metal, wrap it around the end of a small paintbrush handle, coil it a couple of times and then pull the paintbrush handle out. Finish coiling it with your fingers.
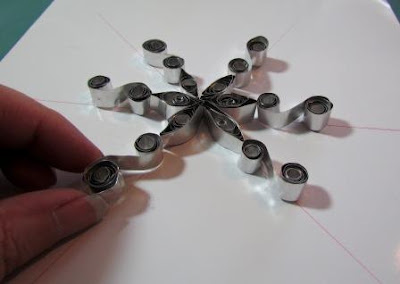
The reason for this is that unlike paper, the metal does not “spring” back; it stays where you originally coil it. That can be great, but if you are wanting paper-like coils, you will need to coil it loosely. The great thing about this is the fact that you do not need glue to keep a coil from uncoiling.
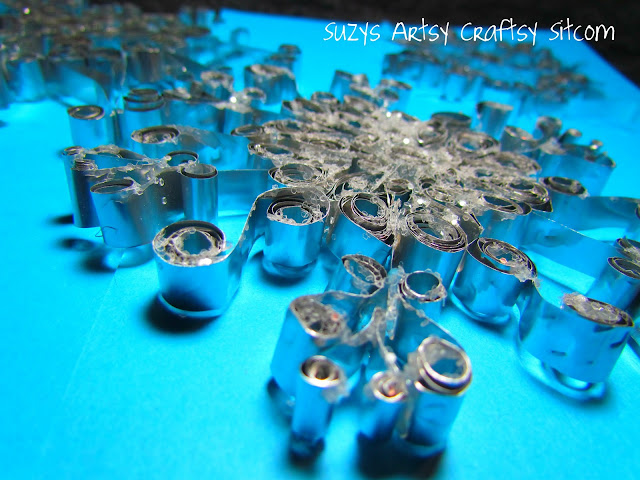
I made three different snowflakes using different shaped coils, glueing them together with dots of hot glue as I went. I decided to coat the front of my first snowflake in white glue and then sprinkle clear glitter on it for an extra sparkly touch.

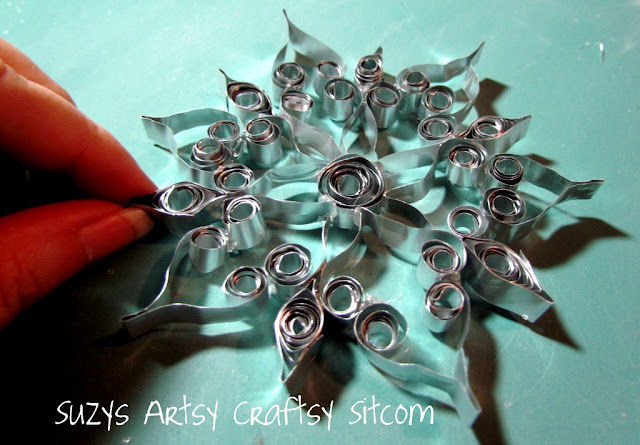
But actually, I think I like my other two snowflakes a little more. You can see the sparkly metal on all sides. To complete them, I just ran of loop thread through one of the coils, and they are ready to hang.

Quilling with aluminum takes a bit of practice as it works up totally different than paper, but it turned out to be a lot of fun. So there may be more aluminum quilling in my future. Who knows?


Enjoyed this tutorial? Be sure to check out my tutorial page for many more!
For more simple ornament ideas, check out the ones below!
Dough Bear Ornaments
Paper Mache Santa Ornament
Paint Brush Santa Ornament
Beaded Faberge Egg Ornaments
Skiing Penguin Ornaments
![]() |
![]() |
![]() |
![]() |
![]() |


Thank you! This particular project is a bit on the high patience level due to the fact that you aren’t quilling paper. Quilling with aluminum is a little trickier. If you want to start out easy, just use the patterns to create snowflakes with paper strips. You can actually coat them afterwards in Mod Podge and dip them in glitter for a pretty effect. Hope that helps!
suzy
I’ve never done quilling before so I’d like to know what the patience need is in order to do this. I paint, carve, sculpt, etc and each has their own “patience ratio”. But I’ve found each are also different in being able to handle it from a human perspective. I know, practice makes close to perfect. These are very lovely. I have to tell you. I made icicles out of hot glue, attached some ribbon and a little layer of sparkling faux snow and they sold like hot cakes at a craft show. I can only imagine if I were to mix and match these with my icicles what it would look like. SUPER!!!!
Wow, I love this idea – so pretty!
That’s gorgeous! I can’t believe it’s made from baking pans. Great idea.
Theses are cool .. Paper colors loves will work also. Thank you for the idea..
Actually, I became completely hooked on quilling in 2007 when I was first introduction to quilling with aluminum strips. I have never tried it, but will someday.
Thanks for sharing and reminding me to try this.
Spectacular!!! I'm going to whip up a bunch of these for hanging in my front window! Thank you for sharing such a great idea.
Impressive! I had never even heart of quilling. Thanks for enlightening me.
Warmly, Michelle
Your snowflakes are so beautiful! I love how you used the tins. Thanks for sharing. Pinning this!
That is just brilliant! Thanks so much for sharing on Craft Schooling Sunday!
We had snow fall last night. Ready or not here it comes. I am featuring you on Thursday afternoon at Bacon Time 🙂
How CUTE! I love this idea!
These are amazing! What a beautiful take on snowflakes!
So beautiful! I wonder if heavy duty aluminum foil would work? Thanks for linking to Wicked Awesome Wednesday.
Wow! I’ve done some paper quilling, but this is amazing! Thanks for sharing!
I love this blog! I'm stopping by via the hop. We have a couple of hops going on our Mom Blog Society, we'd love for you to join us. PS. We feature our members. http://momblogsociety.com
these are so cool! I love them! I would love for you to come link this and/or any other projects you have been up to at the Tuesday Talent Show! Hope to see you there!
-Nikki
http://chef-n-training.blogspot.com/
ΠΟΛΥ ΩΡΑΙΑ ΙΔΕΑ!!!!!!!!!!!!!!!!!
WOW this is incredible! I would have never thought to use disposable aluminum pans. Genius!
Unbelievably beautiful. Wow.
Just beautiful Suzy! Love your thinking – using those aluminium pans! They're really effective!
Thanks for linking to a Round Tuit!
Hope you have a great week!
Jill @ Creating my way to Success
http://www.jembellish.blogspot.com/
Those are beautiful! You are getting better and better at that it looks like! Thanks for sharing on Fancy This Fridays!
WOW! Love this idea and hope to try it myself!
Those are just FABULOUS! I must try this for the holidays. What a lovely idea!!!
This. Is. Awesome. I must remember to do this for my tree this year.
Absolutely stunning – it looks gorgeous and am sure you need lots of patience to work on it.
Jill
How clever you are! I'm thinking it might work with folded aluminium foil strips – for kids.
Wow! You are amazing! These are so cool and the possibilities for these are endless! Thanks so much for sharing with the Pink Hippo Party.. can't wait to see what you share next!
Great idea, thank you for sharing.
Those are beautiful! I love your choice of material, it's perfect.
Wow, I love this I idea. Totally gonna do this, thanks for sharing.
Thanks for linking this SPECTACULAR project up at Follow me Fridays! I love it!
-Robyn from http://tipsfromtheheart.blogspot.com
Incredible! I've never seen something so beautiful…. must have!
https://www.facebook.com/photo.php?fbid=10150386953141141&set=a.192514281140.164586.175378011140&type=1&theater
Shared on FJI Facebook for SNS 101. 🙂
Donna
Thats fantastic– I love a bit of recycling!
Cheers from Bangalore ,India
Dr Sonia S V
http://cardsandschoolprojects.blogspot.com
Ooh, that looks fab, very unusual!
These are beautiful!
This is Wendy, your neighbor at the workshop today! Looking forward to trying several of your fabulous crafts!
Those came out so cute! Love the silver for the snowflakes!
just amazing! my dear its another cool creative tutorial from you! thanks a bunch!
Absolutely amazing! Will try this immediately!
Oh I love them!
OH. MY. GOSH. These are so brilliant and gorgeous. And you'll be linking them up to my link party right???
Those are really awsome, must try!!!!
Paula
Absolutely amazing! Now this one I must try.
P.S. I found a few quillers who used paper threader to thread her quilling strips.