Feature Friday- Marvin the Mummy and Friends

So I’m not much of a Halloween decorator. It’s not that I have anything against Halloween. I’m just not a fan of the color orange. You see, I had a traumatic experience with the color orange back in first grade. It was never my favorite color to begin with. When I started school in a brand new Elementary School, they hadn’t gotten all their supplies yet. Because of that, we were each assigned one big fat crayon to learn to write with. That would be our assigned writing utensil for the next month as for some reason, the supplies were delayed. Of course, my assigned big fat crayon was orange. I still haven’t gotten over it.
Then there is my issue with spiders.
But after perusing all the awesome Halloween crafts here on the net, I started feeling a little left out. So after some thought, a few ideas came to my head, along with a plan on how to finally use these:
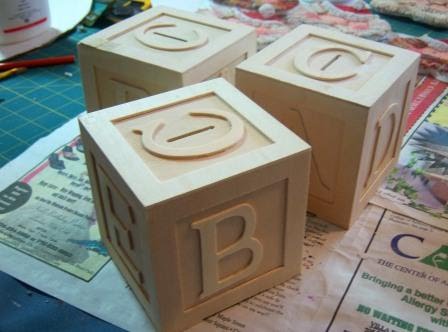
I found these blocks at the major discount price of fifty cents each at Michaels some time ago. There were only three, and I had absolutely no idea what I was going to do with them, but at that price I couldn’t afford not to buy them. So they have been sitting patiently waiting in my craft closet for inspiration to strike. And it finally did.
For this project I used:
Three 4″ wooden blocks
Halloween themed cardstock
Black cardstock
Mod Podge![]()
2 toilet paper tubes
Toilet paper
2″ wooden ball (or styrofoam)
Fabric scraps
Small amount of fiberfill
2 wooden Halloween cut outs from Michaels
Small piece of heavy gauge wire
Acrylic Paint
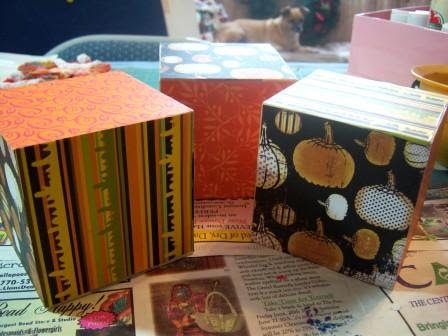
The blocks were embossed with letters, so painting them was out of the question. Instead, I cut out 4″ squares of the Halloween themed cardstock and using Mod Podge, put them on all sides of the blocks.
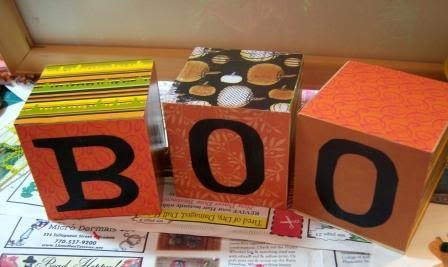
I then cut the word “Boo” out of the black card stock. Vinyl lettering is a good substitute here, but I’m a cheapskate, so I cut my own letters. I then used the Mod Podge to glue those letters onto the blocks.
Using a dry brush and a bit of burnt sienna acrylic paint, I added brown to the edges on all sides to give it a deeper, warmer look. Just add some paint to your brush and brush it across some paper towels to get extra paint off, then lightly brush onto the block corners.
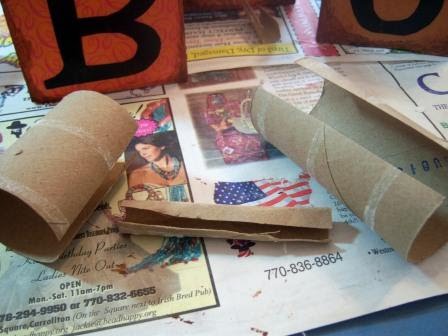
Now, lets add some stuff!! I have been collecting toilet paper tubes for some time now. No particular project in mind yet, but you never know. So for this project, I pulled two tubes out of the stash and used them to make the frame for my mummy. Cut one roll lengthwise, then at about the 3″ mark. Use hot glue to glue it back together, overlapping so that the circumference will better fit your 2″ wooden head. (This is the mummy body). For arms, take the rest of that tube and cut two 4″ x 1″ pieces. Roll each lengthwise and glue along the seam. Bend each at the “elbow” and “wrist”. Puncture two holes at the top of the body around the shoulder area and insert each arm, glueing with hot glue.
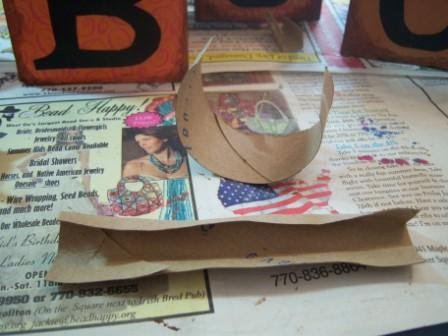
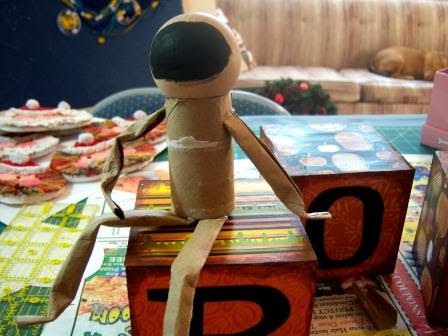
Using the second toilet paper tube, I cut it lengthwise, then cut two 5″ x 1″ pieces for the legs. Roll each lengthwise and glue along the seams. Bend each at the knee and ankle. Glue them onto the bottom of the body. Finally, glue the 2″ wooden ball to the top of the body, and paint the front of it black. This will eventually be the face. Kind of looks like Marvin the Martian at this point, doesn’t it?

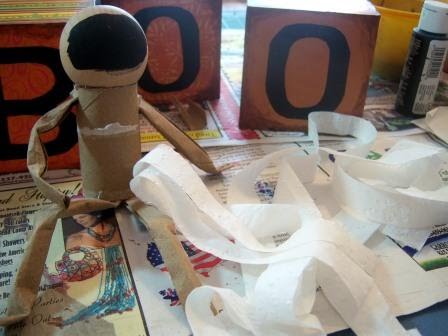
Now, take some toilet paper and cut it into 1/2″ strips. Marvin really needs some clothes.
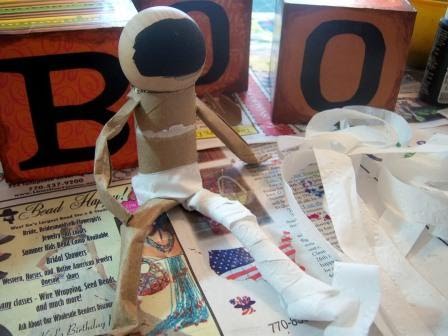
Starting at one of the feet, wrap it around the foot and up the leg to the torso, tacking it here and there with hot glue. Do the same with the other leg, then up the torso and to the arms. Then wrap the head, leaving a section in the front open for the face.
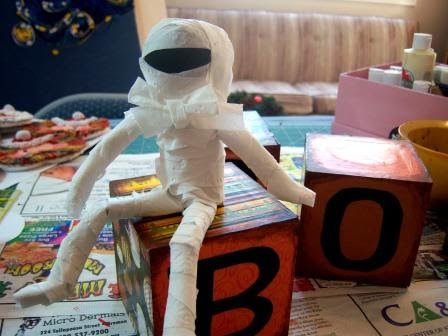

Now take your mummy buddy, Marvin, and glue him down to the top of the B block, positioning him comfortably.
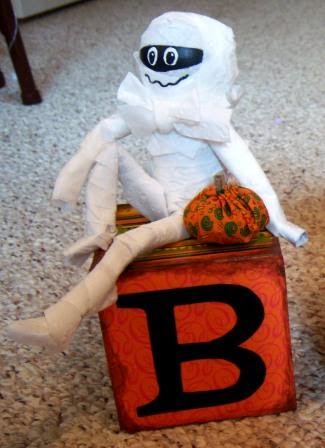
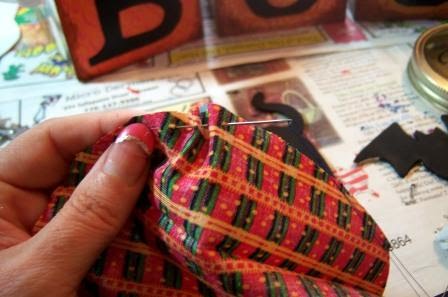
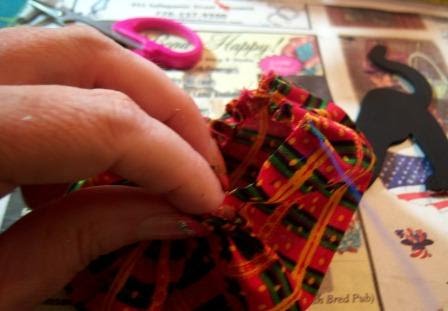
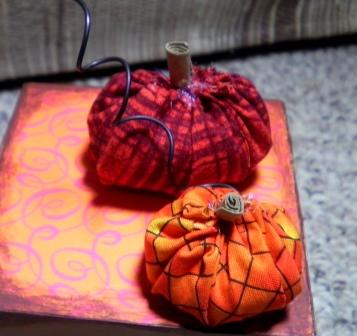
To make fabric pumpkins, cut some fabric into 7″, 5″ and 4″ diameter circles. With a needle and thread, sew a running stitch about 1/4″ inch from the edge on the wrong side of the fabric. Gather the fabric, stuffing with fiberfill as you go, until the gathered edges meet. Tie it off. Using scraps from your second toilet paper tube, cut small 1/2″ x 1/8″ strips and roll them to make stems. Glue them onto the top of the pumpkins.
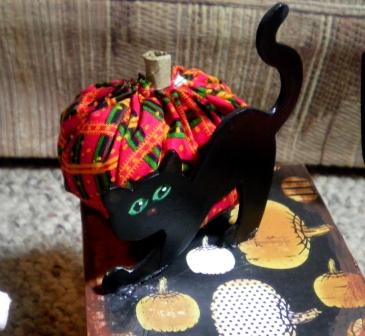
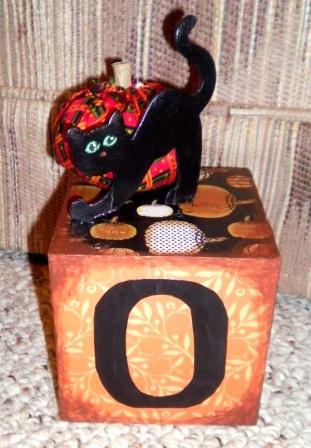
I used a wooden cut out of a bat and a cat, and painted them both black. Place the cat and several pumpkins on the first “O” block and glue them down.
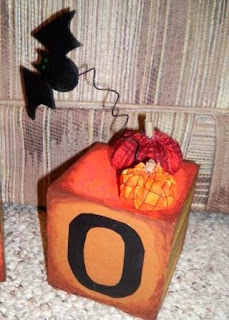
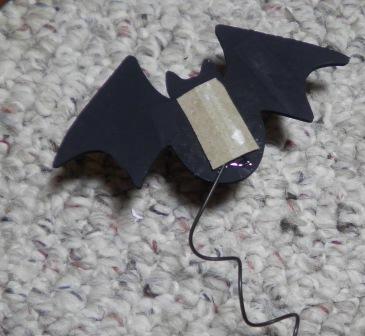
Drill a small hole in the second “O” block about 2″ from the front on the right side. Cut about 8″ of heavy gauge wire and wrap it around a pencil to form loops. Cut another scrap of toilet paper tube to glue down on the back side of the bat. Glue on the side edges to create a “pocket” for the wire. Glue the wire into the hole in the block and into the pocket of the bat. Adjust for the best effect.
All done! A Halloween project completed with no spiders. And I even got over the orange thing briefly. Well, I’m still traumatized, but I’ll live.


This is pretty adorable. I am diggin’ Marvin’s pose.
That is such a cute little mummy. What a great free! project to do with kids. Thanks.
love your little mummy !
cute-adorable!
This is so adorable! I'd love for you to link it to my Halloween party happening this weekend. It would be a wonderful addition! I love the mummy!
whilehewasnapping.blogspot.com
Krista
Wow, these are amazing! I've seen BOO blocks before but you elevate them to a whole 'nother level! I can't believe you went and added your own decorations on top. How fabulous are you:) These are terrific, really great! Thanks for sharing with us at A Crafty Soiree! Please join us next time too!
Hi there! I wanted to let you know that I have featured this post as one of my September bookmarks — "Bookmarked on the Boardwalk". Feel free to stop by, take a look at your project as well as the others, and grab a button! You will find it HERE:
http://wwwbobbypinsboardwalk.blogspot.com/2010/10/septembers-boardwalk-bookmarks.html
If you're not a follower of my blog, I would love for you to sign up to follow. It will make it easier for me to see your future projects through my "reader", and of course, I always return the "follow"! Congrats on a fabulous project!
This is the cutest thing ever! So creative…Fantastic Job and great tutorial! I'll be featuring this tomorrow – Stop by and grab a featured button if you like. Thanks for linking to The Sunday Showcase – I greatly appreciate it! Hope you have a fabulous week! ~ Stephanie Lynn
If these aren't the cutest things, I don't know what is. You are so talented. I love that you re-use. I try to do that as often as possible too! Nothing like making an absolutely treasure out of trash.
I am so impressed and happy to be your newest follower. I invite you to visit me at my blog and do likewise.
That is SO cute!!! Love it!
I absolutely love this! You are so creative to be able to turn a toilet paper roll into such a cute mummy! Thanks for showing us how!
We don't have any blocks, but I'm betting my 4 year old is going to love making Marvin! Thank you!
So adorable! I love it!
What an adorable mummy. and I have major sider issues myself! Thanks for linking up to Topsy Turvy Tuesday's.
Alright, I just had to make one of these! Melvin, Marvin's cousin, is a good looking, bow-tie wearing, Mummy! I will be posting a pic on my blog soon.
WOW!! this is fantastic! You are just too crafty – and thrifty too.
Wonderful project – thanks for sharing!
Jill @ Creating my way to Success
http://jembellish.blogspot.com/
Wow, I was scrolling down and so confused for a minute because I CAN'T believe that Marin was made out of toilet paper tubes. This is so cute and creative. Way to go!
http://boyohboyohboycrafts.blogspot.com
This is awesome! I am totally making this! The mummy is adorable!!!
Cutest mummy ever! Found you on It's So Very Cheri:)
Love love LOVE the mummy! You did a fabulous job especially for hating the color orange! Super cute! Thanks for sharing!
Amy
crazycraftbugs.blogspot.com
Those are two freakin' adorable. I am absolutely BLOWN away. I'm thinking I have to make a litle Marvin to hangout on my mantle with a few of those pumpkins! Thanks for linking with Sugar & Spice.
Fabulous! I love the springy little bat!
SOOO creative! Love the mummy!
Seriously cute. You had me smiling from the title down.
So glad I found your blog, I know I will visit again and again.
My post this week is an announcement of crafty parties you can join this season.
Always glad to meet someone who "has to buy" because of cheap price, knowing inspiration will strike.
Marvin brought a smile to my face. He is adorable and so are the blocks you made.
Wow, Marvin looks great!
Ingenious! Love Marvin!
That is SOOOO Cute! Very creative!
Your mummy is adorable.
OMG, how freakin cute is that!!?? i want one!! 🙂
Kimra
crafty-cove.blogspot.com
HOW CREATIVE ARE YOU? love it all, and its all darling, especially that mummy. WELL DONE. Jen
Wow! I think this is the best Halloween craft that I've ever seen! It is too cute!
How much fun is he!!!! I absolutely the whole thing! 🙂
Hey, first time reader who found you through "Be Different, Act Normal". Love, love, love this project! The mummy is great. I want to make an army of them and hide them throughout the house. Sort of a Halloween version of "Elf on the Shelf." Thanks for sharing!
WOW! that looks awesome and unlike you, I love to decorate for Halloween. I was wondering how you made the mummy, thanks so much for posting the tutorial, can't wait to make it with my boys.
Visiting from So Very Cheri. I loooove the little mummy you created! It's so adorable, I think I need several of these around my house. And what a great way to cover up embossed sides! Love it, great work!
Amie @ http://kittycatsandairplanes.blogspot.com
Happy weekend! 🙂
Hi! Visiting from It's So Very Cheri! Marvin & friends are so cute! Very creative!
Marvin is so stinkin' cute! I love it!!!
http://www.makingmemorieswithyourkids.blogspot.com
Cute! I love how your mummy turned out. He is great! Visiting by way of It's so Cheri.
This is just too darn cute! Thanks for linkin up with Make It Fantabulous!
very cute project! I like cute better than spooky! 🙂
thanks for linking!
gail
SO cute! Thanks for linking up to Vintage Suitcase Friday!
That is really cute! You know Kimberly is gonna want that!
That mummy with the bow tie is just too cute! I love it!
I love your little mummy guy