Feature Friday- Paper Mache Santa Ornament
A group of my friends and family have been exchanging Christmas ornaments with each other every year for the past 18 years. We make an ornament for each member of the group and meet the first Saturday in December to exchange them. Since there is usually about 15-20 members each year, that means from October on, I’m in mass production with some kind of ornament or other. Multiply that by 18 years and that is at least 270 hand-made ornaments and Christmas decorations that I’ve produced and been given.
A lot of ornaments you say? Heck, yeah. I started out with one huge artificial tree. As the ornaments grew plentiful, I would put the ones that were not my favorites in the back of the tree and my absolute favorites would get center stage in front. Of course, my sister knew this and would always check my tree when she came over to be sure that none of her hand-made ornaments were in the back. (I was always careful to move them to the front when I knew she was coming over…) Just kidding! I now have two Christmas trees. One has the hand-made ornaments on it and the other has my glass ornament collection.
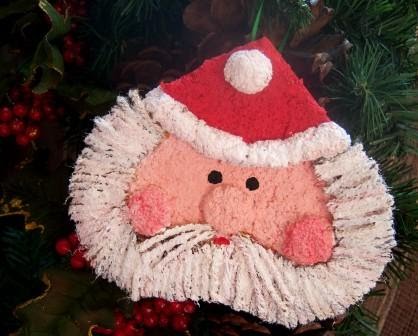
Needless to say, I have a large selection to go to when I want to put out a crafting tutorial. There is one ornament that always gets front and center of the tree. It is an ornament that I received the first year of the club. The lady that made it was only in the club the first year, and no-one really remembers her name or if this was an original craft or something she found in a book somewhere. I love the primitive look of the Santa and the textures and colors. It makes me smile every year when I pull it out of the box and put it on the tree.
So today, I’ve decided to try and re-create this awesome ornament. For this project I used:
A sheet of foam board from the Dollar Store
Instant Paper Mache
Acrylic Paints in red, peach, black and white
Yarn scraps
Elmers Glue
Ribbon scraps
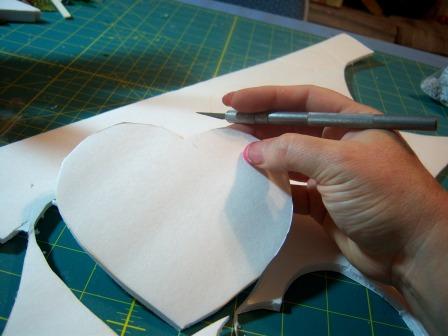
The first step is to draw a heart template, approximately 4″ wide by 3″ tall. To get a perfect looking heart shape, it is sometimes easier to fold your template paper in half, draw half the heart with the fold in the center and cut it out. Both sides of the heart will match perfectly. Use your heart template to cut a heart out of the foam board. I drew it on and cut the foam board with a craft knife.
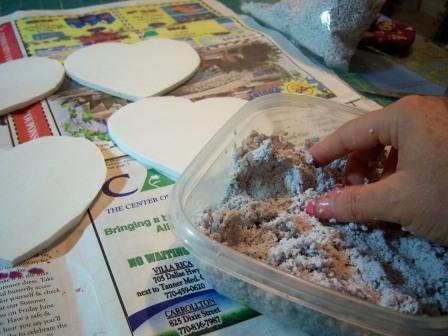
Mix up your paper mache according to the directions on the box. The paper mache that I use just requires the addition of water. Instant paper mache can be on the pricey side at $7-8 dollars a box, but that box will last a while. Look ahead for coupons so that you can get it a bit cheaper. Michaels often runs coupons in the paper for 50% off of a non-discounted item.
Spread a 1/4″ coat of paper mache over the front of your heart, being sure to get it all the way to the edges. Turn your heart upside down.
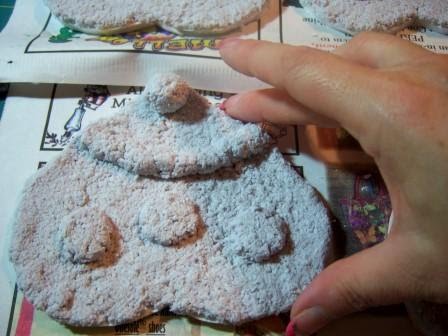
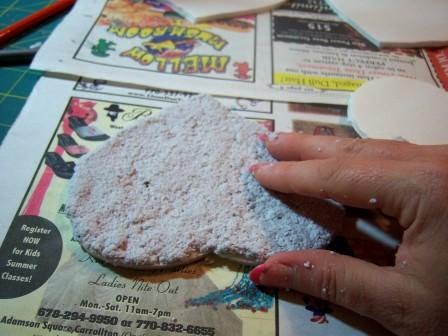
Then roll a tube-shaped piece and place it on your heart to form the fur on his hat. Roll a ball of paper mache and add it to the top of the hat. Roll a small ball and push it into the heart to create a “flattened” nose. Do the same with two smaller balls to create his cheeks.

Now it will need to dry. I was a little worried about the time schedule on this as last time I worked with paper mache, it took over a week to dry. But apparently, the weather conditions were better this time, the humidity is lower. So it only took 24 hours to get a dry ornament.
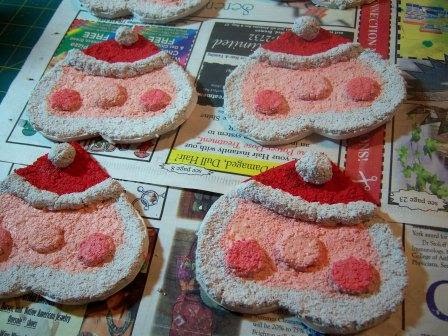
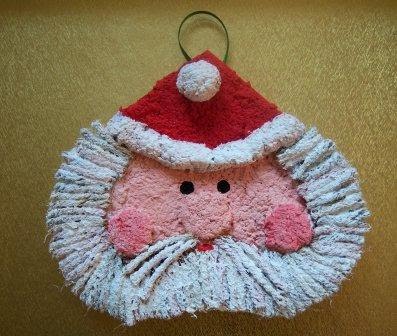
Once the ornament has dried, paint the hat red. Then using the peach colored paint, paint his face including the nose and cheeks. You don’t have to paint where the beard will go, but be sure to get past where the beard will start.
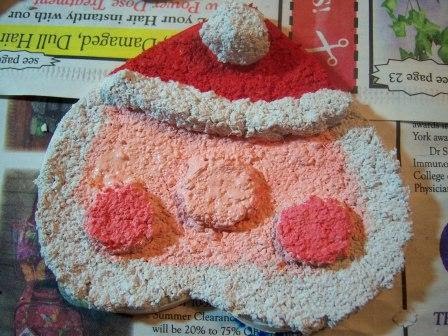
While the paint is still wet, dab a bit of red paint on your brush and add color to his cheeks.
Once the paint has dried, it is time to add the beard. Now one of the things that makes the original ornament look so antique or primitive is the fact that she did not use white yarn for the beard. As I recall, she said she didn’t have white yarn, so she substituted brown and painted it white. She was all apologetic about this, but frankly, I think that is what makes this ornament so fabulous. It gives the beard a more dramatic look. So in order to try to duplicate the look, I looked through my yarn scraps and found a skein of varigated brown yarn.
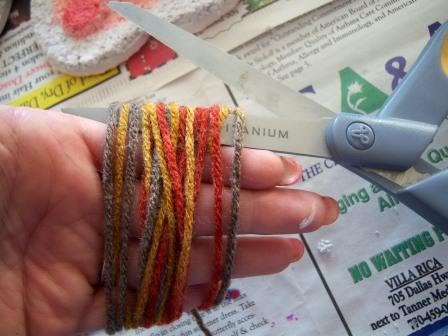
I wrapped the yarn around my fingers until I had quite a bit and cut the yarn above my fingers and below my fingers so that I had a bunch of roughly 2″ pieces. They don’t have to be exact.
I then coated a section of the face in Elmers glue and started glueing the yarn pieces on. I like Elmers or white glue for this because you can push the yarn around to butt it up against each other. Where the beard is, you don’t want any paper mache showing.
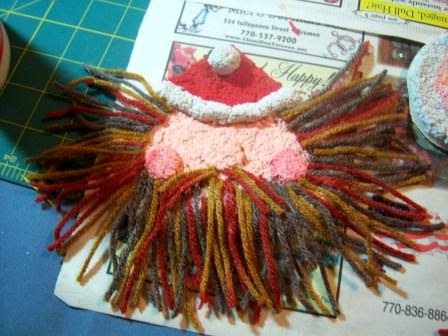
Here he is after I put all the brown yarn on. Kinda looks like Paul Bunyan doesn’t he? Well, we’ll clean him up.
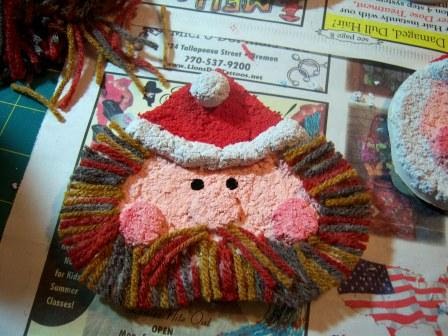
First, we need to trim him up. After the glue has dried, use your scissors to trim the yarn, following the shape of the heart. Better? It’s amazing what a good beard trim will do for a guy. Takes notes, Joaquin Phoenix…

Now lets paint the yarn white. It took several coats of white to get the look I wanted, but the depth of color is what I was going for. The finished beard looks primitive and warm. This photo is after one coat. I’m debating doing the rest like this one because I like the color variation in the beard.
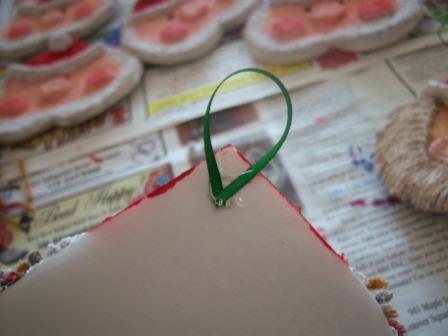
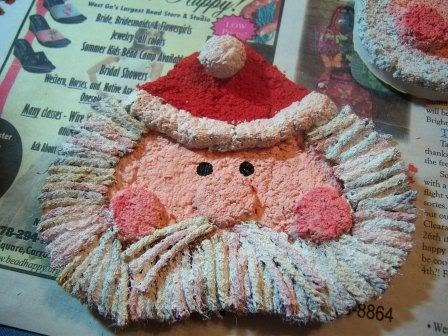
Final touches include painting on the eyes and the mouth. And then adding a folded ribbon to the back for a hanger.
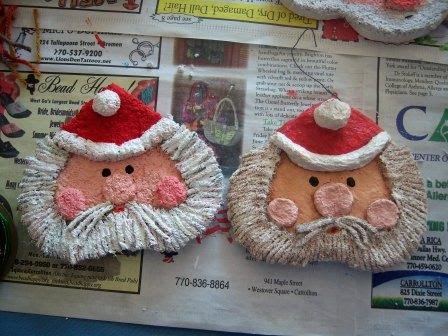
The finished project is close to the original. (The original ornament is on the right). Fun to make and very in-expensive too!
I made these this Christmas. They turned out so beautifully. Everyone I gave them to was very impressed.
I love papier maché and I love how it gives your Santa lovely texture! So cool!
Just stumbled across this while checking out your blog! This is amazing and I would love for you to share this at my Holiday Hookup Party!
http://kraftykat76.blogspot.com/2010/11/holiday-hookup-3.html
Hi!
Wanted you to know I posted a link to this tutorial today on my blog, PaperFriendly.
Nancy Ward
paperFriendly
http://www.nancywardcrafts.com
Wonderful tradition, I wish I had a bunch of crafty friends to exchange with! I'm usually the one making and giving, as I'm the only crafty one of the bunch. Thank you for joining us at A Crafty Soiree!
OMG – what a cute project…
C~U~T~E!!! Thanks for sharing your “creative mojo” with me on Thrilling Thursday. I hope you will be back again soon 🙂
~Lori S.
Thrilling Thursdays @Paisley Passions
He's cute as can be!
I made 100 of these a few years ago for a craft show…I found the directions in a craft book. They were very popular with my customers…you did a great job!
oh i love this. i have a collection of Santa ornaments/decorations. so i can't wait to try this…. wonder if i can use something other then the instant paper mache
Super cute! Thanks for linking up to Mad Skills Monday!
So dang cute! I love them!
http://www.makingmemorieswithyourkids.blogspot.com
wow, those look awesome. i'd never be able to make them look so nice.
new follower from marketing monday
http://www.bassgiraffe.com/2010/09/weekly-linkups-10.html
Hi there,
New follower from New Friend Fridays.
Great blog you have here.
Marie
The Things We Find Inside
That looks so close to the original! Very cool.
So stinkin' cute! Thanks so much for linking up at Between U & Me! See you next week! 😉
Just found your blog through links. Love it! If you ever need new recipes or want to be featured come check out our site and send us a email!
Very cute and creative! Love it! I am a follower!
Can you help me out? I am in a contest because of a recent post that I did on my weight loss. There is a contest on Face Book and I need you to vote! I am so close and I don't want the other guy to win! Just click on the link below and like that page (up at the top) then in the left hand column find my picture( I’m the one in the black bathing suit) under photo's 4 of 14 click(SEE All) and leave a comment under my picture! Thanks!!
http://www.facebook.com/#!/pages/Lehi-UT/Kristi-Approved/391083710513
You might have to copy and paste it into your browser.
I never heard of instant paper mache… sounds awesome… I will have to look for that the next time I have a coupon.
Very cute ornament.
Have a great weekend
He is just divine!!! Love, Love, LOVE him! Thanks for planting your creative seeds at Plant a Punkin Seed Party.
Hugs,
Kristi
Punkin Seed Productions
This has always been one of my favorites and I really like how well it holds up. Never needs repairs.
Very cute, my family does an ornament exchange too 🙂
This is too cute! Thanks for linking up to my "Open House"
That is darling. What a cute Christmas Ornament.