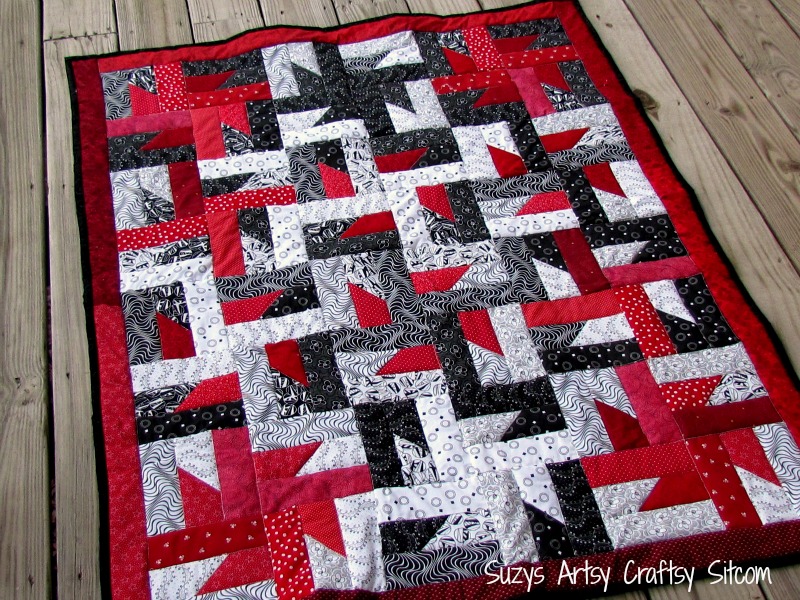
Windmills at Night Quilt Pattern
My most popular quilt pattern is called Windmills at Night. I designed it specifically for beginning quilters, using pre-cut fabric strips called “jelly rolls”. The bright red fabrics touch off the black and white fabrics beautifully, and this striking lap quilt will make a fabulous addition to your decor.

Although it may look complicated, Windmills at Night is a simple pattern. A beginning quilter can easily tackle this project, and a more experienced quilter can easily finish this 40″ x 52″ lap quilt in a weekend.
Want a bigger size?
The pattern includes fabric requirements and instructions for not only the lap quilt, but twin, double, queen and king sizes also!
Of course, you can always select your fabric at your local shop and cut the 2.5″ wide strips to make this project. In fact, I have included cutting instructions also.
Have you ever used Jelly Rolls?
A Jelly Roll consists of carefully selected fabrics in light, medium and dark values-in this case, a 20 strip pack of black and white fabrics, and a 20 strip pack of reds. Each strip is die cut for pinpoint accuracy, 2.5” x width of the fabric or 42/44” approximate. You can often find Jelly Rolls in fabric stores and on line at fabric shops like Discount Sewing Supply.
Are you new to the Sitcom? Be sure to check out my Frequently Asked Questions Page!

Hi Suzie,
I emailed it to you again. Let me know if there is an issue.
suzy
Hello, I am a Nana who is going to make this quilt(lap size) for my grandson….he saw this on this site!!! I have not gotten the pattern however, I have made numerous quilts so I feel confident going by what info you gave except……the inches needed of ea. material. This previous comment gave me my answer….I am so grateful!!!!
Hi!
This was originally a free pattern when I put it out five years ago. However, I have been charging a small fee for it for over a year now. I charge the fee through Craftsy, so I’m not sure where they might have it listed as free still.
suzy
Hello,
I saw this pattern on craftsy.com and it said it was a free pattern. I can only find it for a small fee. Am I missing something….
Hi Mary,
No, there is not a video tutorial for this pattern at this time. The pattern does include fabric requirements and instructions for a lap quilt, twin size, full, queen and king.
suzy
Is there a video tutorial of this? How many blocks can be made from a strip set?
Sorry , I forgot to say which pattern I ordered. It is the Windmills at Night.
Received my pattern and I have my fabric from Jelly Roll.com and did some cutting, but stopping as I’m try to compute this into a queen size quilt. I hope I can do your pattern justice. I’m a sewer not a quilter. Helen
If I was going to make it larger, I would multiply the original numbers by 3 for a full size quilt. If the pattern calls for (2) of that square, then Id make (6). There would be six additional squares that Id have to make in order to get the 42 squares needed for full size. I would just pick my favorites.
This could translate to 4x for Queen, and 5x for King, with a few extra that you would have to make up.
Hope that helps. I try not to go too big with these beginners patterns in order to give those that are new to quilting a project that doesnt overwhelm.
The original pattern used 5 different black prints, 5 different white prints, and 10 different red prints, and calls for 22″ of each print. Multiply that by 5 and you should have enough for a king size.
Hope that helps!
suzy
I just love this pattern. I want to cut my own fabric instead of the jelly roll. How much would I need for a king size?
Thank you for sharing this pattern. I made it for my grandaughter, but made it larger.. Just have to quilt it now. It is awesome. I know she will love it.
Hi!
I’m so glad you enjoyed the pattern! I bet it came out beautiful!!
Suzy
I did this in pink instead of red & it turned out beautiful. It was my
very first quilt. I was surprised at how easy the pattern was. I wish
there was a way to post a picture. Thank you for a great pattern.
As a beginning quilter, I am delighted to find something like this!! I am ready to move to the next level!! Can’t wait to get started!!
I’m so glad you love your finished quilt! Thank you for the kind words!
suzy
I love this pattern! It Looks really complicated but isn’t that hard. This was definitely the most tedious quilt I’ve ever made, but I love the results. I wish I could attach a picture. Thanks so much for sharing this pattern.
Love this quilt. These colours just happen to be the colours for the sports teams where I live. I have had jelly rolls in these colours for a while and was looking for a pattern. You just gave it to me. Thank you, thank you, thank you. I will be making it as a throw, to take to the games in the cooler months.
You do great work! It’s so pretty! Thank you for linking up with us on Idea Box link party!
Love this pattern, Pinned! Thanks for linking up over at Inspiration Monday!
~Jamie
This quilt is so pretty. I’ve always wanted to learn to quilt and I love the thoughts of having the pieces already cut. Thanks for linking up at the #HomeMattersParty
Thank you for sharing this pattern, and posting all of the instructions. I am thinking of beginning quilting (after doing garment sewing for the past year). You have such great patterns and the instructions are perfect for a beginner. Look forward to trying it.
Very pretty!
Hi Amanda!
You can find a kit for queen size on http://discountsewingsupply.com. Hope that helps!
suzy
Hi Suzy
I am absolutely in love with the quilt. I am a beginner quilter and have had my eye on it for over a year. I would like to make it for my queen size bed. Do you know if there is a pattern available and a quilt pack available for that? I was thinking I could possibly just purchase two quilt packs but I wasn’t sure if that would work out. Any advice?
Susan, I am asking for permission to use your pattern as a mystery quilt for my quilting guild? Needless to say, I will need to break it into several steps. I would be happy to send you the steps so you can re-publish it that way and send photos of the completed quilts for your gallery.
Hi Angel!
Thank you so much!! You totally made my day!
suzy
Such a beautiful quilt. I would love to be able to create such a gorgeous piece of art. You are very talented. Thank you for sharing with us at Wake Up Wednesday Linky Party. Your quilt will be Featured at this weeks upcoming party.
Angel
Hi Sydney!
What a nice gift for your brother’s graduation! I’m sure he is going to love it! I found a good video that can help you with pressing the seams. You can find it here:
https://www.youtube.com/watch?v=CtUCovNWqTI
Would love to see what you come up with!
suzy
I’m a total beginner and I’m hoping to be able to make this soon for my brother’s graduation present. I looked at the pattern and I didnt see any instructions on how to press the seams. I probably will be making the colors black white and red and worried about colors showing through the white and also have no idea how i should press them so they interlock like they should when you sew the seams against each other. Any help will be greatly appreciated
I made the queen size, has any one shared the lay out for the queen?
Hi Barb!
Thanks so much! You can get the fabric in kit form from DiscountSewingSupply.com.
suzy
Hi
I absolutely love the colours in this quilt and would love to know where you purchased the jelly roll.
Thanks in advance
Barb
Hi Donna! Here are my estimates for a larger quilt:
Full Size: 76″ x 88″ – 6 blocks wide x 7 blocks tall plus sashing. Approximately 4 black and white jelly rolls and 4 red jelly rolls. (This does not include backing fabric).
Queen Size: 88″ x 100″- 7 blocks wide x 8 blocks tall plus sashing. Approximately 5 black and white jelly rolls and 4 red jelly rolls. (This does not include backing fabric).
King Size: 102″ x 100″ – 8 blocks wide x 8 blocks tall plus sashing. Approximately 6 black and white jelly rolls and 6 red jelly rolls. (This does not include backing fabric).
Regarding backing: width of fabric can vary from 44″ to “56. If you chose a 44″ wide fabric, you would need 5 yards for the Full Size, and 9 yards for the Queen and King size.
Hope that helps!
Suzy
I would like to know if you a a pattern for a king size bed in the Windmill Night pattern ?
I love this pattern too! Looking to make a Christmas table runner in cream tone-on-tone, burgundy, and forest green! Can’t wait!
Yes! You can find it at the bottom of this post: https://suzyssitcom.com/2013/03/free-quilt-pattern-series-3.html. Would love to see what you make with it!
suzy
Would like to obtain the pattern for Windmills at Night but am not finding a link to just download the pattern. Is it still available?
Hi Susan…My son loved your quilt design which he has chosen online for his 21st present. Unfortunately in New Zealand jelly rolls don’t seem to be available. So just wondering how much fabric of each colouring I will need to make a queen quilt?
He loves the black,white and red combinations.
Hi Sonia!
The measurements are in inches, and yes, 6-1/2″ x 2-1/2″ is the measurement for some of the strips:
White (36 ea) 6 ½” x 2 ½”
White (32 ea) 4 ½” x 2 ½”
Black (36 ea) 6 ½” x 2 ½”
Black (32 ea) 4 ½” x 2 ½”
Red (24 ea) 6 ½” x 2 ½”
Red (32 ea) 4 ½” x 2 ½”
All measurements include 1/4″ seam allowance.
This quilt’s finished size is a lap quilt at 40″ x 52″.
Hope that helps!
And those cut measurement is include the seams right ? I try to cut it but for
6 1/2′ x 2 1/2′ is seem like too small compere it on your picture ;D
Hi Susan, All the measurement is in inch right ? sorry I am just a totally beginner 😛
I made one and it looks pretty much like yours. Now, I need some hints on how to quilt it with a long arm that I’m new to. It’s loaded and ready to go but no ideas are coming to me. Help!
Thank you! If you decide to make it, I would love to what you come up with!
THINK THIS IS MY FAVORITE QUILT …LOVE THE COLORS !!!
Awesome! Thanks for the tip! I’m always looking for good products to keep colors from running as everything I do seems to be really colorful!
suzy
Hi Susan,
Another product that keeps red and dark colors from running onto white is “Shout Color Catcher.” I made red “Hot Dog” pillowcases with a white cuff and I use this product every time I wash them. It really works.
I like your “Windmills at Night” pattern. Thanks.
orange and turquoise look great together.
Hi Judy! It certainly would! If you decide to make it, I’d love to see your finished project!
This would make great quilt of valor in red, white, and blue if sized right.
Hi Evi,
Did You order your fabric from my supplier, Discount Sewing Supply? I can only speak for them, as fabrics vary depending upon the manufacturer. I asked them about their processes and this is what they told me:
We do steam press prior to cutting the strips. Some shrinkage does occur at that time. The process uses a large amount of water, and while we cannot guarantee no further shrinkage, we have never ever had complaints about shrinkage from any of our jelly roll products. The binding strips are also treated the same way.
Cotton batting such as the Pellon or Warm & White that we use does shrink up to 3%. That’s why we give a larger cut – 45″ x 57″ Batting always comes with specific instructions from the manufacturer for pre-shrinking, and then for subsequent washing. They should follow the manufacturer’s instructions to the letter for the batting. Instructions can vary by manufacturer.
We include the instructions with every piece of batting we sell. If you plan to wash the quilt, then we suggest you pre-shrink the batting by itself per manufacturer’s directions before assembling the quilt. (Make sure the batting is thoroughly dry).
Always wash the completed quilt in cold water and we recommend laying flat to dry. A product called “Retayne” is available online and in some quilt stores. It is used to prevent color run. Also “synthropol” is another option if Retayne is not available. It is normally used with hand dyed fabrics to suspend extra dye in the rinse cycle. Both products should be used with COLD water only. (Strictly cold, not even warm).
Any backing fabric we sell is NOT steam pressed or pre-shrunk. I’m not sure if I would pre-wash it – I think I would be more inclined to use a very hot iron with lots and lots of steam, and go over it several times. Then hang the piece over a clothes rack or quilt rack until it is completely dry.
Cheap fabrics will run (red, especially!), and will have a tendency to shrink a lot more than average because they are often a very low thread count. If they are from different manufacturers, you may get uneven shrinkage (each fabric may not shrink as much as another fabric).
Hope that helps! Would love to see your finished quilt!!
Love this quilt . I ordered the black/white and red Jelly rolls yesterday – now I have one question : Usually I prewash my fabrics to prevent different shrinking percentage and bleeding – how do I handle Jelly rolls ? Specially the red may bleed into the white when I first have to wash this quilt some day ….
Hi Mary!
Good question! The square themselves are laid out in no particular order. I just moved them around until I found a look that I liked. The only thing to keep in mind is that you want to alternate light background and dark background. (If that makes sense). If I was going to make it larger, I would multiply the original numbers by 3 for a full size quilt. If the pattern calls for (2) of that square, then I’d make (6). There would be six additional squares that I’d have to make in order to get the 42 squares needed for full size. I would just pick my favorites.
This could translate to 4x for Queen, and 5x for King, with a few extra that you would have to make up.
Hope that helps. I try not to go too big with these beginners patterns in order to give those that are new to quilting a project that doesn’t overwhelm.
I appreciate your posts of how much fabric needed and howmany total squares there are for the large quilts. My question is, how does that transfer to how many of each of the different squares since for the original there are some you make 1 of and some you make 2 of.
Thank you; this is a beautiful quilt!
mary
Acho seus trabalhos incríveis!!!!
Não tenho técnica em costura, mas vou tentar fazê-lo.
Bjs.
Hi Lynette!
I would suggest for a first quilt to stay small and make the lap quilt. If you enjoy it, then move onto bigger projects. Quilting is a blast, but it can get frustrating on larger projects. That said, my first quilt was a king size, so I really have no room to talk. Ha!
Anyway- I will give you my calculations for a larger quilt. Let me know if you decide to make it. I would love to see the final project!
Full Size: 76″ x 88″ – 6 blocks wide x 7 blocks tall plus sashing. Approximately 4 black and white jelly rolls and 4 red jelly rolls. (This does not include backing fabric).
Queen Size: 88″ x 100″- 7 blocks wide x 8 blocks tall plus sashing. Approximately 5 black and white jelly rolls and 4 red jelly rolls. (This does not include backing fabric).
King Size: 102″ x 100″ – 8 blocks wide x 8 blocks tall plus sashing. Approximately 6 black and white jelly rolls and 6 red jelly rolls. (This does not include backing fabric).
Regarding backing: width of fabric can vary from 44″ to “56. If you chose a 44” wide fabric, you would need 5 yards for the Full Size, and 9 yards for the Queen and King size.
Hope that helps!
Hi, I have just found your site and love the quilt. I would like to make it much bigger. Can this be done easily please. A bit of a novice at this sort of quilt. Mine so far have been embroidered ones. Thankyou for sharing. Lynette
This quilt caught my eye immediately upon seeing it. I must have the kit in the same colors. Love it, love it, love it.
I just bought a new jelly roll – mostly floral – main colors are purples, blues and greens – won’t that be pretty – thanks!
Love the Windmill with the black, white & red.
Hi Debbie!
So glad you like it! I had a lot of fun designing it!
In answer to your question, the quilt is a three color quilt, so if you want to change colors but maintain the design, go for three colors instead of two. Maybe pink, purple and black, or orange, turquoise and white… I think either combo would look great!
Thank you for your kind words!
I barely looked at this quilt before falling completely in love with it!!! The colors are perfect. What do you think of pink and purple or orange and turquoise?
Thanks for all that, Suzy! I’ll have a hunt about and see what I can come up with.
As for postage, I’m used to it. A lot of the time it works out cheaper to buy loads of things from the US even with the price of shipping. Most products are more expensive here and lots of things we just don’t have access to at all.
I’ll have a look at fabric.com and see if they have something suitable.
Thanks again xx
Hi Sarah,
I am sorry that they do not honor International shipping. As a store owner, I know that the current shipping rates are exhorbitant and are often more than the item itself.
As for your question, yes, you can certainly use pre-cut jelly rolls from any source. There were 20 strips in the black and white jelly roll- 10 of black patterns and 10 of white patterns. These are 2 1/2″ wide strips, about 44″ long. There were 20 strips of red in the other jelly roll of various red pattern. So that is a total of 40 strips of fabric. From that you can get the top and sashing. You will need an addition 2-3 yards of black fabric for the backing and binding.
Let me know if you need any help or have more questions.
suzy
I was all ready to buy from the store you’ve linked to and make this gorgeous quilt as my first ever quilt. Sadly, they don’t ship to Australia and I’m a beginner, so have little hope of cutting all that fabric myself. It’s kind of sad that they won’t ship outside the US. Are all Jelly Rolls the same, as in same amount of fabric? Could I buy something similar here, or at another website that values international customers?
Love this quilt..can’t wait to make it..
I love this pattern and am going to make this one as soon as I finish the one I’m working on now. Thanks so much for sharing this!!
Hi Shelly,
Thank you for your kind words! I’m so glad you and your husband like the pattern!
As for your question, by my calculations, you would need a total of 4 of the black and white jelly rolls and 4 of the red jelly rolls to come up with a queen sized quilt measuring 88″ x 100″. That would be (7 ea.) 12″ blocks across, and (8 ea.) 12″ blocks down, with a 2″ sashing all around. (That is a total of 56 ea. 12″ squares).
If you decide to go even larger, 8 blocks across x 9 blocks down = 72 blocks, or 6 of the black and white jelly rolls and 6 of the red jelly rolls.
suzy
I abolutely LOVE this pattern! My hubby fell in love with it when he walked in and saw it (he loves lurking when I’m looking at quilts!). How many “extra” blocks would I have to make to make a queen or king size of this? He really loves this pattern and would like me to make one for our bed!
Wow. I absolutely love that quilt.
Girl you are so multi-talented! Your quilt happens to be my school colors. Love it!
LOVE LOVE LOVE This quilt colors are great and really pop I want to make it soon..
How do I print a copy of the instructions, I work much better with a pattern in my hand.
Thank you for your wonderful tute and your blog.
wooow this is clearly explained, it looks allways so difficult those special motifes for me.
I like this lesson. th ank you so much for your lesson and the great tute and sharing of it.XD
Thank you so much, Camiele! You totally made my day. I’m glad you enjoy reading the Sitcom. That is what it is all about!
suzy
Gosh Suzy, you’re so talented! I wish had one ounce of your creativity, and actually applied it, haha. I haven’t ever made anything, but I most certainly enjoy reading your blog! It not only makes me admire it, but you also make me laugh like no other 🙂