DIY Valentines Day Conversation Heart Soaps

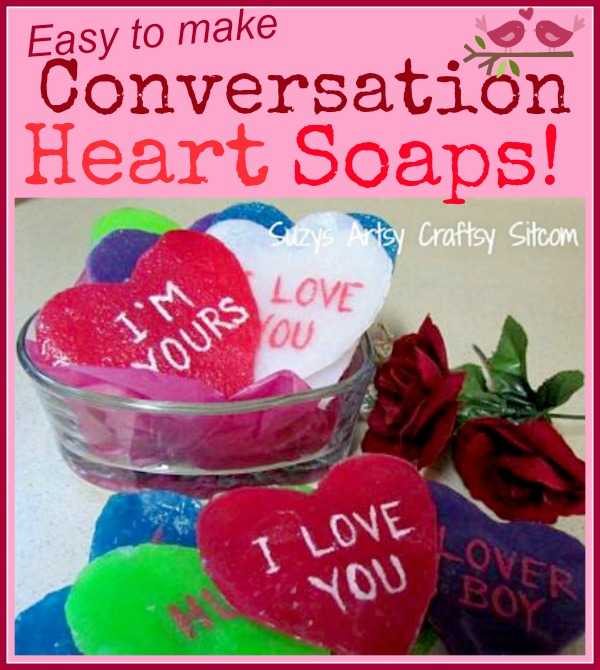
I loved the one-use soap idea from back in December.  It was a big hit with my friends and family.  They loved the little snowflakes and they were nice little gifts to give.  And very easy to make.  So, I decided to recreate them for Valentines Day, this time in the shape of conversation hearts.

diy conversation heart soaps

Affiliate links to Amazon below:

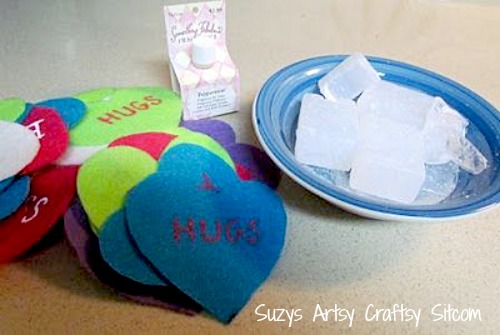
For this project I used:

Clear glycerine Melt and Pour Soap (from any craft supply store)
Felt in multiple colors
Acrylic Paint in pink and white
Peppermint liquid fragrance for soap

diy valentines conversation heart soaps

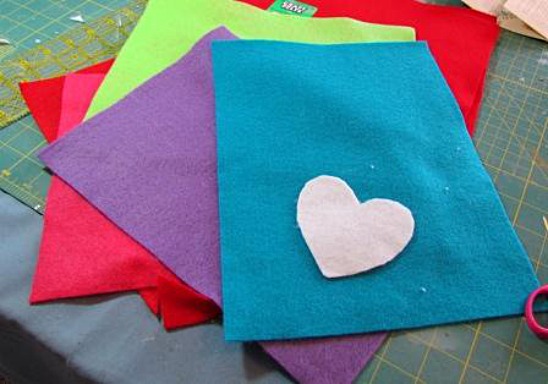
I started by cutting out a heart template from a small piece of white felt (you could use cardboard for the template if you like).  I used that to cut out all the little felt hearts.

diy valentines conversation heart soaps

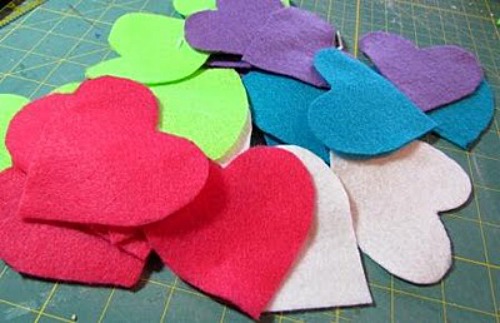
I used bright colored felt for this project, but pastels would work too.  Cut out as many hearts as your heart desires…

diy valentines conversation heart soaps

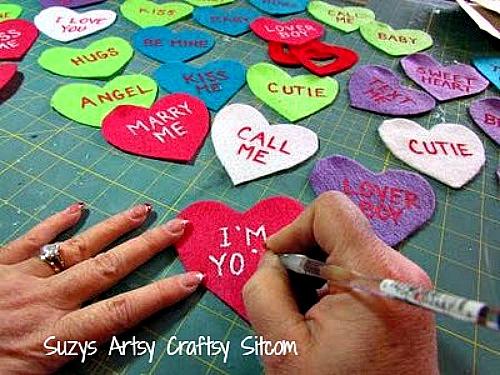
Now using the acrylic paint and a small brush, paint conversation heart sayings on all of your hearts.  I used sayings such as I Love You, Marry Me, Call Me, Sweet Heart, Cutie, Angel….but really, you could totally personalize these.

diy valentines conversation heart soaps

The acrylic paint needs to dry completely before you go to the next step.  Acrylic is only water soluble when it is wet.  After the paint dries, you don’t have to worry about it washing off on your hands.

diy valentines conversation heart soaps

Put some chunks of the glycerine soap in a microwave safe bowl.  Lay out several sheets of aluminum foil or wax paper for a drying area, and have ready your scent drops and a spoon for stirring.  Microwave the soap on high in your microwave for 30 seconds at a time, stirring in between each session, until most of the soap has turned to liquid.  The heat from the bowl will melt any small pieces left as you stir it.

Sitcom 2 step option

Once it is melted, add a few drops of scent.  I used peppermint because I love the smell, but any scent or no scent is fine.

diy valentines conversation heart soaps

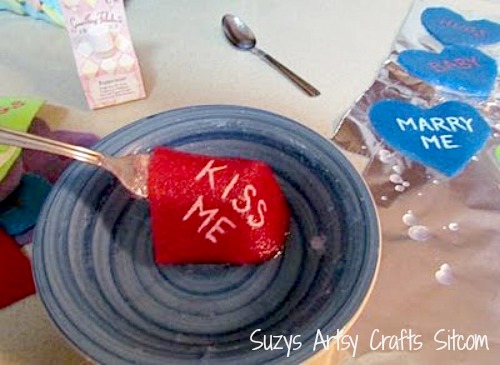
Now place a heart in the bowl, allowing it to soak up the liquid soap and lift it out with a spoon.  Drain for a moment and then place it on your aluminum foil to dry.

diy valentines conversation heart soaps

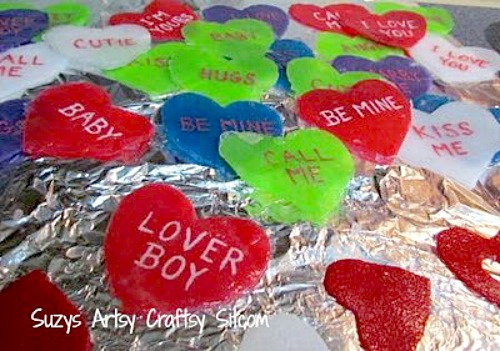
I found that one dip in the soap gives it a slightly textured look to the top due to the texture of the felt.  If you want them totally smooth, then redip after they have dried.  The second layer will be smooth.  Keep in mind that if you decide to do this, they will be multiple-use soaps because there will be plenty there for several hand washings.  Not necessarily a bad thing.

Sitcom 2 step option

They take about 5-10 minutes to totally dry.  Then peel them off the foil and use a paring knife to trim any excess off the edges.

diy valentines conversation heart soaps

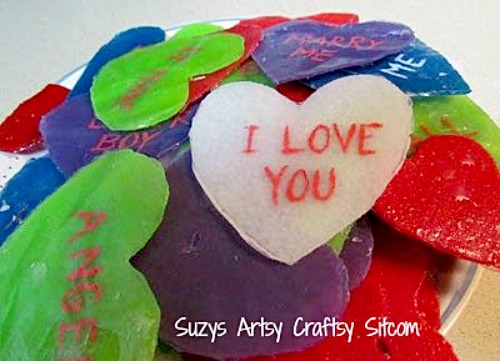
These little soaps can be stored in your purse in a zip lock bag and used as you need them.  Once the soap is used up, the felt inside can be used as a little heart-shaped wash cloth and then thrown away.

Conversation heart soaps

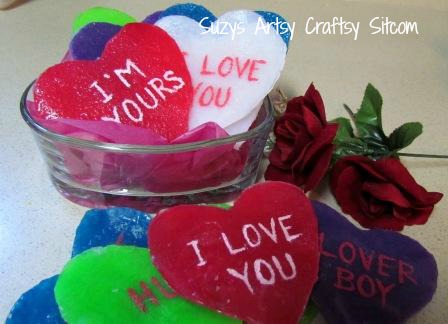
And they look very cute in the bathroom.

I plan on putting five different colored ones in cellophane bags and presenting them to my friends and relatives on Valentines Day.  Shhh…don’t tell!

single-use-snowflake-soaps9

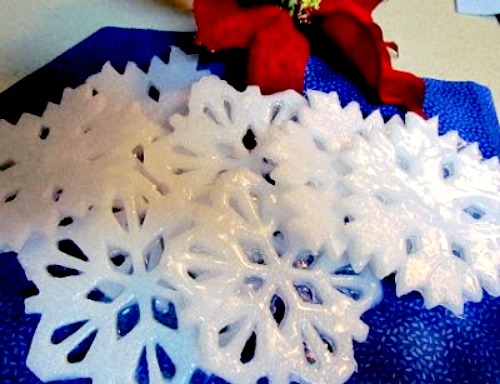
If you enjoyed this tutorial, you might want to check out my Snowflake Soap tutorial.  Pretty much the same process only with pre-cut felt snowflakes.

Want to try your hand at quilting?  

quilt pattern slider

Are you new to the Sitcom?  Be sure to check out my Frequently Asked Questions Page!

For over 150 crafty tutorials for all ages, visit my Tutorial Page! 

43 Comments

  1. Completely adorable! Thanks so much for sharing at #merrymonday

  2. Hi Sue,

    A thick fleece or flannel may work. You would have to experiment. Would love to see what you come up with!

    suzy

  3. Do you have to use felt or can you use cotton, fleece or flannel?

  4. Super Soap Making says:

    These conversation heart soaps are so pretty. These are absolutely perfect gifts for couples. Thank you for sharing the tutorial!

  5. What a cute project.

  6. Thats a really cool idea. How fun! Thanks for linking up to this months challenge.

  7. i have never seen anything like that… and the fact that the felt is actually useful [washcloth in the moment] as well is brilliant. love it!

  8. Nichelle @ Vintage Wanna Bee says:

    I'm featuring this on Talent Tuesday this week!

    vintagewannabee.blogspot.com

  9. AllieMakes! says:

    Very cool. Well done. Thanks for linking up to Making It With Allie! I can't wait to see what you have for next week!
    AllieMakes.Blogspot.com

  10. Thanks for linking up to Mad Skills Monday!

  11. Yet another fabulously simple idea! You are such a creative inspiration!

    Thanks so much for linking up to A Round Tuit.
    Hope you're having a great weekend!

    Jill @ Creating my way to Success
    http://jembellish.blogspot.com/

  12. I remember the snowflake soap…one of my favorites! Now this…love the colors so much fun!

  13. Awesome.. awesome .. awesome! What more can I say? Ok.. well how bout.. thanks for sharing with the Pink Hippo Party!

  14. Krafty Kat says:

    How fun! I didn't know you could use felt in that way! Very creative and great tutorial! Thanks so much for linking up to Gettin' Krafty With It!

  15. Hi Keri-Anne,

    I would test the fabric pens out first. Allow the ink to dry and then dip the felt in water to see if it runs. If it does not run, then it would be fine for this project.

    suzy

  16. Keri-Anne says:

    do you think using fabric pens would work the same?

  17. Wow! I never would have thought! What a fun idea, and my kids would just love these. We copied your conversation hearts last week, we may be stealing another idea… 🙂

    Brandy
    Gluesticks
    http://www.brandyscrafts.blogspot.com

  18. creativejewishmom/sara says:

    This is great! New to me, and love the results! Thanks so much for sharing on Craft schooling Sunday!

  19. What a great idea! Thanks so much for linking up to gettin' crafty on hump day! 🙂

  20. Keri-Anne says:

    thats awesome! bookmarked it under "must do!"

  21. Christine says:

    These are very very clever, and would totally make a great decoration and/or gift. Thanks also for the directions!

  22. TheCraftInMe says:

    Great tutorial, what a fun idea!

  23. ~The Bargain Babe says:

    Those are SO cute. They'd be nice to give to a child's school to put in the staff bathrooms. 🙂

  24. Awesome idea – I totally love it! Heaps of fun and great tutorial!

  25. PaisleyJade says:

    What an amazing idea – and they look so cute!!

  26. Love it! Thanks for putting it on my link party. 🙂

  27. These are so cute and such a unique idea! Thanks for linking up to Creation Mondays @ ~The Life of Me~!

  28. Katie @ EyeSpyDIY says:

    These are cute and would be great for a guest bathroom!

  29. Found you from another blog and had to come by to say how cute these are!

  30. shopannies says:

    how fun these would be to make thanks for sharing the how to's I may make this with my teen girls I know I will share on my blog Annies Home located at http://shopannies.blogspot.com with a link back here

  31. Rachael@Lovely Crafty Home says:

    How neat!! Thanks for linking these up!

  32. Real Life Reslers says:

    How cute! I totally could have used these yesterday. I was traveling and I swear rest stops are so bad for not having soap! I used tons of hand sanitizer but that's no replacement for actual soap IMHO. This looks super fun. I'm stopping by from the tt&j linky party. I'm now following you so I don't miss out on your cute stuff! Come and say hello to me sometime, my blog is http://www.reallifereslers.com

  33. These are so darling and very giftable.

    Linda

  34. So totally cute!!!

  35. These are so cute! I would never have thought to use felt like that!

  36. These look soooo cute! These are also just plain fun.

Comments are closed.