How to make bracelets from popsicle sticks!
So I was looking through my vintage craft book collection and ran across a 1970 Pack O’ Fun magazine. They had instructions on how to take a simple popsicle stick and turn it into a bracelet. I’m always happy to try and take a good idea and run with it.
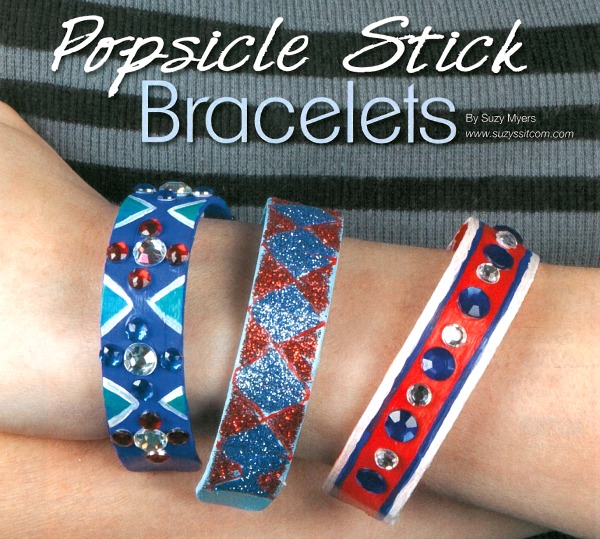
Well, I’m certainly on board for that. The thought of being able to make wood pliable put all kinds of ideas in my head. But we’ll start with the project at hand which happened to be bracelets.
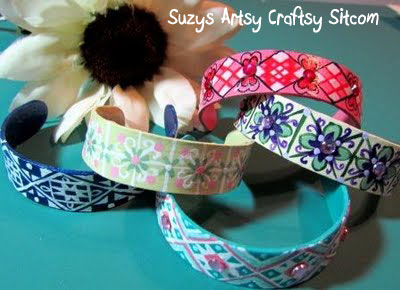
So lets put together some cute bracelets. With bling.
Are you new to the Sitcom? Be sure to check out my Frequently Asked Questions Page!
This post contains affiliate links to Amazon
For this project I used:
- Popsicle sticks (Jumbo size)
- Drinking glass (for forming- use a glass with a top opening that is slightly smaller than you want your bracelet to end up)
- Emory board or sand paper
- Acrylic paint
- Stick on jewels (for bling)
- Mod Podge
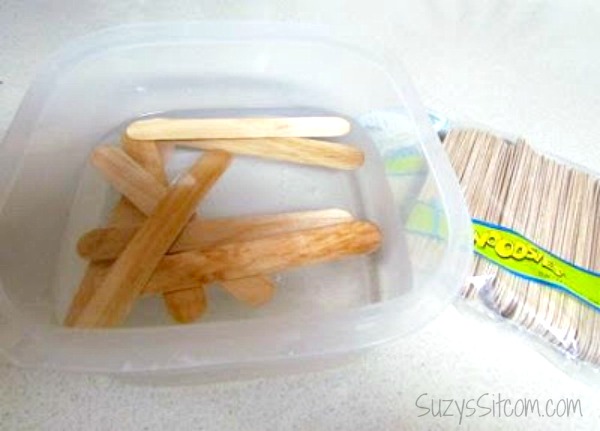
The instructions in the magazine called for allowing the popsicle sticks to sit in water overnight. Once they have become completely saturated, it was simple enough to curve them to fit into the top of a drinking glass.
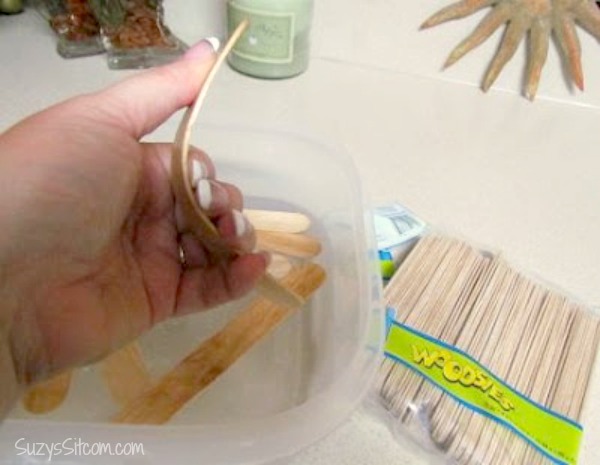
I found that I still had to work the wood, warming it with my fingers, to make it pliable enough to fit into the top of the glass without splitting. My success rate was about 60%.
So, I tried it again, but this time I used a pan of water and boiled the popsicle sticks for about 30 minutes and then allowed them to sit in the hot water for another 30 minutes. This time my success rate for unsplit popsicle sticks was about 80%. Either way works well and if you aren’t as picky as I am, your success rate might be better. The sticks are cheap, so I’m okay with a bit of error.
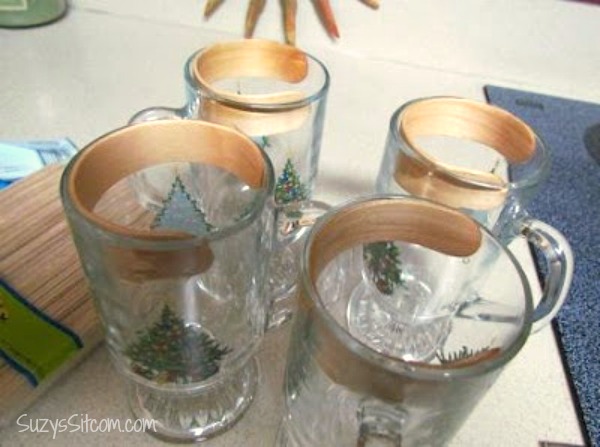
Once the sticks are formed in the glasses, I allowed them to thoroughly dry overnight and then easily removed them from the glasses.
Once I removed them from the glasses, I added a coat of Mod Podge to the insides and used small hair ties to help them maintain their shape.


Hi Ashley,
If you don’t want to use boiling water, soaking them overnight should work.
suzy
Do i Soak them not boiling water
Can u help me
Love this idea. For preschool and Jr. Church . can’t wait to make these????
This is a big hit, great craft! Love it.
Mari
What a fun and simple idea! Pinned!
This is such a super cute idea! I would totally wear one of these (assuming it fits around my wrist). Thanks for sharing at Merry Monday this week!
Hi Susy! We found your site because we had a ton of Jumbo popsicle sticks in the house. The bracelets turned out amazing! And we had so much fun, we created them as gifts for friends and created a video of this project on our YouTube Channel: https://www.youtube.com/watch?v=UbVLWyvSJxk. Thanks so much for the inspiration!
I would think it is possible! Would love to see what you make!
suzy
could this project be done with wooden coffee stirrers?
Hi I use your article and also your picture in my article here : https://suzyssitcom.com/2011/04/feature-friday-popsicle-bracelets.html
Thank you so much for your idea 🙂
Vassilia
Great! I love bracelets and like to wear several at one time….especially bluey, greeny earth colors. I am excited about trying these and wearing them to love and see reaction 🙂
This is such a cool idea – pinning to try when my daughter gets older!
I knew I saved all those popsicle sticks for a reason! I love to do crafts with my kids and am always looking for creative uses for things we already have around the house. This is such a cute idea and your bracelets look great. Thanks for sharing this! 🙂
Thanks for the cute idea. I plan to use this during craft time at our dance camp next month.
i had the same problems, and i tried several times. i’m with you..any suggestions?
awesome, at first i coudn’t believe you used wooden sticks.LOL but you’re right it’s to bow with water and carefully and patience;-D
I had made many years ago by using a flat iron and water a wooden boat.
And my sis made a wooden chair by using her oven and water.LOL
But i was totallly forgotten this idea. Thank you for the brilliant idea of using those sticks. Love this tute and the sharing.!!!!;-D
Hi! Thank you for putting this online. This is the first time I’ve been to this website, it took me a couple minutes to wait becuase of all the comments haha, but i loved the idea. The first time I saw this I was like ” Popsicle sticks….? ” and my face was like :??
But after I read this I was like this is so awesome! First time I’ve ever heard of this idea! I have one, but it’s storebought. Grrr. I spent $2.39 on it! But now that i know this idea I can make it myself AND remember not to buy these anymore! Haha xD
Thanks!!!!!
That is so stinkin’ cool! I’m definitely trying!
awesome . really crreative
so great , i got many ideas from it
This is very similar to the process guitar makers use to bend the sides of a guitar. That being said, if you have a large barrel curling iron, after the soak, you could use that to bend the sticks to get exactly the shape you want, then tie a piece of string or a ribbon around it to hold the shape as it cools and dries. I think I might try this to see how it works!
that craft is working really good for me i love it
Nicole, I’m so glad they worked out for you! Sounds like you were incredibly busy!
I tried these, and they came out fantastic! I boiled the popsicle sticks like you said for 30 minutes, then let them cool slightly while still in the water. I formed them into 5 oz. plastic dixie cups to dry and those were the perfect size for the kids. I made 75 of them and only a handful splintered. They were much easier to bend while still warm and wet.
Great idea I love these bracelets!
Jewelry Rage
If you have trouble bending the sticks try this – boil for about 30 minutes. Turn off heat and let sit in hot water for another 30 minutes. Drain off hot water and rinse the sticks in cold water. Drain and refill the cold water 2 or 3 times. Let the sticks you are not working with sit in the pan of cold water while you begin bending the first stick.
I just finished bending 300 sticks for a crafting party and using this method seemed to decrease the splitting rate dramatically.
Hi Nicole!
Yes, several others had mentioned in the comments that they went this route. A great idea! Mine were actually too small for my wrists as I had used very small glasses to make them. The process of adding wet paint to the wood will usually make them open up a bit, that is why I suggested small mouthed glasses. I used juice glasses. They were perfect for my daughter’s skinny wrists. Thanks so much for stopping by the Sitcom! Send me a photo of your finished project and I will be sure to post it!
suzy
This is well intentioned, however I did them and they are WAY too big for a wrist, and I have a fat wrist! If you have a rotary tool drill that is delicate, you can easily poke two small holes on each end, and I actually strung through an elastic bracelet band so it snuggly fits your wrist! Thank you for the initial idea though!
What if you put small holes in the ends of the sticks before soaking, either with a drill or crop aedile, then used ribbon to tie the bracelet together?
These are beautiful. Great painted designs. An impressive inexpensive craft. Love it.
Fantastic! My granddaughters and nieces will love these as gifts. : )
My brother recommended I would possibly like this website. He was totally right. This put up truly made my day. You can not believe just how so much time I had spent for this info! Thank you!
would adding food coloring *or easter egg die* in the boiling water work??? gonna find out! 🙂
What a brilliant idea! Absolutely awesome.
Such a great idea! I can't wait to do this with my daughter and the little girl I nanny. They are always asking for a new and fun craft…I think I found one. Thank you!
Suzy– This is such a cute idea. My 11 year old loves your site. She is very creative and likes to make things. She tried this, and soaked and bent, and they did bend but perhaps because none of our glasses were small enough (or too small) they were not good to actually wear as bracelets. But, she decided to practice painting designs (on flat sticks) while waiting for curling/ drying etc. and it turns out they make GREAT bookmarks for yourself, little gifts. So cute. My husband drills a small hole in the end when done to attach a tassle.
Suzy
You are devine for responding. I had no idea one could set their comments so no replies can be posted so I most humbly apologize 😉 Thank you for responding anyway!
So, I did buy the wider ones first. I soaked them over night. I boiled them for a half hour and messed with them for a minute before I decided to boil them for a half hour longer. And therein lies another problem. Wood floats. How do you jump that hurtle?
It just seems like they JUST NEVER got soft enough, especially the ends (same brand as in your pics). And the ones that I could bend slowly and gently enough never were circular- they wouldn't bend at the ends to lay flat against the inside of the glass.
So. Any thoughts to this would be greatly appreciated because I REALLY WANT TO DO THIS!!!
P.S. I'll mess with some buttons so comments can be posted!
Thanks again!!
these are wonderful! And your artwork makes me envious! Sooooo beautiful. Thank you for sharing your ideas and talents
D&N- your comment is set to no-reply, so I will have to try to help you here. I would recommend using the wider craft sticks if you are having difficulties. Soak them over night and then you have to gently bend them, working them into a good curve with your fingers. My success rate was definitely not 100%. If the stick had any mars or problem areas, the stick didn't bend to my liking. I went through a few before I got some that worked.
Hope that helps.
suzy
erm. ok. yes. love these. so i tried it. did NOT work AT ALL. when i put them in the glasses none of them would bend completely so they turned out more horse shoe shape than half circle. they also all split horribly. what'd i do wrong? please help me out with this!
Woow!! Love this one! I gonna try this one! Please take a look on my blog!
Also shear genius. I would have never guessed these were made from popsicle sticks.
Hi Suzy! I remember seeing these when you first posted them. 🙂
I have a new site, Fun Family Crafts, it's similar in nature to Craftgawker and Spotlight, but different in that it's a library of craft tutorials geared only at kids. I would love it if you'd stop by and submit this to be featured! (I link to you, I don't post your tutorial on the site) Feel free to submit as many kid friendly craft tutorials as you like! http://funfamilycrafts.com/
Ingenious ! ! !
oh wow you are a genius!!!! thats so clever and so cute!!!
I volunteer at our local senior center where I brought these to be decorated by the seniors. They had a great time, using markers and glitter glue as well as ribbon to make cute bracelets. The idea came from perusing your website. Thanks so much, Lisa Jo
These would make good napkin rings as well 😀
Thanks for posting this!
These will make great napkin rings too!
I was able to start bending my sticks after boiling for 30 minutes. I used a lower quality stick and it came out fine. I also noticed that the sticks with the knots would splinter or break every time.
I think I'm going to use mine as a craft for my dd's 5th birthday.
I love it! Although I've tried to do and I have a problem, it is very open to me. Sorry for my bad English!
You are out of this world!! all of your crafts are just genius! I am also a fellow crafter and would love to have you visit my work…
http://www.craftymoods.com
School's out for summer & I SO need to get some sticks! What a great craft idea. I think the kids would luv to decorate a few of these…and mommy would too!
Kim @ tiarasandbowties.blogspot.com
One of the most creative craft ideas I've seen in a long, long time. Gonna try it!
am gonna try this and I hope it works 😉
these are so good i am a speech therapist so i have a lot of tongue depressors 🙂 they will work great too :)stumbled you
Amazing.
I'm a teacher , and my children will love this.
Thank you for this great idea.
these totally rock…i love them
Absolutely awesome….made some today and though my painting is no where near yours they still look lovely :). I have linked to this tutorial on my blog.
http://www.njs-randomness.blogspot.com
i am so going to try with my students – thanks!
I love these! Was wondering though, have you tried the pre-colored sticks? I saw those today when I went to get those and man would that make things easier!! Wasn't sure if the color would come off though when soaking.
This is so cool. I actually ordered some large sticks and small ones to make bracelets and rings. Instead of drawing on them, I am going to make felt coverings for them and then decorate them with beads. I just loved this idea! You are so smart.
WOW! Very cool!
Thanks for linking up to Making It With Allie!
AllieMakes.blogspot.com
Hi,
I am a new follower. Can't wait to read more of your blog. Have a nice day!
Morela
http://myview-finder.blogspot.com
http://addsomechaos.blogspot.com
http://ihearttoys.etsy.com
Simple. Easy. Must try!
Thanks for sharing this at Creative Juice, Suzy! Hope to see you back this week…
What a great idea, and so "green" and thrifty! Would you please post a link on my Linky Giveaway party? http://the4rsRamblings.blogspot.com
Thanks!
Sandy
I featured these on my blog today!
http://reasonstoskipthehousework.blogspot.com/2011/04/gotta-love-inspiration_25.html
Smiles,
Melanie
Reasons To Skip The Housework
Tuesday Time Out Link Up Party
Link up Your Weekly Parties Here
Now that is cool. I saw you featured on All Things Fee and had to click through to see how in the world you could bend popsicle sticks like that!
featuring this post tomorrow at "AP Tuesday!" Thanks for linking up…my daughters can't wait to try this!
I wanted to let you know that I featured these in my "What I Bookmarked This Week" post -stop by and check it out.
Danielle
How cool and fun. I might have to try making some of these. Love the designs on yours, but I think I will stick with mod podge. You got skills girl with that paintbrush. Found you at New Nostalgia.
This is a fantastic idea and I can't wait to try it out with a class that I teach. Thank you for sharing.
Thank you so much again for linking up to {nifty thrifty sunday} and making my first party such a great success! I would love if you stopped by tomorrow and share more of your cute projects! 🙂
xoxo,
Vanessa @ {nifty thrifty things}
So Adorable!!
I would love it if you would link it up to our What I Made Wednesday Linky Party!!
Also, stop in for a chance to win our 100 Follower Giveaway {{Beaded Watch & Hobby Lobby Gift Card}}
Alisa
Sweet Peas and Bumblebees
sweetpeasandbb.blogspot.com
They're incredible. I didn't think it was possible to do that with popsicle sticks.
Such a cute project! I love them and I really love that anybody could do them in some way shape or form. We are not all great painters but with all the pretty papers and stick on stones out there most of us can come up with something great. Thanks for sharing.
What a great summer project for my girls. Thanks!!
I love this! I saw it on Not Just A Housewife and had to click for more details. Fabulous idea that I will definitely be trying with my three year old daughter! Thanks!
I would love for you to come by and link up to Inspire Me Monday. It's up all week!
http://singingthreelittlebirds.blogspot.com/2011/04/inspire-me-monday_17.html
Loooove these! I included this in a roundup of bracelet tutorials for those wanting to help out with Craft Hope:
http://www.bobalookids.com/2011/04/craft-hope-crafting-for-good.html
Dude…I can't believe that really works! How fun. I totally have to go and try it now.
liZ
(simplesimonandco)
Thanks for linking to Take-A-Look Tuesday – I featured you today! – Mandy, http://www.SugarBeeCrafts.com
Very clever!
🙂
OMG that is so flippin brilliant! i am totally going to be making these! http://www.mylifeunzippe.blogspot.com
I never would have thought that brittle popsicle sticks could be flexible. Amazing! Yeah for old magazines and thanks for sharing.
That's just brilliant! What really makes is your painting. Girl, you have TALENT.
Fabulous idea! I am going to have to make this. I would love for you to come and share this at my Fantastic Friday link party. http://ironvioletdesigns.blogspot.com
thanks
these are great! I love vintage craft books too. TFS
Kathy
BEAUTIFUL!! What a great idea, and a fun activity for kids too. I am definitely filing this one away. Thanks for posting, and for linking up at The Little Birdie! 🙂
Great Tutorial! Thanks for sharing! I am definitely going to try this!
How about using them for headbands for such as american girl and stuffed dolls. I can see fancy fascinators for dolls right now !!!
That is why I never throw a craft magazine away. Particularly since they are so expensive now. $5 to $15 means it is a keeper!!
Thanks for the idea. I can't believe I came across one of those packs of sticks just yesterday while hunting some other stuff. Now if I can find the pan and start the water. Let you know the results Thanks again for the Idea!!
These are so cool! Never would've thought you could do this. Thanks for sharing with us!
this is seriously cool!!! My daughter and I will have so much fun making these!!!
Very cool!
This is amazing! We will definitely be making this craft with my kids!
I pinned this post http://pinterest.com/pin/15172067/
Those are just great, I can't wait to try them myself!
This is such a fab idea, they look awesome!
harika ya teşekkürler
LOVE this idea!!! I'm definitely going to be making these. I have hoards of popsicle sticks. I love your blog, and am your newest follower. And I'm follower #1000!!! Congrats! I feel so special to be your 1000th follower. 🙂
These are absolutely AWEsome!!!
This is AMAZING!!! I can't wait to try this!
this is so cool! what a great idea. thanks for posting.
new follower!
kathryn
http://www.thedragonsfairytail.blogspot.com
Oh my gosh! How awesome! I am definitely going to try this. I've been searching for a new jewelry project. Thanks!
so fun! love it!
This is awesome! I linked it in my home school forum. http://homeschool.forumotion.com/
Never knew you could do that with popsicle sticks! What a cute idea!
Thanks for linking to a Round Tuit!
Hope you have a great week!
Jill @ Creating my way to Success
http://www.jembellish.blogspot.com/
So cute! Kids will love making these. I'm posting a link to my Artfire Kids Guild. Thanks for posting.
My daughter would love doing this project with me. Thanks for sharing!
LOVE IT! POSTING on my blog as a must try!!
http://lifewithoutwhiteout.blogspot.com/2011/04/tickle-my-fancy-tuesday_19.html
Holy freakin dinah who knew you could manipulate popsicle sticks? I'm so on this!!
What a great idea and a craft to do with kids too!
Süper fikir kızımla yapacağım teşekkürler 🙂
What a fun project!
Beautiful! Thanks for posting. XXOO
I never thought about making braclets out of popsicle sticks very cool
come see what I shared on my blog http://shopannies.blogpspot.com
This is awesome! I will definitely be remembering this one. Thanks!
wow, look at all the amazing comments on this cool craft!! I've featured your tutorial on my blog Five Sixteenths http://fivesixteenthsblog.blogspot.com/2011/04/make-it-mondays-popsicle-stick.html
hope you'll pop by!!
I love it and I'd love it if you joined the Running with Glitter Link Party http://runwithglitter.blogspot.com/2011/04/running-with-glitter-5-link-party.html
love this and do I have a lot of sticks!!! Now if I can just paint them as beautifully as you do!
This is insanely awesome, and the decorating is beautiful!
This is crazy! How cool. Great kid project!
This is seriously great. Boiling the water- brilliant! Thanks
Love love love this project! It's definitely going in my 'to do' file.
Wow! These are so cute.
I'm impressed, very cleaver and cute also. Visiting for Sew Happy Geek.
No Way! I can't believe they are popsicle sticks! Looks awesome!
Would love for you to share at my link party!
http://allthingsfee.blogspot.com/2011/04/calling-all-crafters-3rd-edition.html
Love it! THose are awesome!
Heart heart heart
Featured today at Today's Top 20!
Amanda
http://www.todaystoptwenty.blogspot.com
What a great idea! Your designs are fabulous. I'm going to file this project away for when my nieces visit me this summer. Thank you so much for sharing!(I'm visiting from SHG, hope you visit me too!)
This is so cool. I am actually looking for crafts for Vbs this summer. Awesome. Love it.
WOW! who knew you could bend those things?! what a great idea! totally bookmarking for later use! 🙂
thanks for sharing! found you via fingerprints on the fridge! 🙂
GET OUT! this rocks!!! Thank you SO much for sharing this AWESOME idea. I can't wait to get started!!! 🙂
What a great idea! These remind me a little of a modern (and much cuter) version of the old 80's slap bracelet. 🙂
How cute, will love to try these .I have a friend who will do this as she has several children.
Will pass this on to her. Thanks to people who are doing green projects!
Great idea! I love how they turned out!
what a fabulous idea! can't wait to try this out!
What a great idea…they are so pretty!!
So cool! I can't wait to try these with my daughter. She will love them!
These are awesome! Thanks so much for sharing your bracelets. I wonder if you could even use a Sharpie on it?
Harika.Çok beğendim.
Just a fantastic project. Thank you!
wow! These are amazing and so simple! Thanks for the fun tutorial!
Absolutely gorgeous! What a genius idea to use a glass like that!
they turned out prettier than I could picture them , of course.
OMG!!! I LOVE THIS!!!!! Thanks for sharing!!!
L O V E This ! No kids, but I'll try this one !LOL! It probably would work for kidlets too. Maybe want to do the "bending" then let the kids decorate.
These are awesome!!
That's so cute!! I love the bracelets!
I am hosting my first linky party today and would love for you to link up! 🙂 {nifty thrifty sunday}
xoxo,
Vanessa
OH, Wow! These are beautiful! Such a cool idea, but you took it over and above with your fabulous painting!
~Amanda
Wonderful idea and perfect timing! I was just hoping for some cute bracelet tutorials to participate in Craft Hopes newest endeavor. Thanks!
Very cool! I may have to try this!
So I thought I'd seen everything — NOT! And I thought those WERE covered with paper — you are one talented painter! I think I'll stick to paper! Thanks for the great tutorial and suggestions — will be bookmarking this one for sure!
loads of fun! Who needs kids to do this one?
How fun! We will be making some of these for the next Craft Hope project!!
My daughter and I are going to try this! 🙂
We will give this a try! Great ideas!!!
Love this idea! Thanks for submitting them to Dollar Store Crafts – I'll be linking!
Awesome idea. I hope to give these a try myself.
Wow these are so neat, I never would have thought you could bend them link that. As usual, your artistic talent shows!
Those are adorable!
Now that is fun!! Great idea!!
very nice!!!!!!
I have a gazillion popsicle sticks, and kids who apparently don't care for crafting with popsicle sticks at all…thanks for the brilliant solution to my problem! 🙂
I would have never imagined that popsicle sticks could bend! I have 2 boys but I guess their's could be called cuffs vs bracelets!
These is brilliant! I had no idea popsicle sticks could bend. I'll be trying this soon.
Cheers,
Tracy All Thumbs Crafts
Wow what a great idea. I remember getting those Pack O' Fun magazines when I was younger. A couple years ago I even came across a stack my Mom kept but they were so musty smelling that I didn't keep them to see what treasures they had inside.
wow! that's amazing, i didn't know popcicle sticks can be as fashinable as that! you're awesome.
This is incredible! I love this idea and my girls would go crazy over this! They are all about the bracelets and having them be a craft? Just awesome.
Thank you for sharing that looks amazing and I will certainly be giving it a try!
This is amazing…thanks for sharing. I'm your newest follower and plan on featuring this in my Sunday Stalker edition. Please stop by, check it out, and grab a button if you would like.
Jessica
http://myworldmadebyhand.blogspot.com
Decorating these would be a great little-girl-party activity. Of course, my big girl is gonna want to try this too!
That is so cool! I love how you painted them and then added the little jewel. They all look amazing! 🙂 Im bookmarking to try later!! 🙂
oh. my. goodness. My daughter will FLIP over these. This is now added to my list of summer-survival crafts! Thanks so much for including the tutorial as well. Glad I found you today via the Favorite Things linky! -diane
http://www.sweeteuropeandreams.com
Suzy – you are just so cool!! I wish I had kept all my old children's magazines now. Your painting is amazing!! Love this craft.
Suzy, this is awesome!!! I'm going to try it today! Thank you! I'm featuring this on Sat.
put quilling on them and sell them on etsy!!!!!!
Are you gonna sell these on etsy? you should
This is so flipping great!! I am going to run to get some sticks asap!!
I tweeted your link lol 🙂 🙂 🙂
Very cool idea! I didn't know you could bend those without them breaking. I will feature this at somedaycrafts.blogspot.com today.!
You 'hand painted' these? Amazing! Everything is so perfect and even.
Really, really cute!! I definitely see you coming up with a whole new series!
Awsom ,love the designs and bling!
Paula
How cute! I might have to try this. Love the colors and designs on yours.
Thanks! The bracelets are great, you did such a good job painting them. It would be fun to try with my grand daughter.
fantastic fun project Suzy.
I'm going to tweet this.
Oh I am so gonna try this!!!! awesome POST! <3 your blog!