Kids Crafts- Plaster Casting with Sand
Summer is the time for fun kids crafts, and plaster casting with sand is a as easy as making a sand castle! A fun craft tutorial to keep both you and the kids busy on a sunny day.

Years ago, I started collecting suns for my kitchen. I love Native American art, and they often incorporate the sun in what they do. So, I would say my kitchen has a Native American look. In fact, I’ve collected so many suns in the forms of wall art and decorations, that my husband actually asked me to stop. He was all sunned out, he said.
I’ve been playing around with the idea of creating my own molds and it occurred to me that one of the most versatile ways of creating a mold would be to use sand. So with that in mind, I located an object that I wanted to mold and created some sweet wall hangings. Of course it was a sun. But sometimes you just have to do what you have to do. Right?
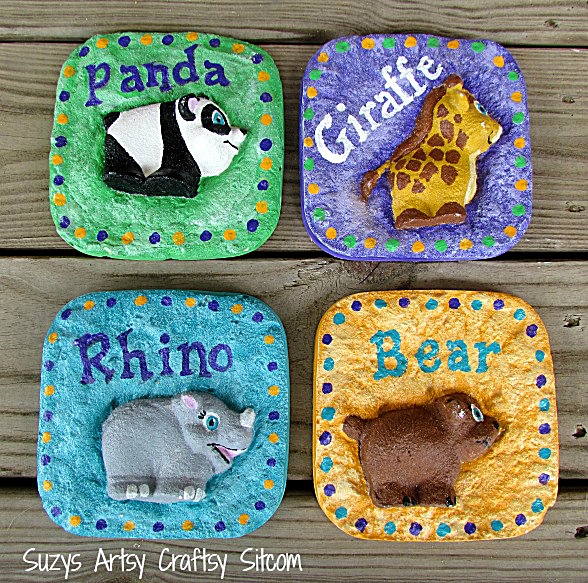
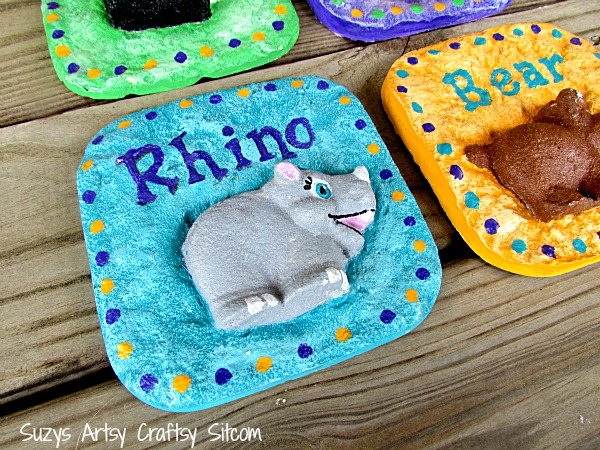
This project was featured in Kids Crafts 1-2-3 – a bi-monthly magazine that can be found exclusively at Walmart, Michaels and Barnes and Noble. For the magazine spread, I re-created this project using bath toy animals to mold, creating a cute piece of nursery art. This goes to show you that there are tons of possibilities with this concept.
For this project I used:
One sun night light for casting (you can use anything here- a knick knack, a toy, a seashell)
About 2 cups of fine decorative sand
A plastic container
Plaster of Paris
Acrylic paint
Water


I found this little night light at the dollar store several years ago. And of course it ended up in the kitchen. I just love his smiling face! So this is what I chose to mold.

I poured the sand into my plastic container. The container that you choose will determine the size and shape of your casted pieces, so you can create a bunch of variety here. I chose a relatively square container, as I had in mind a set of four wall pieces. The sand is a decorative sand that I purchased at my local craft store. I went with decorative because it is fine and I wanted details in my casting. Add enough water to the sand so that is can be compacted and hold its shape. I smoothed off the top with a spoon to create a smooth, even layer.


I then pressed my little night light into the sand, creating a reverse image of my sun in the sand.


Mix your plaster in a separate container. I used a large plastic disposable cup. Basically, add the plaster powder to the cup and then enough water to make it the consistency of thin yogurt. Pour this gently over your sand mold and allow it to dry for about an hour. Then remove the hardened plaster and use a large brush to brush of the majority of the loose sand. I then dipped it into a bucket of water to clean off any leftover sand out of crevices. (Do not put sand down your sink!)


I made three more using the same process, and the same batch of sand. I did have to remold the sand after each cast, but it was a simple process of pressing the sand back into the container, pressing the sun into the sand and repeating the process. I then allowed them all to dry thoroughly before I painted them.


I wanted to bring out the details, so I chose a dark color as a base, painting each one entirely.

I then used a dry brush and a much lighter color to lightly add highlights to the piece.

And there you have it. I am the proud owner of four more suns! Won’t my husband be excited!!
This actually was a very simple process and with a little help, the kids might enjoy casting in sand too. The possibilities are endless!
Are you new to the Sitcom? Check out my Frequently Asked Questions Page!
For more than 100 tutorials for all ages, don’t forget to visit my Tutorial Page!

Love & I will be doing this soon! Love your projects! Pin many to my Pinterest. 🙂
OMGosh! So stinkin’ cool!
This is a great idea…Thanks so much for sharing.
I like to do something similar when I am at the beach…I take masks(sold at craft stores for making mardi gras masks),press the “face” in the sand after digging into sand and making a soft pile. I remove the mask from the sand and put decorative items from the beach such as sea shells, and twigs. I add flat clear glass marbles-(flat ones)- where the eyes go. I carefully fill the indentation awith plaster of paris or stepping stone cement. Add a hanger. Allow to dry on beach overnight. Mark the area as wind blows sand dunes over it making it hard to find…the next morning, dig up your sand “face”. Wash off carefully…Beautiful!
Just found your sight. Thanks, love all the crafts
we did that when I was a little girl at girl scout camp once. we made circles out of either… paper or oaktag I think (something like that.. it was a long time ago though so it's hard to remember that part clearly) for the edges of the mold and did it down on the beach at the lake. what we were molding though, were animal tracks. they had already prepared molds of some different tracks for us to choose from (I did a deer track), which we then pressed into the sand to create our mold (so our mold could when finished also be used to make fake animal tracks), put up the ring for the border, and filled w/ plaster. ….I think I still have mine somewhere.
very nice suns and technique!!! really like them! just twitted the post! kokoroblu
This is such a beautiful project! Love the theme & the shapes! Thanks for sharing. I featured this on my blog: http://koolbeenz-blog.blogspot.com/2011/06/gallery-of-featured-crafters-4-with.html
Feel free to grab my Featured Button if you like.
@pril
This is a great idea. Its now on my official waiting list of crafts to try. We are going to be featuring this at this thursday's party. Come by and check it out!
What a great summer project and something to do with kids. Thanks for linking this up to Motivated Mondays at BeColorful
Pam
Very creative!
I found you from the blog hop and I'm a new follower via GFC. I would love it if you would follow me back!
http://www.centslessdeals.com
Thanks 🙂
~JB
They turned out great! You can make so many things! Thanks for linking up to this week's Catch a Glimpse party!
Very neat!! That sun does have such a sweet smile. Hurray for dollar store finds. 😀
Btw, I stumbled and hope you'll stumble my Bat Signals back.
I would love for you to link it up to my party that is running now. Any linky goes.
http://bacontimewiththehungryhypo.blogspot.com/2011/06/any-link-goes-party-running-now-summer.html
Come strut your stuff.
I do this same thing, but use melted hot glue sticks.
LOVE it…easy and unique and a great finished product. I really need to tap into my creative side (I'm not sure I have one, though.)
Stumbled you…my post is:
http://keenlykristin.com/2011/06/summer-of-kristin-a-sad-day-in-wildwood/
Thanks!
Kristin 🙂
Your site truly showcases very original projects, Suzy. I always pop by for inspiration!
Thanks for sharing at Creative Juice Thursday…
What a cute project! It looks like a lot of fun!
Stumbling through from Stumble Through Thursday! Would love if you'd return the visit and the stumble at http://formulamom.com
How neat are those!!!! I bet my girls would have a great time painting those if I made some.
Stumbled your post for Stumble Thursday.
Angela from MoveOverBetty.com
FANTASTIC! just printed this out! Thanks for the really cool idea. Following you on FB so I don't miss any other great ideas!
Mary
Those are great! What fun!
Great job!
Thanks for linking up to Making It With Allie! I can't wait to see what you have for next week!
AllieMakes.Blogspot.com
This is beautiful. I love the colors you chose.
So creative Suzy! These would look great all around a garden!
Thanks so much for linking up at my link party.
I just L.O.V.E. this. I will be imitating you in no time!! 🙂 Very cool!!
They're so beautiful. Thanks a bunch for sharing. I've never tried that technique before.
Cute project! Hi! I found your site through the Tuesday Time-Out Hop. Please come follow me back at:
http://healthykidshappykids.blogspot.com
Thanks and have a great Tuesday!
What a great idea. Before I retired I was a nursery school manager (3-5 year olds), and you're right, they loved making plaster casts but we used paper plates filled with plaster to cast their hands. Great fun. If I can get hold of some fine enough sand, I will give this a go. Thanks for sharing the tutorial. Kate x
Thanks for the helpful tutorial!
Super cute and a great tutorial! Thanks!
What a cool idea! Love those sunny faces!
Thanks for linking to a Round Tuit!
Hope you have a great week!
Jill @ Creating my way to Success
http://www.jembellish.blogspot.com/
Those turned out so neat!!! Funny how we get attached to something and collect LOTS of that thing huh! 🙂 Thanks for sharing on Fancy This Fridays!!!
Denise said…
Sorry, I didn't mean to post that last comment anonymously, but for some reason that is all that would work for me? Weird? Anyway thanks again
Denise
http://www.dancinglydenise.typepad.com
What a great idea! Now I have ANOTHER new project to try:) Thanks for sharing (I found you on Market Yourself Monday!
Denise
What a wonderful creation here! You always have such nice easy to understand posts! Love this one especially!
Thanks for sharing at Making the World Cuter Monday!
How neat, I love them!! The sand casting is really cool, I'll have to try it sometime. As usual, your painting ability astounds me!
GREAT IDEA !!!! I love the result !!!!!
I'm going to be wandering around for months finding objects that will work with this. Thanks for the tutorial! I'm looking forward to playing around in the sand.
Lorrie@the Victorian Rabbit said….I love this project. My kitchen is done in grapes. I would love to try this. Thanks for sharing.
Suzy, good God woman, where do you come up with this fantastic stuff???
How fun! And so many possibilities. I like the texture the sand gives.
Very Fun! Thanks for sharing!
Cool casting! These suns will definitely fit in well with the Native American feel of your kitchen. I like the fact that they're textured too. Bet your husband is pleased as punch with these. 😉
This is a great idea…Thanks so much for sharing. My girls will love doing this:)
wow. thanks for sharing that tutorial. i'm going to try this project out.
you have such great, simple ideas that turn out so perfect! love these! And I love how your crafts always have limitless things you can do to change them up. Now I just have to find something to cast…..
This is great! At Arcosant, the compound being built by Palo Soleri, craftsmen make wind bells using the sand-casting method. Only they pour molten metal into the sand depression instead of plaster. I think your suns are so cute. The highlighting makes them extra special! Thanks for sharing!
Your tutorials are all amazing! And this one is no different. What i love most is the quality of the results and the clear instructions and photos. Please keep them coming. My 'to do' list is getting seriously looong! LOL!
You really do have such creative ideas! Cute little sun!
Cool! I'd love for you to share this at Fun For Kids Friday. It would be a great summer craft for older kids.
http://smilemonsters.blogspot.com/2011/06/fun-for-kids-friday.html
Jo @ SmileMonsters
Una idea estupenda, gracias por compartir el tutorial. Besos
wonderful :)how easy & interesting..waooooo
thanks a lot for sharing these awesome ideas ^(^