Made a Photo Frame with Paper Tubes!
I thought it would be nice to put together a hand-made frame for some of my favorite photos. So naturally, my mind went to toilet paper. Yep. This frame is made from toilet paper tubes! Want to know how?

Oh wait, I’m getting ahead of myself. You see, since the Faux Metal Wall Art project, I have been inundated with toilet paper tubes. At least several times a week, a family member, friend or vague acquaintance will hand me a bag full of toilet paper tubes.
Everyone wants me to come up with a sequel to that project. What have I done to myself? Well, the lengths I will go to in the name of artsy-craftiness.
So the idea of a Photo Frame made with Paper Tubes was born.
For this project I used:
A ton of patience
The first step was to take the frames apart, separating the glass and cardboard backing from the actual frame. Then lay the frames out upside down, lining up the tops of the two top frames and separating them by 3″ from each other and the two frames below them.
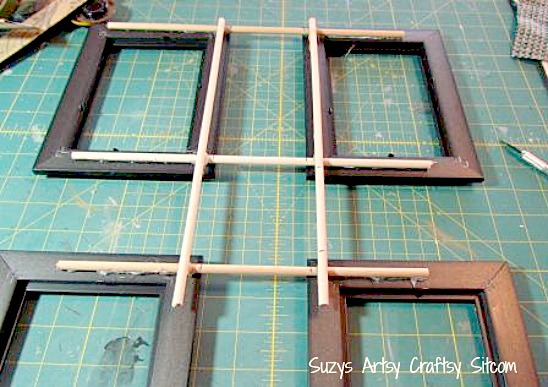
Once they are laid out the way you want them, cut the dowels to hot glue on the backs of the frames. This is for basic support. I didn’t want to use too many dowels as I wanted the filigree effect, so I used just enough to support the project while all the cardboard filigree is added.

Cut four dowels and glue them down across the tops and bottoms of all four frames, and then two longer dowels to overlap lengthwise over the inside edges of the frames. This creates a center square. (Be sure not to cover up the frame area so that you can put the photos in).
Carefully turn your piece over. It will be fragile at this moment, but as you add the filigree, it will become much stronger.
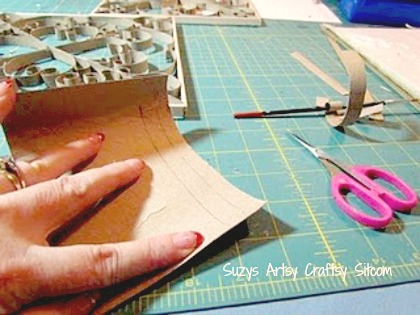
Cut the toilet paper tubes once length-wise, then mark 1/4″ lines along the width of the tube so that your strips will have a curl. Cut up all my toilet paper tubes, creating a pile of paper curls to work with. Set aside one toilet paper tube to cut in 1/4″ strips lengthwise to use for occasional straight pieces.
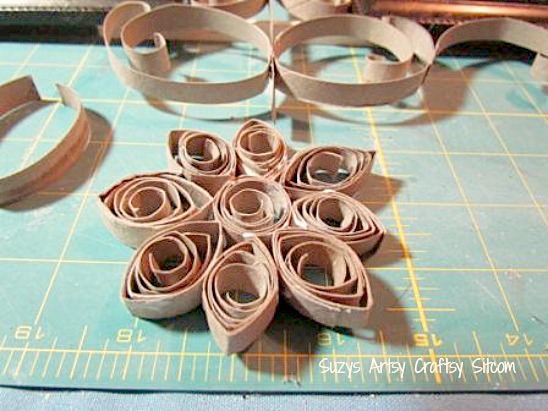
Start with the centerpiece, creating a flower. Create the petals by coiling strips around the end of a paintbrush, glueing it with tacky glue and then pinching each end. The center of the flower was coiled around the end of the paintbrush and then just glued. The outer petals were created by pinching the center of the curl and gluing the ends in place.
Glue the flower together and allow it to dry.
Since the dowels raised the frames about a 1/4″ above the table, I added a circle of paper curls in the center section to help support the center flower. I then glued the flower on top, centering it within the center square.
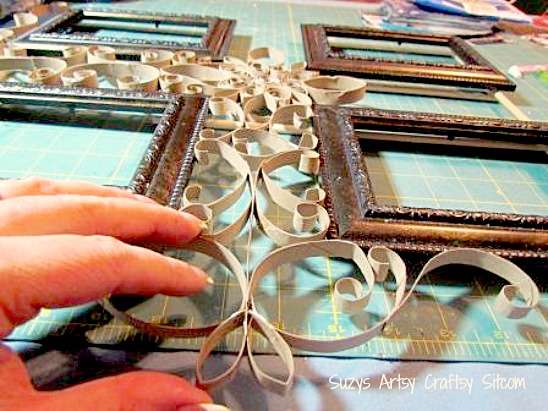
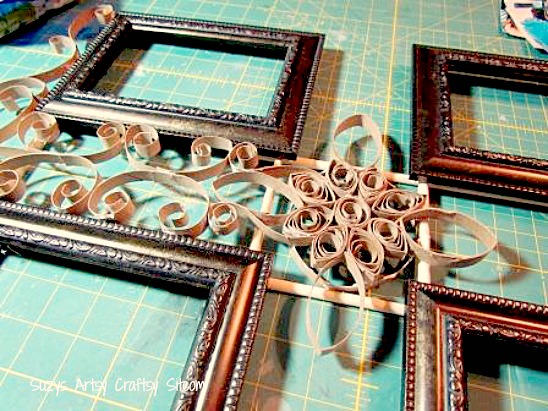
The filigree pattern that holds the frames together was made up as I went along. Once a pattern was established on one side, I recreated the pattern on the opposite side.

The simplest way to do this is to curl your paper to match a finished section, then flip it over to place on the opposite side. This makes for a relatively even pattern.

82 Comments
Comments are closed.
Большое вам спасибо за ваши добрые слова!
Извините что пишу на русском, очень плохо знаю английский язык. Но не смогла не выразить Вам свой восторг по поводу замечательной идеи и столь же замечательного исполнения! Очень красиво!
Just wanted to say that I completed this project this weekend, and it looks great! The tutorial was just perfect & i used textured spray paint, to appear like grey stone. Thanks for all the compliments you’ve brought me!
Acordei pensando em rolos de papel higienico, nem sei o porque.como acabei de comprar um computador,corri para elefiquei impressionada ! isso e demais.
Greetings from Finland!
I saw the project through Johnnie’s blog: What a imagination you have! This is a piece that you can’t buy even with money! So lovely!
Hi Vicki-
Thanks for letting me know. They have apparently revamped their website since I updated my post. You can find the patterns here: http://www.craftsnthings.com/magazines . I’d love to see your finished project!!
suzy
I have looked all over the web to find the patterns for these. Could you re-post them, since the magazine no longer offers them? I’d love to make a set.
What a great idea! I have done lots of quilling before, but have never thought to use a toilet paper roll as my base material! I teach a lot of craft classes in my local area with my Girl Scout unit, and would love to pass your idea on — it is not only crafty and very pretty, but falls in line with our “Girl Scouts Go Green” initiative, where we are trying to find another use for recyclable items! Would you mind if I used your idea? I would, of course, give you the credit! Thanks!
Ashlee
muito, muito lindo,,ótima idéia ..em templos de reciclagem…maravilha
Hi Suzy,
Amei suas idéias,gostaria se possível receber sua novidades em meu e-mail.Que DEUS continue te dando sabedoria e paciência para encantar o mundo com suas maravilhas..beijo no coração.
This is way cool and creative! What a nice, inexpensive present. Such a good looking couple, and good luck to your son in law in his military career.
superbe! tout simplement ingénieux et magnifique
Wow!…stunning…amazing. Your are very talented. Thanks for sharing.
hi – i dont normally comment on blogs but i HAD to after seeing your faux metal wall art frames and this one too – BEAUTIFUL and inspiring, i'm going to start collecting 'em tubes soon too!
THANKS
I raved about you over at my blog Scribbles and Swirls. Would love for you to check it out!
http://tamiscribblesandswirls.blogspot.com/2011/10/as-if-faux-metal-wall-art-wasnt-enough.html
Thanks for the inspiration!
~Tami
What a nice idea. I like to do it some time. Need many toiletrolls.
Marianne
I dont have words to tell u how amazing u have made this art…i am gona try this out hope i will have the patience…u are welcome to visit my blog and join me too…
Это просто чудо!!!Вы-настоящий талант!!!Я просто в восхищении от ваших работ!!!
Fabulous!!!!!!
I featured this tonight! Stop by and get a button if you like!
You are a creative rockstar! Thanks for sharing on Motivated Monday at BeColoruful.
Pam
I featured this today because I LOVE it! Thanks so much for sharing…come get a "featured" button 🙂
My mouth is wide open I am SO amazed at your creativity. Wow, that is FABULOUS!
Now that is truly recycling! I would have never guessed it was paper!
You have been featured at CraftOManiac, thanks a bunch. Winks-Jen
YOU are like TOO AMAZING with your tp roll art!! I LOVE it! 🙂
Thanks for linking to "20 Below Thursday"! 🙂
I featured you today at Lovely Crafty Home!
HI
I am a new follower from the Thursday blog hop.
I blog at http://www.tammileetips.com
Tammilee
beautiful! great tute!
gail
Amazing! Such a great idea!
Thanks so much linking up at Olivia Renn, hope to see you again next Wednesday!
WOW! That is amazing!!
Thanks for linking up to Making It With Allie! I can't wait to see what you have for next week!
AllieMakes.Blogspot.com
How completely amazing is this?!?! I LOVE IT!
I'd love it if you'd link up to my party…"20 Below Thursday" which is for cute and thrifty projects just like this one!
Wow, amazing job! I'm featuring this over at womenwhodoitall.blogspot.com
Jill
That's faux cute! Seriously, awesome job there.
These looks so amazing, and again you fooled me into thinking they were metal when I just glanced at the pictures!!!
I have a great Dove chocolate giveaway going on right now and would love if stopped by and entered: http://eyespydiy.blogspot.com/2011/02/dove-chocolate-discoveries-giveaway.html
~Katie @ Eye Spy DIY
wow, very nice! Infact amazing! Thanks so much for sharing on Craft Schooling Sunday, great to "see" you!
Wow. I am very impressed. Not only your patience, but talent and creativity. That really is fantastic. It looks so great. Again, impressed.
popped over from not just a housewife…this is incredible!! Thank you for sharing
Gorgeous! & the fact that you made it from tp rolls is astounding! I have a drawer full that I am always thinking of using but haven't yet. You are definately inspiring! Thanks for linking up!
so beautiful!
Absolutely amazing! Seriously, I can't even find the right words to describe how incredibly cool this is. I started saving TP rolls when I saw your last TP post, I can't wait to try them both. 🙂
Love that you used toilet paper rolls. Happy recycling! I am also a quiller so it goes hand in hand. I can't wait to give it a try. I have also written a post with this tutorial on one of my websites. Take a peek and if you have other articles you'd like to submit let me know. Here's your post:
http://www.ggcaa.com/2011/02/faux-metal-frames-from-toilet-paper.html
Thank you!
Monica
A ton of patience? No, you must have the patience of a Saint!
This is amazing. Now I know what to do with all the tubes my teenaged daughter has been saving.
wow,, that is so pretty. I'm just amazed at these toilet paper tube projects.
Just wanted to let you know that you have been featured on my site. Stop by and check it out and be sure to grab my "I Was Featured" button.
http://diyhshp.blogspot.com
What a beautiful piece. Thank you for linking it to the More The Merrier Monday.
http://diyhshp.blogspot.com/
I LOVE this! Toilet paper rolls are amazing.. but only in the right hands.. obviously yours are those hands! This is awesome! Thanks for sharing with the Pink Hippo Party!
WOW! I really thought that was made of metal well into your tutorial. What a smart idea! 🙂
How wonderfully creative is this. It tuned out beautiful, great GREAT job! winks-jen
Do you mind if you use your picture and link to your this project on my blog? This is so cool and frugal to the extreme!
Oh, wow! I just knew there was a reason to not throw out that toilet paper tube… Awesome project.
–Jill, from jillmadeit.blogspot.com
Okay, THAT is JUST INCREDIBLE!! I LOVE it! I'd love to try it sometime!! You are amazing! My sister used to do quilling, so I get the patience and art involved. REALLY nice!! 🙂
Very creative! And thanks to your son-in-law for his service to our country.
Beautiful!!!! I love both of the faux ironworks you've done!!!! Great tutorial and thank you so much for sharing… now I'm off to put notes in all our bathrooms to: SAVE THE TUBES!!!!!
This is amazing! I am going to start collecting toilet paper tubes! I guess paper towel tubes would work too!
This is beautiful!! Great job!
OH this is absolutely fabulous!! Is there any limit to your craftiness??
Anyway, I just stopped by to let you know that I featured your cute three little bears on my round tuit post this week!
http://jembellish.blogspot.com/2011/02/round-tuit-37.html/
Thanks again for linking up! Hope you have a great week!
Jill @ Creating my way to Success
I love this. Thank you so much for sharing! I would be honored if you would link up your super cute blog over on my blog stalkin' page.
http://alaynahoward.blogspot.com/p/blog-stalkin.html
WOW. amazing and fantastic! you had me fooled!
megan
craftycpa.blogspot.com
You're so talented! I loved the original, I love the sequel 😉 Thanks so much for sharing these awesome projects!
Wow!!! I love this… being in love with quilling and filigree in general, this is really something that I can relate to… love that you created it using toilet paper tubes – lol!! hugs, antonella 🙂
I love it!! Thanks for joining Thrifty Thursday this week. Blessings…
Saved By Love Creations
Wow! Simply Wow!
Ok, obviously you are brilliant and UBER talented. I am AMAZED! Thanks for sharing. I remain in awe.
~Pam
pamspaintparlor.typepad.com
This is beyond amazing. I would love to feature this on my blog Reduce, Reuse, Upcycle. It is to incredible not to!
http://reuseandupcycle.blogspot.com
LOVE IT! LOVE IT! It came out better than I pictured, of course.
I'm speechless. Thanks for linking up to Finished for Friday. This should get some kind of award for the ultimate in recycling. You are amazing.
Love this! Very creative!
Denise
Extreme Personal Measures
Why do you have to make these wonderful projects? After working on the faux metal wall decor I don't think I am patient enough to do this one even though I LOVE IT! I guess I will just have to come back often and look at yours….Also I am just spray painting my 4th one then I will post it and let you know!
Ha! My husband will tell you that I've been out of control for years!
Thanks!!
suzy
You are seriously OUT OF CONTROL!!! I don't understand how you can do all of this amazing art with TP ROLLs. I'm in awe…..again. I will feature this today at somedaycrafts.blogspot.com
You are amazing. Who would ever think that you could make something so beautiful from toilet paper tubes?! Oh my! Thanks so much for linking up to my Open House and if you didn't leave a comment, be sure to if you want to be eligible for the giveaway!
Just WOW!!! Amazing that toilet paper tubes can looks so expensive!
That looks AMAZING! You are very talented!
momsofalltrades.blogspot.com
Wow! Beautiful work! Love it.
xo -El
That's fabulous; thrifty and very classy. What a great combination!
Such a unique idea, and I love the finished product! Excellent work!
-Robby
http://downonsanford.blogspot.com/
This is stunning! I absolutely cannot believe what you can do with a toilet paper roll. WOW. Thanks so much for linking up!!
So incredibly awesome! Have you ever thought of selling these? I know I want one!
oh my God!I don't believe that you make so beautiful things from toilet paper tubes!A perfect present for a young couple!!I hope the kids will be always happy and "kalous apogonous" as we say here in Greece (means good offsprings-babies)