Homemade Conversation Hearts
I have literally been snowed in here for most of the week. And being the craftaholic that I am, you would think I have lots to show you. Yes, I spent a large amount of time crafting and I have three projects currently in the works. But none of them are complete. So I decided to go into the kitchen and make some homemade conversation hearts.
Why, you ask? Well, I ran out of supplies for one project, another project is still being worked through in my head, so it is not coming together as quickly as I’d like, and the third one is totally kicking my butt. Here is a bit of my three projects combined:
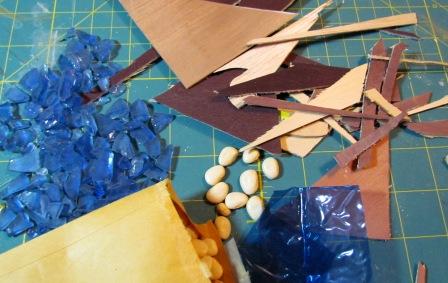
A mess. But it will come together. You will see them all soon, and in the meantime, I’ll share with you a project that I did last Valentines day.
Well I got all Martha Stewarty and decided to make some Valentine baskets for the girls. Yes, I know they are a bit old for that, but apparently their mom isn’t.
For this project I used:
Put the corn syrup, gelatin, and water in a small microwave-safe bowl. Stir it well. Microwave for about 30 seconds so the gelatin dissolves, and stir again.
Then pour the mixture into a large bowl and add 1 cup of powdered sugar, mixing it with a mixer on low until the sugar dissolves. Then keep adding sugar and mixing until the full two pounds of sugar are added. This will become a stiff, sticky dough.Use a sifter of powdered sugar to dust the counter and scrape the candy out of the bowl onto the counter. Add lots of extra powdered sugar to the top and start to knead it like bread dough. Keep kneading and adding sugar if needed until the candy is satiny instead of sticky.
Then decide how many colors you want to make and divide the dough up into that many portions. Take each portion, add a few drops of food coloring and almond extract and knead it until the color is well distributed. (By the way, any flavored extract will work). For this step, use rubber gloves so that you don’t end up with rainbow hands. Repeat this with the other portions until all your candy is colored and flavored.
Dust the counter again with powdered sugar and roll out one of the colors to about 1/4″ thick.
Then use the heart shaped cutter to cut out the hearts and place them on a sheet of parchment paper. One batch makes a lot, as you can see.
The hearts have to air dry for at least 24 hours before you can write on them. Be sure that they are totally dry before you go to the next step or the ink will run due to the moisture.
I found my food coloring markers at Michaels in the Wilton cake supply section. They are easy to write with and can be used for lots of future projects. If you cannot locate them, you can use a toothpick and liquid food coloring to write with instead.
My hearts have lots of personal sayings on them that only my kids would appreciate; Amanda-Panda, Dork, Myers-Tires, and of course the usual stuff like Sweetheart and I love you. What is great about this project is how personal you can make it.
The finished hearts should be stored at room temperature in an air tight container. Don’t I sound just like Martha Stewart? I’m wearing my sensible loafers as I type this.
- 2 tsp. light corn syrup
- 1/2 cup water
- 1 packet (or 2 tsp) unflavored gelatin
- 2 lbs. powdered sugar, plus a bit more for dusting
- Almond extract Food coloring
- A small heart-shaped cutter
- Food coloring markers
- Put the corn syrup, gelatin, and water in a small microwave-safe bowl. Stir it well. Microwave for about 30 seconds so the gelatin dissolves, and stir again.
- Pour the mixture into a large bowl and add 1 cup of powdered sugar, mixing it with a mixer on low until the sugar dissolves.
- Continue adding sugar and mixing until the full two pounds of sugar are added. This will become a stiff, sticky dough.
- Use a sifter of powdered sugar to dust the counter and scrape the candy out of the bowl onto the counter.
- Add lots of extra powdered sugar to the top and start to knead it like bread dough. Keep kneading and adding sugar if needed until the candy is satiny instead of sticky.
- Decide how many colors you want to make and divide the dough up into that many portions. Take each portion, add a few drops of food coloring and almond extract and knead it until the color is well distributed.
- Dust the counter again with powdered sugar and roll out one of the colors to about 1/4″ thick.
- Use the heart shaped cutter to cut out the hearts and place them on a sheet of parchment paper.
- The hearts have to air dry for at least 24 hours before you can write on them. Be sure that they are totally dry before you go to the next step or the ink will run due to the moisture.
- Use food coloring markers to personalize your conversation hearts.
- The finished hearts should be stored at room temperature in an air tight container.
For other cool Valentine craft ideas, check out:
Conversation Heart Soaps
Homemade Conversation Heart Dog Treats
Valentine Heart Sachets


I did end up making these, and I'm posting and linking to you as my inspiration on Saturday. 🙂
Suzy-
I <3 these!
Thanks for linking up to Creative Juice last week…hope to see you back this week…
Thats awesome! I love it! Love that you can make it up!
Thanks for linking up to Craftify It Thursday!
Jennifer
well the other thing that looks pretty neat about this is that you can make the heart whatever size you want…neat idea
I will have to pick up some unflavored jello, but other than that I'm good to go! Browsing is bad for me… I'm up to my ears in projects and ideas, but it's so much FUN! (Though I totally understand about having so many projects in the works and not being able to post them.)
Suzy-
I love this party link from Polly want a Crafter and was wondering if you would like to be featured on Remodelaholic's recipe link up on Sunday. It would be the full recipe, if that sounds exciting let me know. (usually you can just respond to this comment!)
And it should get you a ton of visits…
Hi Jenn,
I flavored mine with almond extract and they have a much better flavor than the store bought ones in my opinion.
You can use any flavor extract to alter the flavor. Last year I used peppermint. They were awesome.
suzy
these are very cute, but how do they TASTE? if they don't taste better than the store-bought ones, i'm not going to invest the time. your opinion?
Lady, you are amazing! Seriously. I got my kitchen organized while we were snowed in. Not much crafting got done around here. Oh well!
Thanks for linking up last week to Favorite Things Friday @ The Speckled Dog. Hope you'll come back this week!
http://thespeckleddog.blogspot.com/2011/01/favorite-things-friday-no-8.html
I used your recipe to make really cute cupcake decorations for a baby shower! Everyone loved them! http://messhalltobistro.blogspot.com/2011/01/cutest-baby-shower-cupcakes.html
Great idea! And thank you for sharing how to make these!
Thanks for linking up to Making It With Allie! I can't wait to see what you have for next week!
AllieMakes.Blogspot.com
Love it…
I just featured you as one of my super moms of the week. Grab a button. Thank you again for a great idea
http://www.couturiermommy.com/p/my-buttons.html
so cool. I have never seen this before. My kids will flip. Thank you for sharing.
http://www.couturiermommy.com
LOVE…you are one amazing lady…a new thing to fascinate me every time I pop over!
Awesome project! Thanks for linking up!
Thanks for linking up to Mad Skills Monday!
LOVE this!! I am actually going to feature it, so come by and pick up a badge if you would like 🙂 Thanks for linking up to handmade tuesdays @ ladybug blessings!
love love love this!! i cant wait to try this with my kids. these are adorable!!!!
Oh they look so yummy! Could you please link these up to Hoo's got talent instead of Hoo are you? Thanks!
wow! so fun 🙂
-Jackie
http://jaclyndesigns.blogspot.com/
What a fun and timely post.
I live in the midwest so I "get" the whole cold and snowed in for a week thing. 🙂 Weird, but I kind of like January for that reason. I get to stay in and paint or create and I don't have to explain my staying home to anybody.
Thanks for sharing on Motivated Monday at BeColorful.
I must admit, I can't wait to see what else you have been working on. You have me intrigued.
Here's to January! Enjoy.
Pam
LOVE IT!! You're never too old for these!
Thanks for linking up to A Round Tuit! Hope you have a lovely week!
Jill @ Creating my way to Success
http://jembellish.blogspot.com/
I love this idea! I am going to make these for my little ones! I would love for you to come and link up to Fantastic Friday at http://ironvioletdesigns.blogspot.com
Thanks.
So cute! Thanks for sharing over at Tuesday Tell All!
What a cute idea. These would be adorable class gifts. Thanks for sharing.
This will not end well for me. Conversation hearts are my all-time favorite candy (I know, right? Weird.) If I can make them myself I see my caloric intake skyrocketing.
These are great! Hope you'll stop by this week and link up to Creation Mondays @ ~The Life of Me~!
How fun are these!!! Thanks for linking to Fancy This Fridays!! They look yummy and it's fun their in your own handwriting!! Hope to see you again THIS Friday!!!
Very cool idea. Thanks for linking to Craftastic Monday:)
How fun! I love this idea 🙂
Hi Julia!
Allow them to dry at room temperature. It takes about 24 hours.
suzy
Hi, what a great idea!
Do you simply dry them at room temperature or in the oven?
You could also use alphabetic stamps to write your messages!
I can't believe you made those! How stinkin' cute did they turn out? Very fun project!
These are amazing! I can't wait to try this! Thanks for sharing with the Pink Hippo Party!
Ohh! I can't wait to try this out! Thanks for sharing!
jen @ messhalltobistro.blogspot.com
Wow those are great! I don't know if I could make them, but kudos to you for such a sweet and creative idea 🙂 Thanks for linking up!
What a FUN idea! We are definitely going to make some this year! I just need to get some of those markers!! Thanks for the recipe!
Fantastic idea, love it! So gonna have to use this for an upcoming welcome to the world baby party… Thanks for sharing!
xoxo,
Ellen
Love this! I never thought of making them!
I love that you can personalize them with things that would mean somehting to your kids! Such a nice idea!
new follower – hope you will stop by and visit my blog – Mom to 2 Posh Lil Divas! You can also follow me on twitter! Looking forward to reading more of your posts.
Bernadette
http://momto2poshlildivas.blogspot.com
Twitter – @bern425
I featured this over at Today's Top 20!!
Amanda
http://www.todaystoptwenty.blogspot.com
Great idea! I love that you can personalize them this way:)
What a cute idea!
Stopping by to follow you from Fab Friends Friday. Love your blog and hope you'll stop by and say hi to me at:
http://norwegianphoenix.blogspot.com
I'd love for you to follow me back. I can't wait to read some of your older posts. Have a great weekend!
Adelaide@ Norwegian Phoenix
Oh I love this! We're going to make these this weekend! Thanks!!!
I didn't know you could make your own conversation hearts! That is too cool!
~Katie
eyespydiy.blogspot.com
I didn't even know you COULD make these! I might have to give it a try. Congrats on your faux metal art being shown off all over blogland!
Holy cow! What an awesome idea!
Thanks for linking up!
Ashley
http://www.simplydesigning.blogspot.com
They're so cute! Love the idea of personalising them!