Quilled Paisley Monogram Tutorial
Create a unique look with paper quilling! Quill a monogram with a paisley touch! And the monogram is even made with recycled cardboard. You can’t get much more thrifty than that!
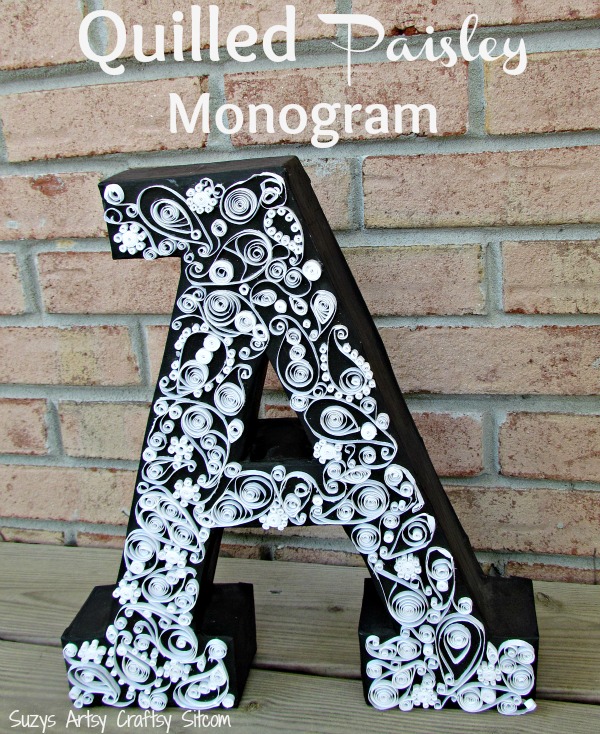
I’m working on Christmas presents already and I’m working with a strict budget. So coming up with things that look expensive out of things that just plain aren’t is kind of a hobby of mine. I love monograms and they make great gifts. So with that in mind, I decided to create a monogram out of cardboard and add a quilled twist to it.
For this project I used:
One cardboard box
Hot glue
Newspaper
Acrylic Paint
White cardstock
White glue
Craft knife
Straight edge
Creating the Monogram
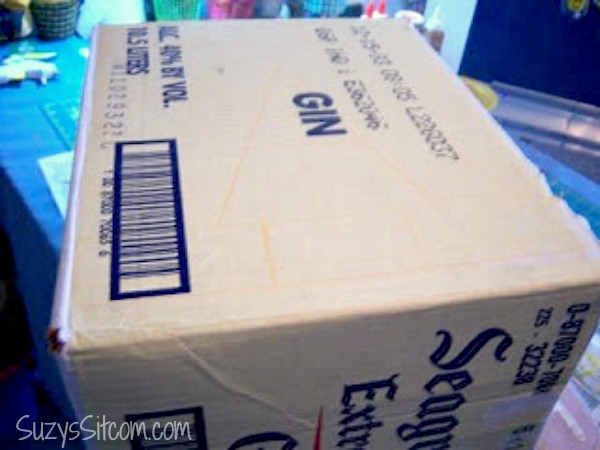
I located an old box that has been sitting in my attic for years. No, I did not drink a box of Gin. Really I didn’t. I don’t even like gin. I’m blaming it’s presence on Tom Selleck. I’m sure he and his mustache must have had something to do with it. That’s my story and I’m sticking to it.
I decided to create an “A” this time. You can either print off a template using any font on your computer, or do what I did and just freehand it with a straight edge. I tried to use up as much of one side of the box as I could because I wanted the monogram to be large.

Draw out your monogram and then cut it out with a craft knife.
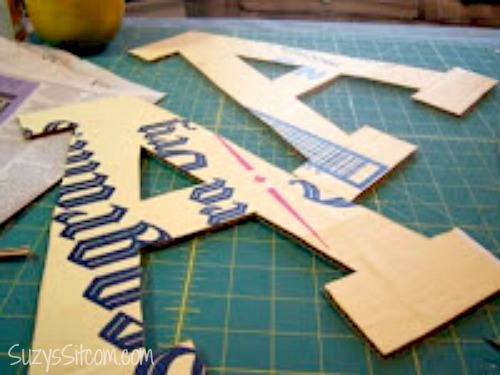
Flip your box over and using your cut out monogram, trace the letter again and cut out a second, matching piece.

Lay one piece down and start cutting 2″ wide sections of cardboard to create the sides. I started in the center, measuring the length and cutting the cardboard to match, gluing each section with hot glue. Once the center was done, I glued the front of the monogram to the back, matching the edges. This does not have to be entirely perfect as we will be using paper mache to clean up all the edges.

This is a unique gift. Love it.
Not sure if this mentioned in the comments, so many to read I didn’t have time. Anyway, if you all don’t already know, you can find the letters already made (without cutting out of cardboard boxes). I found mine at Joann’s & Michael’s, (if you have one in your area), also made of cardboard. They come in different sizes and are not expense. Much easier than trying to make the letters out of cardboard boxes and you don’t have to paper mache them. I made a giant “M” for my granddaughter in hues of pink (her favorite color) sprayed it pink and did different colors of pink for the quilling. It turned out beautiful and she loves it on her wall in her bedroom.
If you are not familiar with “quilling” look it up on the internet for free instructions……..it is very, very easy but takes patience as the (quilling) process is very slow. Hope is info was helpful………….Kathy
Love your felt flowers and all your projects.Will be making some of my own soon. THANKS for sharing!
Wow!! I just love the color combination..white color stand out well. beautiful piece!
Hi Kim,
If you wish to protect the paper, you can spray it with a light coat of clear UV protectant sealant. I don’t like to spray too much on it as it can weight the paper down and give it a plastic look. Use a matte finish rather than gloss to keep the paper look.
Hope that helps!
Hi Kim,
If you wish to protect the paper, you can spray it with a light coat of clear UV protectant sealant. I don’t like to spray too much on it as it can weight the paper down and give it a plastic look. Use a matte finish rather than gloss to keep the paper look.
Hope that helps!
Suzy, got a quick question for you. Did you spray your finished monogram w/ any type finishing spray after you finished? Like polyurethane, or something, to protect the quilling paper.
This wAs such an inspirational project! I found it through Pinterest and have just started quilling! I can’t wait to try this myself!
Love This! I Reposted to let my readers know! I wish I was this talented! http://www.thefrugalnavywife.com/2012/01/diy-quilled-paisley-monogram-tutorial/
Beautiful!
Wow. That's all I have to say.
You are just incredible. If you visit my blog you will see cardboard is my first choice for most of my projects and this is just too awesome. I saw the thumbnail and thought it was just another wooden letter but I should have known better 🙂 I have to feature you. You deserve an award for all these awesome tutorials and ideas!!
Insanely, amazingly, beautifully awesome. 🙂
Thanks for sharing and your tutorial is great!! Have you considered posting it on totallytutorials.blogspot.com?
Love,
The Creative muslimah @ http://www.thecreativemuslimah.blogspot.com
WOW !!! You Have A Gift !!!
very cool! Love it.
Hi!
Wanted you to know I posted a link to this tutorial today on my blog, PaperFriendly.
Nancy Ward
PaperFriendly
http://www.nancywardcrafts.com
This is absolutely beautiful. I found the link on Polly Want a Crafter. Thenk you.
Suzy, I don't think your old box could have had a better use. Gosh, your finished monogram looks like a MILLION bucks, 🙂 Well almost, ya know what I'm saying, surely worthy of being in any of those costly fashionable magazines.
I LOVE IT!!!!
I host a weekly party **Amaze me August** and would be SO HAPPY if you shared this with my readers. Not that they haven't seen it already Im sure, BUT you know I'm selfish, and just want it on my blog permanently, lol. Thanks so much.
Bella 🙂
I just found this post through House of Hepworth's & I must say that your monogram is absolutely gorgeous! I just may have to give this a try. Thanks for sharing!
that is beautiful, i have been wanting to try quilling. those letters are at hobby lobby or joanne's for really cheap if you don't want to make it next time. yours is a little more 3D though.
Just beautiful! Now I have a new craft to learn how to do!
I found your site through http://familyhomeeveningsmadeeasy.blogspot.com and I'm glad I did. Thanks for such a great tutorial with wonderful pictures!
Hi Suzy! You just can't get away from me, can you? This project was the #2 MOST POPULAR LINK from last Tuesday's Boardwalk Bragfest! Congratulations. Please stop by and take a look. Feel free to take the "Featured Boardwalker" button, as well; and thank you again for linking this great project!
Suzy! I love this! I featured it today. Feel free to come check it out and grab a button if you want.
http://whilehewasnapping.blogspot.com/2010/11/weekend-wander-3-features.html
Thanks,
Krista
oh my AMAZING! I love it! Not only did you make your own monogram (impressive) but that quilling is GORGEOUS! I love the paisley! I'll be featuring this on Topsy Turvy Tuesday's this week. Thanks for linking up!
wow-this is really beautiful-I've never seen anything like this-definitely will check quilling out-love the look!
This is simply A-MA-ZA-ZING!! It is totally beautiful! Thanks so much for linking up to our party on Polly Want a Crafter I wanted to let you know that I am going to feature this on 11/25 @ 12:30 pm during out DIY Gift Ideas week. I hope you get some new readers!
Cassity
I have to say that this is pretty cool! Love it!
Gorgeous. I love that you used what you had.
Hello, I came to your AMAZING blog through the link on all things paper blog!! WOW!!! Im just getting started with quilling,the letters are amazing! I hope you dont mind if I borrow a bit of your idea of quilling the letters. I will ofcourse give credit to you and they will be different,but you've given me the idea!!
Nicola.xx
Now that is a super fabulous monogram!! Love it!
Absolutely lovely- goergeous!! Lovely post and great tutorial!!
Wow! Amazing what cardstock and cardboard can do! You did an awesome job!
This is absolutely gorgeous!! And so super thrifty! I love it!!
this is so cool!!!!O.O
Each time I look at this, I'm so tickled. It's a beautiful piece of art made entirely from paper. You are so good!
Hey Suzy!
I'm featuring this as one of the Making It With Allie Features this week! Come on by and grab a button!
AllieMakes.Blogspot.com
wow this is gorgeous! Great job on the recycling! I love it!
Popping by from Boardwalk Bragfest!
That is amazing. I wouldn't have thought to make my own letter. The quilling looks so custom. Wonderful job.
This is absolutely stunning! I used to quill a bit when I was younger, but haven't done so in ages….What a wonderful, unique gift idea.
So glad you could Mi4M!
I never even of heard of quilling before! This is stunning!
So pretty! I have never heard of quilling until now! Thanks for the introduction =) I will definitely have to try it sometime. I love how you made something beautiful out of what most people consider trash (cardboard!).
ABSOLUTELY beautiful!!! I found your blog while blog hopping. I am now a follower. Would love for you to check out my blog and follow back!
That was very impressive, I might have to try this out when I find the time!
This is gorgeous! You are so talented!
It's absolutely gorgeous. I'm a new follower, and look forward to reading your quilling tutorials.
Thank you for sharing this beautiful project.
Just gorgeous.
Kelsie
Amazing! What a beautiful gift!
So beautiful!!!!
That is amazing! I can't believe that is from a cardboard box! The recipient is a very lucky person!
This is insanely gorgeous! Thanks for sharing!
You even made your own letter! Totally frugal. That quilling work you did is so lovely and intricate. The whole thing turned out great!
Look at you! That is awesome and what a great tutorial to boot!
What a gorgeous monogram. You're so talented. The 3-D effect from the quilling makes this so unique. I'd love for you to link this over at my 'Sweets This Week' Link Party
Just beautiful! Thanks so much for tutorial! Adding this to my crafting to do list!
Amazing, Suzi! You must have the patience of a saint. It's so beautiful.
Suzy, this is fabulous – I'd love to feature it!
This is a great tutorial! Seriously something I want to try. Thank you so much for sharing.
That is Freaking Fabulous! Excellent Job! Wow!
Thanks for linking up to Making It With Allie! I can't wait to see what you have for next week!
AllieMakes.Blogspot.com
Not only is your talent obvious, but if I were one of your friends and a recipient, I would be honored that you took that amount of time to make me something!!
I never could get a neat quill going. That is just beautiful.
I LOVE quilling. how beautiful!
This is beautiful! I love it.
This is amazing! I just featured it and you on my blog. Come get a featured button from my buttons page:) http://answerischocolate.blogspot.com/2010/10/giving-thanks.html
I this is beautiful. I haven't done any quilling….not sure I would have the patience!
Turned out great!
Oh my goodness, I love it! I just started quilling, but I totally want to try this!
That came out great – and it looks expensive. Good job!!
That is absolutely stunning! I'm always so jealous of people who have mastered quilling. Great project!
Wow that is very impressive! A lot of work goes into those gifts. Nice job!