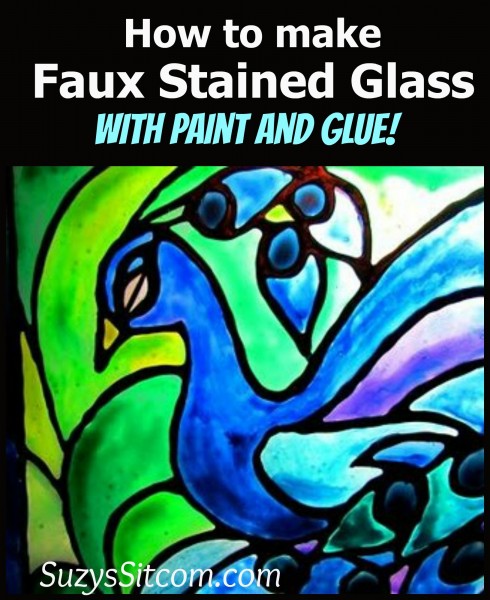
How to make Faux Stained Glass with Acrylic Paint and Glue
Love new innovative craft ideas? I found a way to create faux stained glass using only acrylic paint and glue!
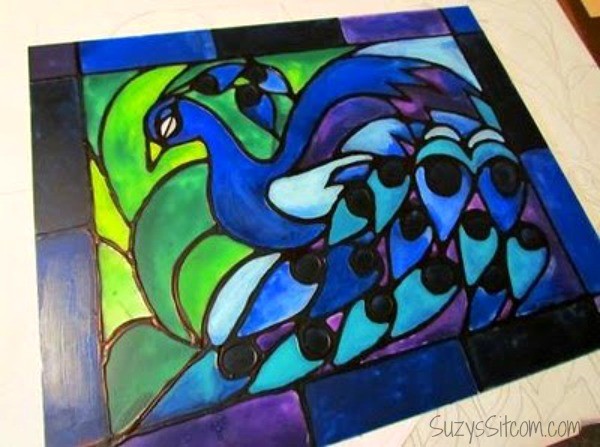
This easy stained glass project is even more fun with a good pattern. One of my specialties is creating unique patterns like the Majestic Peacock Pattern used in this tutorial.
This project is relatively child friendly and a page from a coloring book can be used for your pattern along with an 8×10 photo frame. Or, you can use a large sheet of glass and draw out a detailed pattern.
Your choice.

These stained glass projects were made by one of my readers using coloring book pages!
Want to know how to make Faux Stained Glass?
Faux Stained Glass Peacock
This post contains affiliate links to Amazon.
For this project I used:
- One framed picture covered with glass
- One bottle of white glue
- One bottle of clear glue
- Acrylic paints
- Black Sharpie pen
- Craft Blade
- Super Glue
- Peacock pattern (or page from a coloring book)
- Clear acrylic spray sealant

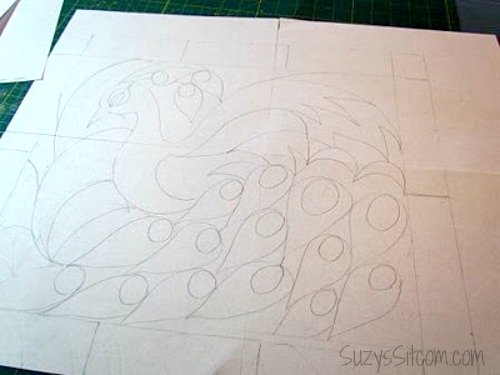
Start by enlarging your pattern in the same size as your sheet of glass.
I love the color blue and lately, I have been drawing peacocks. Why? I have no idea, but they are being incorporated in several projects this month.
I checked the Chinese calendar to see if maybe this was the year of the peacock, and it turned out to be the year of the rabbit. So apparently, I’m just kinda weird. But peacock it is.
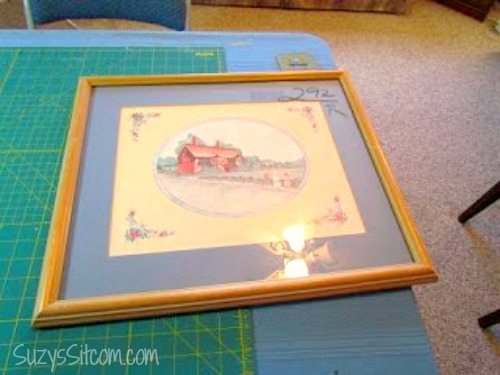
I took my thrift store find apart, and set aside the frame for later. Spray the glass with clear acrylic spray. This is important as it gives the paint and glue something to adhere to.
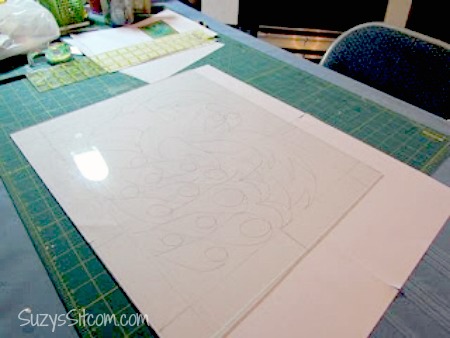
Lay the sheet of glass over the pattern.

How to make the leading!
Take the bottle of white glue and dump just a small bit out so that there is room to add color to it. Add about a teaspoon of black acrylic paint and stir it with a wooden dowel. Add enough black paint to make a solid color. You will be surprised, but it doesn’t take a ton of paint to change your white glue to black. Then put the glue nozzle back on. The glue is now ready for the next step.

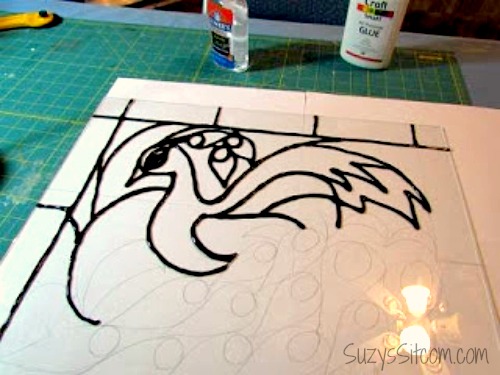
Carefully squeeze the glue onto the glass, following the lines of your pattern. Try not to have shaky hand syndrome like I do, but even if you do, it can be fixed.
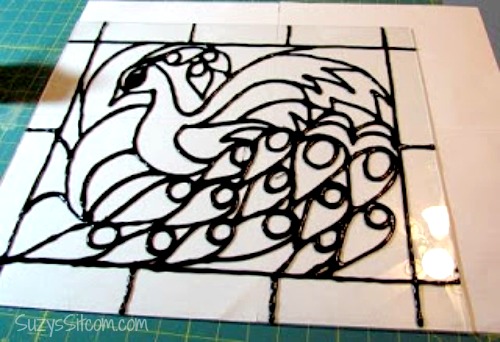
Once all of the lines have been drawn in, allow it to sit overnight to dry completely.
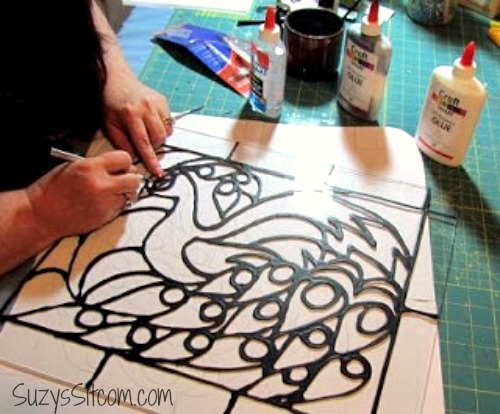
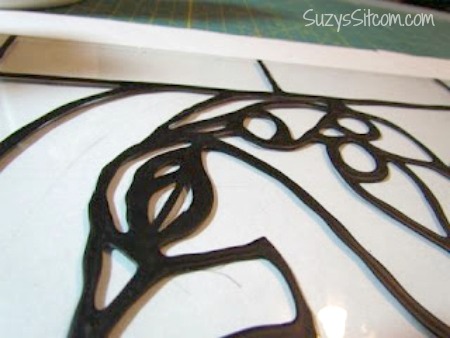
Once it is dry, you can go over it with a craft blade and correct any shaky lines or errors.
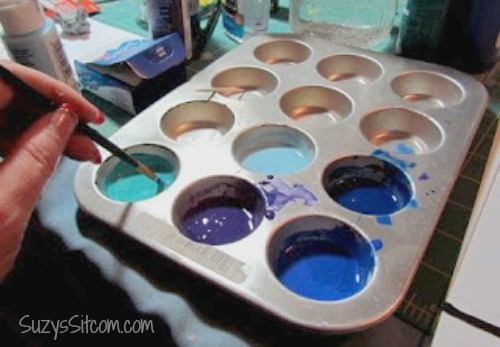
Adding color to your Faux Stained Glass project:
For the next step, use a small muffin tin to mix up your colors. Use about a tablespoon of clear glue to one or two drops of acrylic paint. You will be surprised at how easy it is to add pigment to clear glue.

Use a blunt paintbrush and add your colors where you want them. Put it on thickly and be sure to get your colored glue all the way up to the edges of the black lines. Take your time and if you see any air bubbles in the glue, use a toothpick to pop them.
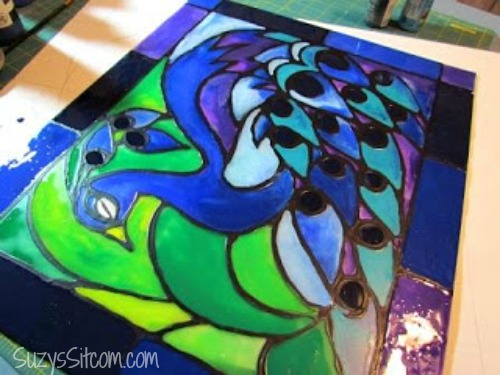
For a variegated marbled look, add a color to each side of a section and push them together with your brush, mixing them in the middle. Allow the entire project to dry overnight.

The final step is to do some touch-up with the sharpie pen on the leading where paint may be overlapped. If you are neat to begin with, you might be able to skip this step. I’m not neat. So my friend, the sharpie, was put to use.
I painted the frame a deep blue and re-framed the glass. This can sit in a windowsill where the sunlight can shine through, or you can hang it on a wall. Either way, it turns out pretty decent and costs just pennies. And looks just as good as those expensive stained glass paints that you can buy at the craft store. Edited: One suggestion for this project is to finish it with a coat of clear acrylic spray sealant in order to protect it.
Here is a beautiful piece done by artist Jennifer Stoehner using this very technique of faux stained glass. She has allowed me to share it here:
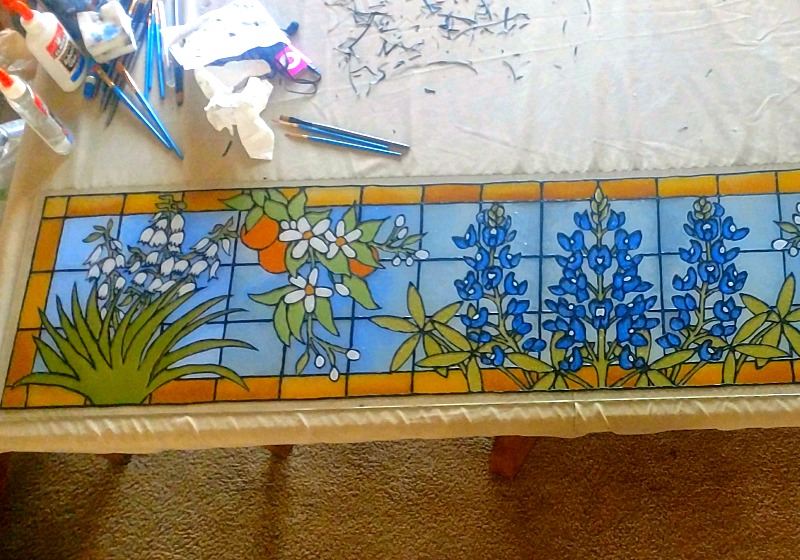
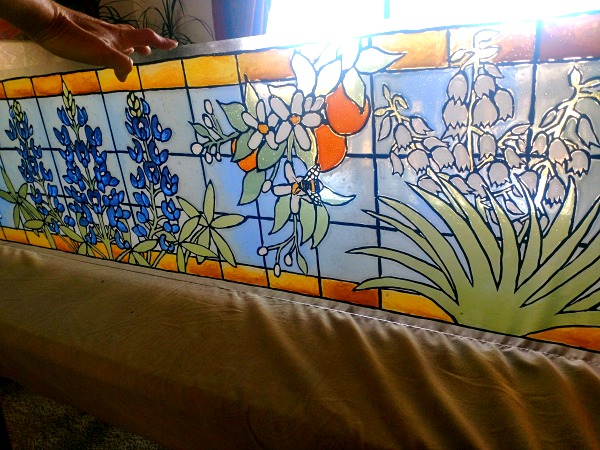
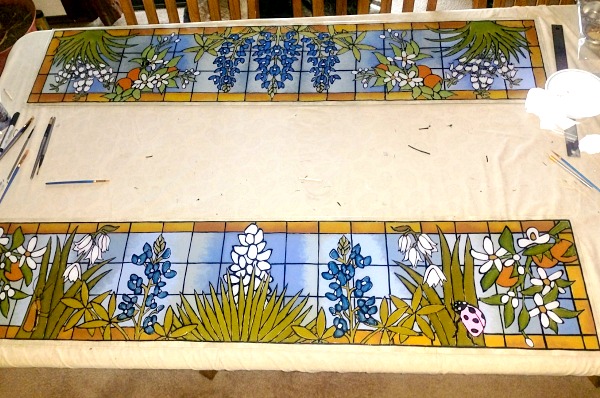
Jennifer says that the blue bonnets, orange blossoms and yuccas are the state flowers of where her client’s family was born. The bee and the lady bug represent her nephew who was killed in a plane crash a few months ago because he loved bugs. And the caddis represents her brother-in-law who was also in the plane crash.
You can find more of Jennifer’s beautiful work on her website.
Love to Craft?
 You might also enjoy my 7 DIY Suncatchers post and my Sitcom Handmade Gift Guide with tons of free and original craft ideas!
Are you new to the Sitcom? Be sure to check out my Frequently Asked Questions Page!
For over 200 crafty tutorials for all ages, visit my Tutorial Page!
Do you have to wait over night for The stencil to dry?
Attended a craft class many years ago which had several projects titled “ tinsel art” . We did artwork on glass with stain glass paint and when finished crumbled up tin foil, then flattened it and placed behind the artwork in a frame. The light reflected back through the stain glass and made it much nicer hung on s wall.
Your windows will come out it you want to go through the trouble . I use to remove mine twice a year to clean them
Hi Shari,
For this particular technique, the project has to be perfectly flat until it is dry. If you can remove the window to work on it, then this is a possibility. However, if you cannot, then I would suggest using glass paints and leading that you can find in a local craft store. Hope that helps.
suzy
Wish I could edit. I meant a real glass window in its frame doing its job of holding out the weather.
Can this process be done to a window, a real window in the window? How would you do it or can it be done?
Hi Norene,
Since the paint is used just for the color, I think tempera paint would work just fine with this project. Hope that helps!
suzy
Just out of curiosity, can tempera paint be used instead of acrylic?
You could certainly try it! Let me know if it works better than the glue bottle.
suzy
Could I put the glue mixture in a cake decorating bag with a small writing tip to get a smaller outline than the glue bottle makes?
Hi Donna,
I’m sorry that you are having trouble with it. I’m thinking maybe too much paint in the glue, or not mixed well enough. As for thinning the lines, I did have to do that in areas of mine. I used a craft knife. It’s an easy fix.
Would love to see what you come up with!
suzy
I found that adding the black to the white Elmer’s glue worked ok but squeezing it out from the glue bottle was a disaster. Sure doesn’t look anything like the example. I am going to have to thin out the lines and use a Sharpie to fill in some of the white or grey glue that came through. It would have been so much easier if I had used a waterproof felt. Maybe dipping the felt in glue as I went! Will see what happens tomorrow when it is dry but right now arghhhhh!
Hi Anna!
My advice for an installed window would be to go the route of true glass paints. You can also find the “leading” in strips that you can easily cut to what you would like. Trying to do this particular project on upright glass would just be unsuccessful. The pattern itself can be used with any project.
Hope that helps!
suzy
Do you have any advice for doing this on a previously installed window? I have a window in my house i would love to do but am not sure how to since the window is upright and not laying flat.
Yes, I did make two. The first one really came out bad, you are right, it takes practice. I left it on the dryer in the laundry room and my husband told me it slid off and broke. I wasn’t too upset, because it was ugly. I tried a second one, and it came out pretty nice. I can still see room for improvement, especially on the outlines, but I look forward to making more. I got lots of patterns online on pinterest, just by searching stained glass for beginners.
Somewhere, I saw a website that used Mod Podge clear gloss and coloured it with food colouring for a transparent finish. The suggestion was to spray it with a UV acrylic sealer, to resist fading.
Will this stained glass hold up outside in my garden?
I’ve had mine dry with a few bubbles, but not many. Most bubbles can be popped when the paint is still wet to avoid having them after they have dried. I try to stir my paint and glue gently and then add on the paint thickly to the glass without brushing it on. That seems to help. Once the piece is dry, you could certainly try adding more paint and glue to try to cover up bubbles.
Hope that helps.
Suzy
Mine dried with bubbles. How can I fix it?
Hi!
I completed mine about 3 years ago and it has been sitting in the window. None of the colors have faded so far. Hope that helps!
suzy
Hi all y’all,
Does anyone know if this will fade in the sun over time?
HI Jennifer,
That should work just fine! Would love to see what you come up with!
suzy
Hi there! I am doing this project and absolutely love your idea! As I was ordering materials, I did not realize that you had the exact acrylic sealer you used. I purchased an acrylic coating uv resistant clear by Krylon. It says on the back that it is good for glass. Do you think this will work and be ok or should I return? I have the glass outside all ready to spray. Thanks!
Hi Carson!
The super glue is simply to put the frame back on. It is not a necessity. Would love to see what you come up with!
suzy
I’m going to be starting on this in a couple of days and I don’t see where the Super Glue comes into play. I read it twice and still don’t see where to use it. I know I’m missing something, but where?
Hi Suzy, Thanks for your fantastic idea. Iam planning to do it at my balcony glass window. But I didn’t understand one thing that you explained. “For a variegated marbled look, add a color to each side of a section and push them together with your brush, mixing them in the middle” Could you please explain me how to do this method in my balcony window. Thank you.
Jey
Suzy you are fantastic so glad I found your site.
I will pray for my poor husband, because I could see me making HUNDREDS of these in different patterns. This looks like so much fun!
Elmer’s School glue or Elmer’s Glue-All goes on white and dries clear. Truly!
Hi I work in a carehome and have been gathering material buttons and glass beads together to make a peacock collage, any peacock photos would be very useful I was thinking tail at the bottom so I could use the heavier glass beads at the bottom many thanks Joan Raine
I forgot to mention, back then Gallery Glass didn’t sell pre-made “leading” that sticks to the window. Making my own leading strips with the G.G. paint was really hard on my hands and turned out irregular in width. Next time I’ll use the pre-made leading!
– Gaye
I also used Gallery Glass on a large window. In my case it was a window in my kitchen between rooms where there had been an add on. (I love those!) I didn’t want the other room to be quite as visible. I made my Gallery Glass window nearly 20 years ago and it still looks new! Everyone who comes in the kitchen thinks it is really stained glass. When I tell them it’s paint they can’t believe it. I really want to try using the glue and paint idea too! I’d love to “borrow” some neighbor kids and give it a try. It looks really pretty.
I actually have a stain glass piece that was given to me, but has no color…which side should I paint on. Right now it is totally see throught except for some panels which are frosted, so I want to do the center area in color….Thanks.
Hi Karen!
Yes, I believe that would work. The main reason for the sealer is to give the paint something to adhere to on the glass. Try using it and verify that it will not peel off the glass when dry. If not, it would be fine!
suzy
Hi!
Love your faux stained glass method! I’m wondering if it works to use Mod Podge water based sealer instead of the spray-on acrylic sealer:
https://www.amazon.ca/dp/B000HWY6EC/ref=pd_luc_rh_bxgy_01_02_t_img_lh?_encoding=UTF8&psc=1
Thank you!!
Karen
Hi Kate – I have a lot of pictures of peacocks that I have taken. We have about 100 peacocks in our neighborhood and I take my Grandson for walks twice a day and take pictures. Would you like me to send you some. I don’t mind sharing.
I kept getting bubbles and I couldn’t my colors to blend well. I was trying to “repair” a paint fo paw and I found the glue actually will peel off !! (Like a facial mask) I then fixed my color and let dry an extra day before spraying (last step)
I did mine on an old window, the glass was out so I cleaned it best I could then like you laid on counter and painted. After drying I then replaced the window in a freshly painted window frame. I actually put one other pane in and painted it also looks great!
I found clear glue at local Walmart, but amazon also carries it.
Ok so been carrying this around for long time, finally made my project, a bit different than yours I used an old window. Is there a way to send you pics or post? I had a problem with the glue in first step actually being black towards a charcoal grey. Thank
I found clear glue at Walmart
Anywhere glue guns are sold should sell the clear glue sticks. They appear opaque but when heated, the glue is clear.
Thank u so much for the tip about the importance of using a glossy sealant instead of flat or matte. I would not have realized what would have happened if I had used a non-glossy sealant, and I would have most-likely ruined my faux stained glass project. Thank you again!????
Has anyone tried Modge Podge in lieu of the clear glue? I can’t find clear glue anywhere near me. I’ve tried over 10 stores. White glue I have, but no clear. I know from working with it that MP dries clear. Thanks for your help! I am excited to try this!
If you use only acrylic paint without the gel, not only will it be less transparent, but it will flake very easily. The glue gives it a bit of glassy appearance, and also allows your painting to be moved. If you used only the paint, when you tried to peel it off of the glass, you would only get the outline or “lead”.
It is important to do the “lead” outline first because …
1. When you put the paint mixed with gel into the spaces, it will pool in the Wells caused by the “lead”. You are going to want to use more paint in the area than you normally would use for a painting. It works best to let the Leda completely dry. I usually wait 2 days. Then I dip a brush in my colored gel, and let it drip I not the Wells, right inexpensive Center of them. This allows the color time completely fill the space, and produces less bubbles. The more you move your brush around in the space, the more air accumulates between the bristles of your brush. That air in the bristles, in turn, causes more bubbles.
2. After drying, and fixing any mistakes with the sharpie, when you turn the glass over, you will have a clear black outline. If you did the coloring first, you would just see colors with a shading of black behind it. Where it would be beautiful on one side, it would be a swirly goofy mess on the other.
Hope that clears it up for you???
You mix the black paint straight into the glue bottle. Then you just use the glue bottle lid as your piping tip.
Hope this helps clear things up???
As they said before, it will come right off of glass with a paint scraper or razor blade. If you use the scraper and peel slowly, it will come off in one piece (if you painted your color in thickly enough). If you would like to move it to another piece of glass or window, do this…
Clean the window thoroughly, and dry with a lint free towel.
After completely dry, spray the area with a fine layer of the sealant again.
Wait about 5 minutes so that the sealant is still slightly tacky, but not completely dry.
Starting at the top of your peeled painting, press the edge to the area. Press to remove any air bubbles. Gently rolling your painting towards the bottom, work slowly enough that you can remove the air bubbles.
Once you have pressed your painting in place, if you find an air bubble… you can prickly it with a straight pin, and press the air out that way.
After you are satisfied with its placement, give it a light mist of the sealant one last time. Allow to dry.
This worked for me, and i loved what I ended up with. Another smaller painting I tried to move… I left an air bubble. I tried to peel it off quickly and reposition it. Big Mistake. The sealant on the window was almost dry, and after I peeled and moved my painting, I ended up with an icky mess of glue strings everywhere. It ruined the little painting, and I ended up having to redo the entire thing over again. Just make sure that you place it Exactly where you wanted it, or wait a couple of days before you try to move it again.
Hope this helps???
If your acrylics are thick and you wish to thin them… Just add a few drops of water at a time, mixing in between additions, until you get the consistency you desire.
The reason she says to use the white glue for the “pewter”, is because it will dry opaque. This gives the same effect as a real pewter would have. The reason she tells you to use the gel glue is because it appears see through while you are working with it. Another reason for using the gel is that you will not have to wait for it to dry completely before you can see any mistakes you might have made. This gives you time to fix the mistakes before it dries and it is too late.
Acrylic paint and Elmer’s glue are water based, so they are compatible. They can be heated. I would not apply the heat to the spray sealant as it contains flammable propellants. Let those dry for about 10 minutes between coats, and at least 2 hours to overnight for the sealant to dry. Always use at least two coats on your project to seal it completely. Also, make sure that you buy the the glossy sealant and not the matter or satin for the stained glass projects, or you will have a dull looking finish.
I hope I helped??
Hi Jen!
I would not recommend this particular technique for actual windows. First of all, the project needs to lay flat while creating. Also, the paint and glue needs to be properly sealed. I can say that mine are still fine, but for an actual window I would recommend glass paints.
suzy
Has anyone tried this technique on actual windows. I want to create my own stain glass windows without paying a fortune.
Your hardwear store [home depot] has your acyrlic spray sealant .
I have tried to do this project (because it’s so cool, thanks for sharing!) but I always get bubbles in the glue/paint! I pop the ones I see until it dries, but the next morning, there are bubbles. I followed your instructions exactly in making the mix and even let it sit overnight. Is there any way I can avoid the bubbles? Thanks!
Hi!
Thank you so much for sharing your experience! I’m so glad that you and your mom had some great quality time together. And the most important part was that you had fun! Give her a big hug for me!
suzy
I pinned this tutorial sometime ago. My mother has dementia now so I was looking for something easy for her. She has never liked crafts. I traced a Dolphin & thought maybe we can do it. Together we worked on it. Our first try not the best colors but my mom had fun. Thanks
I would love that one too!!
I used a product called gallery glass to do a large project o a lounge room window. It was very successful and if I get sick of it, it should peal off. I am told t if you are very careful you in removing your work it can be transferred to another piece f glass. Work done on clear Perspex, on the other hand is almost impossible to move without destroying your painting and damaging the surface of the Perspex. If you would like to see a photo send me an email address and I will send you one. ( I will try to post one on Pintest
Good painting,
Richard Court.
Do you have a pattern that you would share for the large peacock? I really love that one.
I have used the Liquid Stained Glass with much success and this looks just like it. So the frugal side of me will try this asap. Thank you for the How To on this project.
Hi Randy!
Yes, gray would work. I like the stark contrast of the black, though. Thanks so much for the suggestion!
suzy
Susan I’m not trying to step on your toes because this is an incredible project but when mixing your glue and black paint (or food coloring ) together wouldn’t you want to try and get more of a gray color as to match more closely to solder or lead like true stain glass looks like….like I said it’s just a thought
You could always use a piece of glass just a 1/16TH inch smaller ( top and bottom ) then the original glass in the window frames then do you stain glass work and when you’re finished you can then take that piece of glass and put it in the window frame over the original glass and then use the caulking to seal the two pieces together
Hi Suzy
I am a primary level art teacher from New Zealand. I am teaching a series on animals in art. At the same time I am gradually putting together a curriculum to (hopefully) sell online. One of the lessons will be about peacocks. I prefer to ask before I use images I find online so I was wondering I you would mind if I used one of the images from your website.
I would attribute it to you and link the picture to your site.
Kind regards
Kate Dunn
What a beautiful project! I want to try this! Thanks for sharing with #HomeMattersParty
You can also use hot glue gun with medium heat and paint over with a marker. White glue dries clear and I love to use food coloring. With all the windows over the doors you could make them seasonal if you use acrylic (like poinsettias) If you don’t have windows go to the hobby stores and get glass bricks with the hole in one end and just put in clear Christmas lights! Don’t forget . Clear shelf liner makes a beautiful acid etch window!
This is just amazing! My daughter would probably love to try this during summer vacation, so thanks for sharing. 🙂
Thank you for your email sharing the templates etc they are much appreciated
Can also get small squirt bottles from the beautician hair supply store.
Hi Gena,
I would consider cutting some plexiglass the same size as your windows. Create your stained glass on the plexiglass and then use tacky adhesive to place in your windows. A house that old- I’d be afraid of messing with the beautiful antique glass. Hope that helps!
suzy
Hi Emily!
Great ideas! Thank you so much for commenting!
suzy
That is a great idea!
suzy
Perhaps have a piece of glass or clear plastic cut to match the glass in the window, do the Faux Stained Glass on that, then tack it to the existing window? You would be able to work on a flat surface, and the Stained Glass piece would be removable if you wanted to change it out.
Hi.
I know this might sound really cheap, but I dilute my lead stimulant with water so I can dab it on with a brush for more detailed work. I don’t use the stained glass paint, I found that glue mixed with water and food coloring works just as good. It’s a fraction of the price and dries hard.
Suzy,
We live in a big 2 story home that is 116 years old. I have wanted to do a stain glass in this house since we bought it 2 years ago. They are the old rope and pulley windows where i want to do this project. My problem is that they don’t come out. What would be the best way to do this when u don’t have a flat surface? What about a very thin bead of caulking followed up by covering that with black paint. I know would definitely take longer but just throwing that out there.
Thanks,
GENA
Hi Lori!
I have not tried white glue, but it might work well too. I would imagine that it would be more opaque. A different look. If you try it, I’d love to see what you come up with!
suzy
Hi Suzy,
Have you tried Elmer’s white glue instead the clear? I’m curious about the results? I love this project and I am having my class make Christmas presents with it.
Lori
Hi Renee!
The candle votive was created by my friend Amanda from Crafts by Amanda. The link to her project is right below the photo. The process to create that votive is not the same. She used glass paints.
You can try lead paint from a bottle if you would like. I think it would look great! I wouldn’t add anything to the lead paint. You want it to remain thick.
This project was meant to create the look of stained glass with minimal spending. I like to create from next to nothing. So, all in all, I’d say it turned out just the way I wanted! 🙂 If you decide to make one, would love to see what you come up with!
suzy
I love both of these! They are really beautiful, yet with practice would be easy to make.
I read the articles, and I had a couple questions…
The one has heat… so I assume the paints in the bottles are heat safe. Would the paints that are mixed with the glue, with the sprayed top coat be heat safe?
The lead paint from the bottle..would it look nice used on the peacock picture?
You had said the paint in the bottles were kindof ‘thick’…is there something you can add to that paint like you did the first one?
What would you do differently now that it’s all over?
Any of these questions you answer would be awesome! Thank you!
This was great! I can’t wait to try. (and I love peacocks, too.)
It seems like it would drip it you did with with the mirrors on the wall. How did it turn out?
Hi!
I believe it work work well on a glass alternative. Would love to see what you come up with!
suzy
Absolutely love this idea, would love to do this with a class of children and wondering could I use perspex as a glass alternative? Would the acrylic/glue mix stick to it the same.. Thanks
I’m sure you could. The results would be different, but it is a viable option!
Couldn’t you use black puff paint (taping the end so that it is very narrow) to achieve the same effect?
I’m wondering if this would come off of glass? I have a glass door at work and would love to try this. Thanks,
Jocelyn
I have been painting with stainglass paints for years I love this and it’s fun and Relaxing
I’ve sold nearly all my windows
A paint scraper will let you take off the paint without damaging the glass.
Having gotten over the peacock WOW factor, I began to giggle as I read the ‘How to’s’. What gorgeous, glorious fun to be able to create a masterpiece.
So inspired, I’m off to buy some glass, as big as I can get it and I’ll endeavour to get it home without breaking it. Short of losing my faith in myself, you might find me on a nature strip somewhere gluing and painting my ‘Stained Glass’ window.
I loved this article Suzy.
I did, basically, the same thing on the covers of florescent lights in my kitchen!! Love the look, but of course, I just did around the sides as we needed the light LOL
it is a nice art wok form .the question is whether it can stand against the sun light .what is the life of this art work. thanks ds.pancholi a stained glass lover Baroda -Gujarat – India
I loved your peacock
I have a question I live in a home for 15 years and there is 2 huge 4 1/2 feet by 4 ft mirrors on wall in livingroom they are not coming off
They are in diamond shape and there is a diamond shape in each corner edged off I have been wanting to do something on them forever and and after seeing u using the glue with Acyrlic paint it looks awesome and maybe I could try it
My question is I don’t want it to be on there forever I get bored with things so I want to be able to take it off in future and change perhaps so can you give me these answers
Thank you
Hi Belinda!
It does take practice. I found that if I put lots of paint/glue mixture on my brush and dabbed on the color thickly, it turned out the best. Would love to see what you come up with!
suzy
Very easy! I love how it turned out but when I put it outside with the light shining through there are a lot of areas where the paint is very thin. I think I will paint the backside also. I would show you a pic but I haven’t figured out how to post it.
Thank you sooo much for you quick response and your help 🙂
Hi Della,
I think it would work fine with acrylic plastic! Just be sure to add a light coating of clear acrylic spray first so that the paint has something to stick to. Would love to see what you come up with!
suzy
Hi, love your tutorial. I was wondering if it would be possible to use this technique on acrylic plastic? I have a project in mind with acrylic plastic but need the paint to be see through for the lighting underneath. Thanks in advance! Della Hall
This is gorgeous! Saw it on Wonderful Wednesday and I can’t wait to try it.
Oh my! This is genius! Just simple craft supplies but the results look amazing! Pinning this for later. Thanks for sharing on Something To Talk About link party! Hope to see you again next Monday!
Hi Pat!
Wow! That sounds like a fabulous idea! Would love to see what you come up with!
suzy
Love this idea. We have a couple of skylights, and in the summer the heat coming through is intense. I’m going to put UV film over the skylight to filter out some of that heat, but I knew that wouldn’t be attractive. With this idea, I plan to custom make a frame to fit the skylight opening and have a piece of glass cut to fit the frame. (This can be done at a glass shop or some hardware stores). I’ll find a design that goes with my French Country decor, or perhaps just match a piece of abstract art glass that I’ve framed and put in my kitchen window. This will handle the heat issue, retain light and cover up the less attractive UV film. Thank you.
I’m so glad it worked out! Would love to see what they came up with!
suzy
Hello! Sorry to take so long writing back. I didn’t want to leave a complaint on your blog. I think I found the answer. So we could start over, I soaked the glasses in water and the paint came right off. Then we started over with new school glue and new paints. I think part of the problem was old supplies. It also helped when you said to use a bigger brush and drop the paint on. We were using smaller brushes and dab, dabbing. The new finished projects are nice and students happy and they are proud to show them off.
Hi!
I’m so sorry you are having troubles. I haven’t had anyone complain about this type of problem with this project before. Are you using school glue and acrylic paint? Keep in mind that this particular project is meant as a substitution for glass paints. It will not give the same effect of glass paints, but is definitely cheaper to do.
Be sure to mix the paint and glue well and use a large paint brush to “drop” the colors into the areas with the “leading”.
Hope that helps!
suzy
I love your project. The problem is the ones I did for my art class came out smeary! I would never hang them in the window because they would show these problems even more. First, maybe the glue and the paint has to be very fresh and new? And how runny is yours and how thick is your mixture? Also, do you ever go back and retouch something or is that a no-no? Thanks.
Hi there,
My question is when you do the piping how do you do that part? Do you put it in something to pipe?
Thanks,
Shauna
Hi Charmaine!
Thank you so much for your kind words! Would love to see what you come up with!
suzy
WOW!!! Thank you so much I always wanted to do stained glass but was so afraid of glass cutting as well as using lead. For many years I researched it but was always hesitant to do it but seeing you do this with easy materials and no glass cutting I feel I can attempt this easy project. Thank you thank you thank you, I am so appreciative of your tutorial, now I’m have the self confidence to do this!!!!
Suzy, I see none of my photo’s showed up on my comment. If you need them just let me know. I can email them to you.
That would definitely work! Would love to see what you come up with!
suzy
Beautiful effect!
I made a trip to the art supply store to the purchase acyrlic spray sealant you recomended. Wasn’t able to find any that act as a primer, but the sealant as a top coat. Is that what you used as your primer on the surface? Just a clear spary sealant? Thanks!
Hi Lisa!
Thank you for your kind words! Regarding your question, I would say that plastic is easier to work with simply because it is lighter and will not break. Be sure to spray it lightly with clear primer first so that the paint adheres. Would love to see what you come up with!
suzy
I just have to tell how beautiful I thought this was and the picture with it lit …WOW…..Every xmas instead of purchasing presents I make them – and I was looking for something different to try this year and I think I am going to try this ! Wish me luck – because I do have shaky hands sometimes – but I think I should do fine just taking my time and going thru with a craft knife after it dries for any screw ups I do. Your instructions were very clear ! I see you said this works with glass or plastic …..do you know if one or the other is easier to work on?
Suzy;
love this idea, wanted to try and find something to cover up some windows, as we live on a corner lot and people walking by and driving by can see into our bedroom and bath. Was looking into the decorative window film, but found your site.
One Question — Should we get tired of looking at a design I put onto the glass windows, will the design peel off, so I could try something else? Or will it stay permanently on the glass?
Being as we rent and not our own home, I don’t want to put something on the windows that won’t come off should we tire of it or when the time should come for us to move.
Thanks for answering my question!
looking great…. I also like, the cookie sheet metal tile idea too ! 🙂
Great idea, using paint with the glue! I have done this before, mixing food coloring into the glue. It gives the same effect, but your color choices are much more limited. For the black, I used black puff paint instead of glue and paint, and that works really well for the outlines.
Hey Suzy I have a stained glass window hanging that is faded and I want to freshen the colors. Would I add the clear glue to the acrylic paint? The black outline looks ok. Thanks for this info! I am fascinated!
Elmer’s is a popular brand of white glue.
Awesome! I was bored while waiting for my walls to dry (just started painting them for the summer), so I decided to check for something else to do to kill the time. Well, I came across this site and faux stained glass process and thought it would be perfect, since I had old glass frames just sitting around. Almost threw them out last week even! Thanks for doing this, and adding pictures along the way. About to try one now, making a mermaid one for my little sister. Hope it turns out!
Some call it “school glue”. You can find it in any Wal-mart, craft store, grocery store. It is widely available. Hope that helps! Suzy
What is white glue & where to find it?
What is clear glue & where to find it
It is a glue and acrylic paint mix, so once dry and coated with clear acrylic sealant, water shouldn’t bother it. However, I wouldn’t recommend keeping it under water or outside in the rain.
suzy
hey i was wonering if it got wet would it get destroyed
Great idea and a very pretty result. Thanks for sharing this! One question: is there a particular reason to do the black ‘lead’ first and the ‘glass’ afterwards? If you did it the other way around, would it not be easier to avoid gaps or overlap, and avoid the sharpie touch-up step?
I have made actual stained glass and loved the process as well as the results but there are many problems. Not the least of the problems is the amount of space required to work and for storage – glass, lead came, solder, tools, etc.
I love this simulation and pinned it for later, and to share.
Hi Erica! The clear glue gives the acrylic paint some transparency. Without it, the light can shine through, but not with a look of stained glass.
The stained glass looks great! Just some questions..
Do I need to mix the clear glue with acrylic paint? Can i know what is that for? And if I only use acrylic paint to paint, can the sunlight pass through?
Hi Lena!
I am not sure. I would assume that the UK has clear school glue. It may not be Elmers brand, but it would be similar. If you cannot locate it, you can always order some from Amazon over the web. Hope that helps!
can you tell me if I can get the clear school glue in the uk
thanks Lena
OMG this project is SO COOL!!!!!! I want to start it right away!!!
P.S love the peacock! You are really talented.
Hi Chelsea!
Nope, just one side. If you want a marbled look, put one color on one side of the space you are working on, and another color on the other side of the space. Use a toothpick to blend the colors where they meet.
Hope that helps!
Hey! I think this is awesome and I’m definitely going to try it! Just one question though, do you paint both sides of the glass to get the marbled look?
Thanks,
Chelsea
This technique has been around for sometime, but nonetheless is always a pleasure to see 🙂 Thank you for reminding me of it once again!! 🙂
How does it hold up to prolonged sunlight? Do the colors fade?
Hi Brittany,
I’m not sure how the glue/paint combo will hold up under extreme heat. One suggestion would be to use a battery operated candle light in place of a candle. It gives the same look with no heat.
Would love to see your finished project!
I was wondering, if i used this method with the glue and paint and used it on candle holders will the warmth of the candle melt the glue/paint? If so what do you suppose I could do to avoid melting? Thank you
Thank you for your kind words! In answer to your question, I piped the black on with the glue bottle. The tip is perfect for lines!
Another great tutorial although I’m pretty sure mine would be a mess of shakey sqiggles & mixed up paint!! May I ask, what did you use to pipe black on? Thank you! Great peacock, lovely colour combos 🙂
Love this!! Are you on fb? Would love to post pix of my projects!!
Hi Lynn!
For an outdoor project, I would recommend using regular faux stained glass paint. You can find it at most craft stores. It is more durable and can handle changes in temperature. If you decide to make one of my designs, I would love to see it!!
I love your faux stained glass project. Would there be a version that would withstand being outdoors? I don’t know if oil based paint would mix with glue. Thanks!
I have tried this : mix the white glue with black enamel paint instead of acrylic paint for the outline (the blackline). And the result is good. Unfortunately I do not have the picture.
Oh that and glue strings! Ha! Someone else mentioned trying black puffy paint.
@ Christy, I have tried this idea, a glue gun with black glue. At first It might work, but since holding the gun vertically is very tiring (making my hand trembles), then the results became erratic : looks like it is the work of a kid aged 3 or 4 years old 😀
(sorry for my bad English)
i have a project for history and i have to make stained glass and helpful ideas?? the project thyme is medevil time stained glass.
love your idea and creativity! but most of all i love your disclaimer of the chi with pms AND terrible bad breath! that made me laugh so hard!
Thanks for the tip to do stained glass painting, I have done this before but never used the paint combination with the glue as you suggested, great idea! Thanks again!
Fantastic tutorial. Thank you for taking the time to put it online!
you mention “clear glue”. What brand do you use…or do you recommend?
We are in love with your project! For our homeschool art class we used plastic sheets instead of glass (safety reasons). These also allow the images to easily hang from our school window with water surface tension.
http://www.thebestkidscrafts.com/faux-stained-glass.html
Hey Suzy,
Thanks for the reply and for the suggestions! I’ll certainly put them to good use. The final size of the pieces is going to be 18″ x 24″.
Hi Felicia! I just love the idea of the Disney Princesses depicting the seven deadly sins. Your artwork is wonderful! One note, when using the glue technique, you will find that in the initial “leading” phase that sometimes your lines will run together especially in highly detailed areas. Your drawings are very detailed. The use of a craft knife should easily clean up your lines once they are dried. Keep in mind that at the leading phase, the project is fragile. The lines can easily be cleaned up and the excess removed, but lines that you want to remain may want to come up too. Just work carefully with the craft knife, and you shouldn’t have a problem.
Would love to see your finished works! What size will each of them be finished?
I am a Graphic Design major (with an English minor) at a college in my state and in order to graduate we have to do a show and present some artwork we created. Well, what I wanted to do was to create a series of artwork with Disney Princesses depicting the Seven Deadly Sins, and I thought in order to make it look really nice I’d make it look like Stained Glass. Now, I thought to myself “How can I make stained glass without the hassle of breaking up shards of glass and hurting myself?” so I googled it and found this, and I must say, this seems like a great plan! Looking at your final peacock really helped me to decide to try this out. I got all my supplies (I have an acrylic glass that I got from Hobby Lobby, it looks like regular glass but it isn’t as fragile) and I’m gonna try this out to see how it works.
If you want to see all the pieces as they look now (I did them on my computer so I can print them out) you can see them here:
http://www.redbubble.com/people/meitismitsune
I can show you pictures of how they look on the glass later if you want. I just thought I’d let you know that I was going to use your technique and what I was gonna use it for.
Note: On the website provided, there is an 8th image, that was just something I made because I thought it would be cute. It has nothing to do with my final project. 🙂
Hi Suzy,
I have a question, we have activity in our school about making stained glass using 1/8 illustration board and glue and some coloring materials… So instead of glass we should use illustration board. And I’m going to use this technique. Is this technique will fit to our activity by using illustration board instead of glass???
I need an immediate response… Thank you :)) By the way, the technique is very impressive!
Hi Karen,
It will hold up in cold and heat. My oldest project is a year and a half old and sits in a sunny window. Can you lay the shutters flat to work on them? This process requires that you lay the project absolutely flat until it dries. You can clean up any wiggly lines with a craft knife after the “leading” has dried. I recommend being very thick with your paint, overlapping you “leading” to ensure that you don’t have any spots missed. Just a few drops of paint to about 3 tablespoons clear glue. After the entire project is totally dry, I recommend applying several coats of clear polyurethane spray to protect and seal it.
i have shutters on my large living roon window which i faux stain glass 10 years ago will this work on shutter panels and hold up to cold and heat 1st time they came out ok but had hard time using the strips of “soder” this looks like something i could do on these shutters there are 8 panels in all and i like a little light 2 shine thru any help you can give me would be much apprieciated
Hi Carla,
I’ve done a ton of projects using this technique, and occasionally, I have had a line peel up too. When it is at the stage of just leading lines, the project can be a bit fragile. My solution has always been to glue the line back down. You could technically use glass glue for this, but I’ve just gone the route of a few dabs of Elmers. Once you lay down the colors, the lines themselves will be much more stable.
One advantage of this is that if you do make a mistake, it can be peeled up and you can start over. I am adding to the tutorial that a good idea would be to spray the project with a clear coat of acrylic sealant once the project has totally dried and been completed to protect from any damage.
Let me know how your project turns out! I am excited to see what you come up with!
My daughter wanted to make a nativity scene stained glass window, your website helpes us greatly!! As we were cleaning up her black lines the glue would completely peel off, is there a way to prevent this?
Hi Chinmayi,
You can mix the glue up and store it. Just be sure the cap is on tight. You will need to re-stir it before using it, but it lasts just fine for the next project.
suzy
Thanks for this awesome tutorial. I tried it out and made an apple stained glass:
http://pinkstripeysocks.blogspot.com/2012/10/diy-faux-stained-glass.html
Wonderful idea…its beautiful!!I want to tryout a small piece first, so 0nce I mix the black paint with the glue can I store it or will I have to discard it.
beautifull!! please email me [email protected]
Thank you
beautifull!!
Thank you!
Hi April,
The one that I created- I made a year ago and it still sits in the window of my workroom where it catches the afternoon sun. To dust it, I just use a damp wash cloth or damp sponge and wipe it down.
How can this be cleaned without destroying your picture?
Please email me @ [email protected]
Thank you
I think it would give it a different look, but it might be amazing!
Do u think that it will look nice with brown outline instead of black I have no black acrylic paint ;(
Hi Kelsey,
I’m not sure how well it will hold up around heat. You could try a practice piece first. Mine have been sitting in sunny windows for nearly a year and they are fine, but I don’t think it gets very hot there. Let me know if you try an experiment. I’d love to know how it turns out.
Any thoughts on how this may hold up around heat? I have an old fireplace screen I snagged at a garage sale. I thought about doing a stained glass scene and then soldering that to the screen. It would be around a wood stove.
Anyway this looks like a great project!!! Thank you!
i love this thank you so much
Hi!
I have done several now. The peacock is over a year old now. It sits in my craft room window and gets the afternoon sun. So far it is doing very well. I just have to dust it now and then.
I’d love to see your project when it is done!
Suzy
I can’t believe how easy this looks! I have two old window frames I’ve been hoarding for a while looking for the right project to do and this is it! I do have a question though. Since it’s essentially all glue, does it peel off easily? Or does it stay pretty permanent?
Hi!
I’m so glad my project is being made by your group! I’d love to see photos!
In answer to your question, you can check out my tutorial page at https://suzyssitcom.com/tutorials , where I have 84 tutorials listed currently. Those that particularly might interest your group are:
https://suzyssitcom.com/2010/11/feature-friday-paintbrush-santa-ornament-tutorial.html
https://suzyssitcom.com/2011/04/feature-friday-vintage-bouquet-tutorial.html
https://suzyssitcom.com/2011/04/feature-friday-hand-made-decorative-soaps.html
https://suzyssitcom.com/2012/02/feature-friday-magnetic-mousetrap-clips-tutorial.html
https://suzyssitcom.com/2012/03/feature-friday-paper-reed-frames.html
Thanks so much for stopping by the Sitcom!!!
Hi Suzy,
I am so excited about finding your website! I love this Faux Stained Glass Peacock ! I recently started working with Seniors at our Local Retirement Community, and the ladies wanted to do something that was “MORE ADULT”. We are going to attempt this project!
I think they will love it! Have any other ideas I might be able to use with them?
Have an Awesome day and thank you so much!
Hi Sally,
Permanent markers would work. They would give it a slightly different look, but would be easier for a child to do. What I did with the black lines with glue is once they dried, I went over them with a craft knife, cleaning up areas that were wavy. I’d love to see your project!
My eight-year-old grandson and I did this with a sailing schooner and it turned out well. It is very hard to get the black lines straight, but I think any irregularities add to the charm of a child’s art work Someone mentioned using permanent markers. Would that work?
Hi Christy!
I have not tried a glue gun with black glue. It just might work. If you decide to go that route, I’d love to hear about your results. And of course I would love to see your finished project! Let me know if you have any questions!
What do you think about using a glue gun with black glue? Easier/harder?
When we replaced all of the old windows in our house, I hung onto the old wood frame ones; I was trying to come up with a ‘crafty’ plan for them and this looks like a winner!
Thanks for the tips!
OOH! I love this idea. I wanted to do faux stained glass on some armoire doors I have…this may be just the thing! 🙂
I believe it may be waterproof, but do not have mine outside. I would suggest if that is a necessity that you spray coat it with several layers of clear varnish on the side of the glass that has the glue coating. Hope that helps!
Is this waterproof? If not, what sort of coating would work to water-proof it?
Hey Josh..I’m a Titanic fanatic myself…and have been sooo tempted to do a stained glass painted Titanic window myself…..when you get yours done….send a pic of it to Suzy so she can post it…I really wanna see it!!!!
Hi Regina!
I am so sorry you are having trouble! I believe that you have too much black paint in your glue. It doesn’t take a whole lot of paint to turn it black. Start with a fresh glue bottle and add just a few drops at a time of black until your glue is black. You will be surprised at how little it takes. Now it will still spread just a bit as it is drying as you will see in the photos on the tutorial. Once it is dry, you can touch it up with a craft knife in areas that spread a bit too much for your liking. Be absolutely sure the project stays horizontal during the whole painting and drying procedure. Unlike stained glass paint, you can not do this on a vertical surface.
Let me know how it comes out.
suzy
I tried this projest, but my black glue ran when I did my outline on the glass. How do I get the glue to be thicker or so it does not spread when applied to the glass? Any help would be greatly appreciated. I am having my grandkids make these for their Moms for Mothers Day.
Thank you ,
Regina
Suzy,
I am very inspired by your stained-glass painting! I was actually searching for stained glass paints on the internet and came upon your post. I am going to attempt making Titanic’s stained-glass reception room window. Google it up it is absolutely amazing! I’m glad I found this genius technique, it will save me time… and money!
Josh
i cant wait to use this technque! very beautiful, thank you for sharing. i was wondering if the project could be water/weather-proofed with a clear cote or similar sealant.Any suggestions?
Let me know how it turns out!
suzy
You did an AMAZING job! I am going to try a much simpler kind of thing for 2 block windows (the previous owners REMOVED the stained glass!). Wish me luck.
Lori
Hi Jessie,
Yes, the paint and glue holds up well to light. However, I don’t believe I would recommend this method for a window. The reason is that for this particular process, you would need to work on a flat surface. The paint/glue mixture would definitely drip down on a vertical surface because you have to apply it so thickly. Secondly, the issue of air bubbles in the paint is more prevalent with the paint/glue mixture unless you do apply it thickly.
Now if you can lay the window down flat to work on it, then yes, I don’t see why it wouldn’t work for you. I have two projects completed using this process and they both sit in window sills and they both look as good as the day I made them.
If you have to work on a vertical surface, then I recommend going with the extra dollars and buying glass paint and the glue on lead stripping.
Hope I was able to help. Let me know how it comes out. I’d love to see a photo!
suzy
Does the paint&glue hold up to light? I want to paint a window to create privacy and beauty and also allow the beauty of color and design show on my side. It is a large window in my stair well that I can view neighbors kitchen window through. I plan on using glue on lead stripping on my interior side.
I love it! I’ve spent hours and hours searching for the perfect project for my son’s class. Had some cute ideas but this is PERFECT! Haven’t decided on a theme but the kids will draw the pictures and I will use them to trace and create the pattern. Going to give it a trial run and create something for myself tomorrow. So excited!
Let me know how it turns out!
Thanks! This is a really cool idea! I have a TON of picture frames just sitting around, may give this a whirl.
I’m also thinking of experimenting with the colors using white glue & food coloring. I have no idea if it will work or not, but I don’t have any acrylic paints on hand. I’ll give it a shot on a small piece of glass to see what kind of effects I get, first. If it works, I’ll let you know.
Thanks for the fun Idea =) I have a larger faux stained glass project in mind, but this is a good start!
Oh wow…how cool. I also love the idea of using a muffin tin for mixing colors!
I've done this using tempera paint and wondered why I wasn't getting the right opaqueness. Thanks for your tutorial… now back to the crafts store! I also get frames at yard sales, sometimes scooping up several at a time by offering $10 or so for the lot. Have gotten some good deals that way.
Thank you! I will try that the next time I do a stained glass. I have an extra frame I bought in the dollar store!
Also guys, a garage sale is a GREAT place to find frames! Sometimes they charge 10 cents and 25 cents! Great bargin and it's recycling!
Hi Anonymous! I have no way of replying to you by email, so I hope you come back to see this message! Anyway, bubbles are an issue even with the expensive stained glass paints. Popping them with a toothpick can help, but I found that if I put the paint on very thickly (lots at a time) that the bubble issue was much less. Also, take your time when adding color. Speed does create bubbles. Hope that helps!!
I used a regular (soft) paint brush on mine. It looked fine when I painted, but when it dried it tended to get a lot of small air bubbles in the clear spots. I did try popping them with a toothpick, but they wouldn't pop. It just moved them around. In later color mixes, I tried mixing the clear/acrylic really slowly so I didn't create so many bubbles. It did help some, but I still got bubbles. Any tips?
I used your technique to create my own faux stained glass. It doesn't look quite as awesome, but I really appreciate your tutorial! Check out my version at http://www.nidhizzle.com/2011/04/faux-stained-glass.html
Hi Anonymous!
I have never tried this technique on a vertical object. I think that the glue might not be thick enough to withstand gravity. You might have to resort to the more expensive stained glass paint from the hobby stores.
suzy
looks great…..but I was wondering if this would work on mirrors that are already glued to the wall?
Popped over from your doodle frame post- this is amazing! Thanks for sharing this- I had no idea stained glass could be achieved this easily.
WOW !! I Just Love It !!
Hi Bradford!
The clear glue was Elmers and it might have come from the craft store- probably Michaels. I buy supplies everywhere when I find them cheap. The project took less than one bottle of clear glue. I was surprised, but it goes far. I designed the pattern myself.
When you complete your project, please send me a photo! I will feature it here on my blog.
suzy
Hi Suzy…is the clear glue you used Elmers? it looked like it in the picture but I couldnt tell for sure….what kind of Dollar Store did you find the clear glue at? I cant find clear glue at my dollar stores..and how many bottles of the clear did it take you to do that peacock painting? one last question…did you design the pattern yourself or did you find it in a book? if so what book did you find it in..I would like to use that pattern as well…thanks!!!
LOVE LOVE LOVE this craft! I am going to have to try it out! Thanks for sharing such an affordable project!
Hi Garden Lily,
Yes, you are right. You would display this with the glue/paint side forward for the stained glass look.
suzy
This is amazing, and I love your peacock design. It seems to me that you display it with the glue/paint side forward, so that it appears textured, rather than on the backside of the glass, as other glass paintings would?
OMG. I am sooooo getting on this. Christmas presents for next year here I come!
My GOODNESS!!! This is an awesome idea!!!! Thank you so much for sharing 🙂
OMG, this is fabulous!! I've been on a peacock kick lately and can't believe I just happened upon this without even doing a peacock search. Thanks so much for the tips on how to do this. I love it!
So , so nice !!!!!!! And you make it seem so easy ! is it really ? – I 'll have to try !
this is AWESOME! I have always wanted to learn stained glass but I heard it's expensive. thanks for sharing al alternative. your peacock is gorgeous!
Es una autentica maravilla, me ha encantado y me he hecho seguidora de tu blog. Te invito a visitar el mio http://fimomanualidades.blogspot.com/ Besos desde España
LOVE LOVE LOVE LOVE LOVE LOVE LOVE IT!!!!!
Oh wow! That is a really great project!! Thanks for sharing.
Great design. I love the peacock and the colors you chose!
Awesome!!
This is genius and I so want to try it. Thanks a bunch for sharing!
Wow Susie, that's quite a piece of art!! Very nice.
Thank you so much for your tutorial and your contribution to our DIY CRAFT TUTORIAL linky party.
We love featuring great articles like yours and appreciate people following the party 'rules' and linking back to us so we can all share in the fun.
Look forward to seeing you again next week!
Hi
Just wanted to let you know that I “ Featured” you on Santa’s Gift Shoppe Blog Hop today for your great project & inspiration! Be sure to grab the “I was featured” on Santa’s Gift Shoppe Button/Code for your sidebar! You deserve it! Thanks so much..If you’re not a follower already we’d love for you to join us…
Barb
What a GORGEOUS project & fabulous idea! I LOVE peacocks and you couldn't have chosen more perfect colors!
I signed up to follow you as I'm eager to see more of your projects and hope you'll join me over at Create With Joy!
Ramona
http://create-with-joy.blogspot.com
what fun idea!!! This could be used in so many fun ways. Thanks for linking up to Topsy Turvy Tuesdays!
WOW! That is amazing! Great job!
Thanks for linking up to Making It With Allie! I can't wait to see what you have for next week!
AllieMakes.Blogspot.com
You've been featured at this week's Craftastic Monday! Be sure to stop by & grab a Featured On button. Thanks for linking:)
Thank you so much for sharing this on Motivated Monday at BeColorful. That is why I love hosting. It exposes me to so many creative people and projects. I have never seen anything like this done before and your tutorial was so easy to follow. I will be featuring this project on the next Motivated Monday.
Thanks again,
Pam
The technique is genius, but your lovely artwork and skill with color is what make it so beautiful. (In other words, not sure I can do this, but I may try anyway.)
Kathy
You're brilliant! No more glass paint for me. Thank You!!
Beautiful! Thanks for linking up to Mad Skills Monday!
This is SOOOO impressive and looks so inexpensive (relative to trying to create my own stained glass studio with tools, etc.) – what a great way to make gorgeous art affordably! Thanks for sharing!
Absolutley beautiful. Thanks for linking up to Creation Mondays @ ~The Life of Me~!
This is so pretty! I love the colors!
Thanks for linking up for Friday Favorites!
That is incredible!!!!! Thank you so much for linking this up to gettin' crafty on hump day, this is one I'll definitely be trying!!!!! 🙂
Lovely! My daughters and I would love doing this!
Cool technique…very pretty.
I love this! It looks just like stained glass! Great job! Thanks for linking up to Sassy Sites- Trash to Treasure Tuesday! We are doing a LABEL giveaway today, so come back and check it out!
xoxo!
Marni @ Sassy Sites!
THAT is one stunning piece of work!
I am in such awe of this project – you sure are a crafty dynamo! Your project has been in the back of my mind for days now trying to figure out how I want to play. Big hand of applause!
This is wonderful!!!! I'm adding this to my list to try out for me and my art classes! Love it!
Does Nate know about you? He would love your talent
This is AWESOME! Love the peacock the colors.. everything! Simply amazing as always! Thanks for sharing with the Pink Hippo Party!
This pretty much rocks. Thanks for sharing!
Wow that's a really cool effect! And I love peacocks too, you got a great art nouveau look going on there, really pretty!
Oh this is FANTASTIC! I'm so going to try this with my kids! Great tutorial!
Thanks for linking to A Round Tuit. Hope you have a lovely week.
Jill @ Creating my way to Success
http://www.jembellish.blogspot.com/
What a beautiful job. Just gorgeous.
Wow! This is stunning! I totally want to give it a go. I've always wanted a piece of stained glass art but it is so expensive. And I have just the spot. Thanks so much for sharing this wonderful tutorial. I off to buy my frame!
And I love the idea of the peacock. They are just beautiful!
Beautiful piece of art!
Absolutely gorgeous…
Just wanted to let you know that I featured you today, so stop by and grab a button if you want 🙂
Oh my gosh.. this is so fabulous!! thanks for linking in!! 🙂
This is totally interesting- thank you for sharing. Have you ever considered to do little videos on this? Could probably be easy to film, making it nice to follow the step by step instructions. You can also think about making a few dimes with it, for instance posting it with this video-tool Movielocker. You can choose if you give the vid away for free or by donation etc… take a look: http://movielocker.com/
Best to you and a happy new year!
Sebastian
Awesome! I'm need to try this! Thanks for your great tutorial!
Oh snap! You were featured on One Pretty Thing, so that's how I found you. Where have you been al my crafty life? This is soooo perfect! I can see doing this with 3-4-5 yo's, if the
leading" is pre-done for them. I'm thinking this will be this years Mother's Day project. Thank you for sharing~
Absolutely gorgeous! Your first time on Craft Schooling Sunday, and you've shared a major winner! I'm so excited to try this myself, and my daughter will love it too! Thanks so much and hope to see you every week!
Yay! Thanks for linking this up, Suzy! I can't wait to try this. Here are some pics of faux stained glass I did with Gallery Glass. Most of my projects were done before digital cameras, lol, so I don't have more pics. If you check them out, you'll see why I'm going crazy for your project.
http://muralmaker1.com/Art_FauxStainedGlass.html
A couple answers to some questions: the glue that you use for leading will be fine if kept in the glue bottle until your next project. For a dollar, you will have plenty for other projects.
The term "piping" is actually a cake decorator term and means to place the nozzle back on the glue bottle and use it to draw the black lines on, by squeezing the glue out of the bottle in an even stream. If you need to, you can practice on a piece of paper first, but remember that most errors can be corrected after the glue dries with a craft knife.
suzy
http://www.RealDadReviews.com
Following your blog!
Please follow back!
If you could follow me on Facebook, that would be great!
http://www.facebook.com/RealDadReviews
Thanks
The Dad!
This is great! I have been painting on glass using Gallery Glass paints and Redi Lead strips. This looks easier and CHEAPER. I will have to try it.
Faux?! This looks so real! What a wonderful project idea!
Also, I'm still working on my interview questions. It has been a busy week, full of wisdom teeth surgery and cleaning my boss's house (really!)
🙂
This is gorgeous. Great idea!
That is gorgeous! What a great idea.
Hello! I was browsing around to find some great new people to join my linky parties, and I am now your newest follower! I would love for you to come join in and don't forget to enter my $250 giveaway while you are there!
DANA
http://danajeanward.blogspot.com
wow. this is so cool!!!!! the colored glue lasts for a while, doesn't it? as long as it stays in the bottle?
I love the colors and the muffin tin is the perfect tool for the job! You are full of great, new ideas!
Your feature 🙂 http://menmythriftyideas.blogspot.com/2011/01/standout-saturday-linky-party.html
Absolutely beautiful! And a great alternative to spending $100s for one!
http://www.uvinyl.blogspot.com
This turned out beautiful, thanks for the tutorial!
Sorry for the double comment, lol, but what do you mean by pipe the paint?
First the faux metal and now faux stained glass, can you get anymore awesome? You have been such an inspiration to me.
It is very beautiful. I love the colors!
Thank you for sharing this.I was afraid to let the kids use the gallery glass because of the exspence.This solves all that.Beautiful peacock
Wow – that is so impressive! I love it. Thanks for sharing the artwork and the tutorial!
~Stopping by from Tatertots and Jello 🙂
I totally forgot to invite you to Passion for Paint this weekend. Links are open right now. This would be perfect! Hope you'll join us!
My *artsy* daughter would be all over this!
Thanks for linking up to my Pity Party.
xo,
Mique
great idea… the picture turned out beautiful
Hi this is Nicole from Colies Kitchen I just discovered your blog and wanted to drop by and say hi. I really like your blog, and am now a new follower. I would love to have you stop by Colie’s Kitchen if you get a chance. http://www.colieskitchen.com
This is so flipping awesome! Another thing added to my to-do list!
Are you kidding me?!?!!! I have spent tons of $ on Gallery Glass over the years. Hubs wanted me to do it as a sideline biz – faux stained glass. And now you're saying all I needed was a couple bottles of glue???
I'm so tickled, I can't see straight. Can't wait to try this!!
Okay, first of all there's no way I could even draw the darn picture in the first place! LOL But this is absolutely STUNNING! And you make it sound so easy 🙂
Terrific! Thanks for explaining how you did it!
Will you PLEASE stop being so talented????? I'm seething with jealousy.
That or start selling your stuff!!
Very cool idea – may have to try too!
Found you on a blog hop and am your newest follower – Would love for you to check out my blog and follow back if you like it.
Check out my "retail therapy" giveaways and enter a few, there are some great products to win.
I also have a fantastic weekly blog hop.
http://retailtherapylounge.blogspot.com
Carol
Thank you so much for linking up! I would never have guessed that it's not real stained glass! Gorgeous!
Oh my goodness that is so awesome! I will have to try this.Thanks for sharing such a great idea.
Rebecca
I am doing this ‘Follow Friday 40′ that I saw over at Design It Chic's blog and I am now following you! This is such a cool idea isn’t it?! Love your blog by the way – that stained glass window is absolutely amazing!
Hey there! I just wanted to let you know that I love your stained glass and will be featuring it tomorrow morning on my blog! Don't forget to check it out!!
Anestazia <3
http://yourworkistodiscoveryourworld.blogspot.com/
Ooh, that's an awesome idea! I really love the colors you chose for your peacock.
This is gorgeous! I did a kid version with permanant marker: http://takens-tidbits.blogspot.com/2010/11/stained-glass-for-kids.html
Wow, that is beautiful. I've been thinking about doing some faux stained glass myself. I'll be bookmarking this for sure. Thanks for sharing your tutorial with us.
This is FABULOUS! Wow, great job and I love, love, LOVE the peacocks
You are amazing, woman!! Love this!
I think I will have to try this one. End results are awesome!
The idea is really a cool one and the peacock just a beauty! 🙂