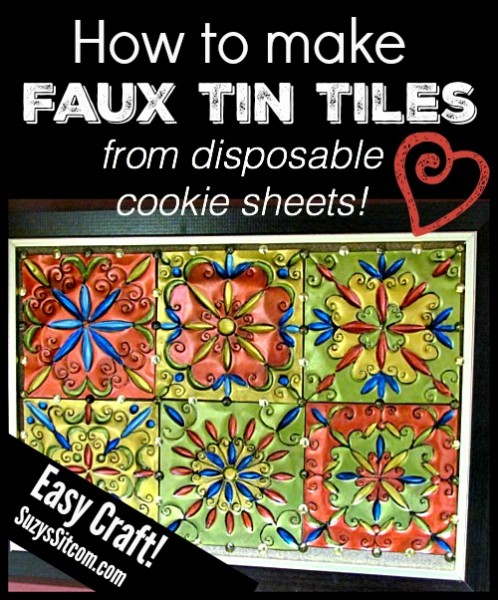
Recycled Crafts – Faux Tin Tiles from Disposable Cookie Sheets!
How to make beautiful faux tin tiles with just a disposable aluminum cookie sheet!
Recycled crafts are one of my specialties. Embossing disposable cookie sheets is an easy technique and creates amazing art. Beautiful faux tin tiles!
Want to know how?
This fun project is one of the most popular craft ideas on the Sitcom! And that is saying a lot. The Sitcom currently features over 200 fun craft tutorials!
I’m always on the look out for interesting things to make out of the unexpected. Disposable aluminum cookie sheets can be found at your local party supply store.
This simple embossing and paint technique turns a disposable pan into a work of art.
AND… this project comes with 12 free downloadable patterns!
Want to learn how to make this fun project? And get the 12 free patterns?
This post contains affiliate links from Amazon
For this project I used:
2 disposable aluminum cookie sheets
Free patterns from my pattern page*
A knitting needle
Paintbrush
Various metallic acrylic paints
Spray primer (or for a different look, use black spray primer!)
A cork bulletin board
Thumb tacks
Are you new to the Sitcom? Be sure to check out my Frequently Asked Questions Page!
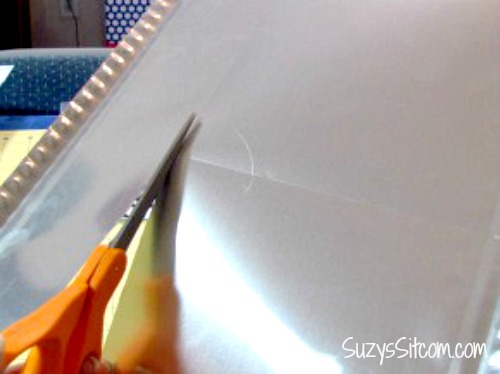
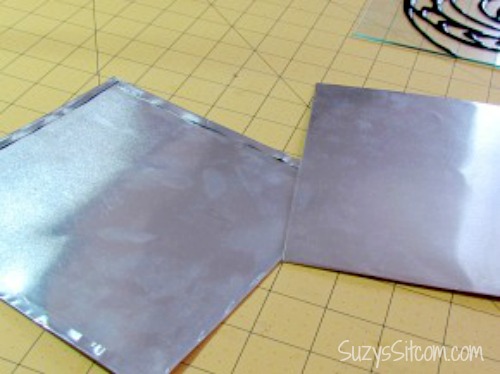
Begin by measuring out and cutting (3 ea.) 7″ squares from each cookie sheet.
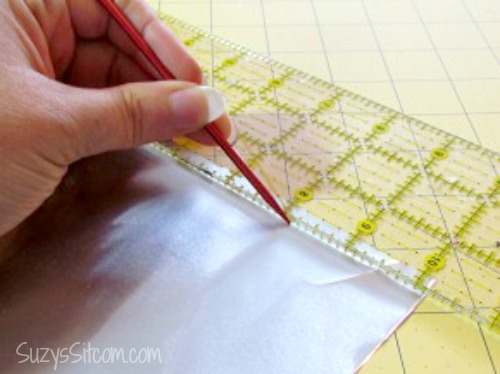
Use a ruler to measure them and mark the cookie sheet by pressing a knitting needle along the ruler, then simply cut them out with scissors. Take the ruler and score 1/4″ from all four sides of your square using the knitting needle.
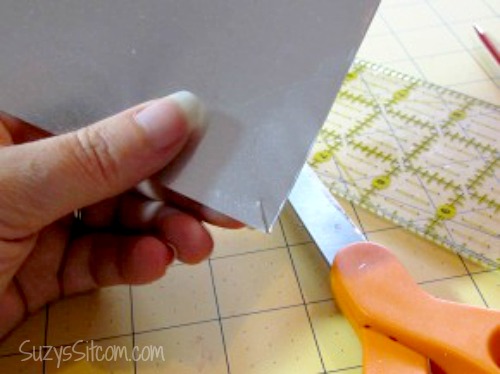
Use the scissors to clip a notch in each corner.
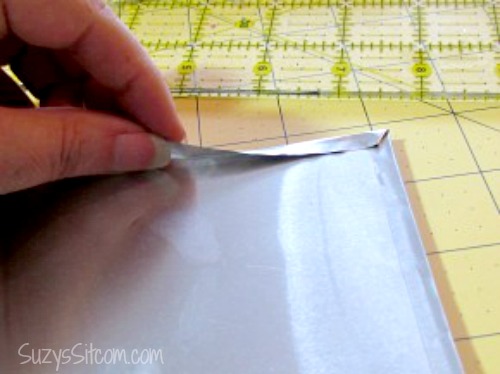
Fold the metal over carefully along your scored seam. This will create a smooth finished edge for each tile.

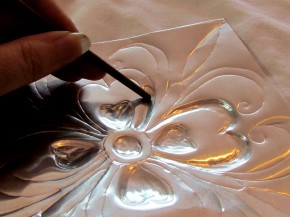
Print out the patterns.
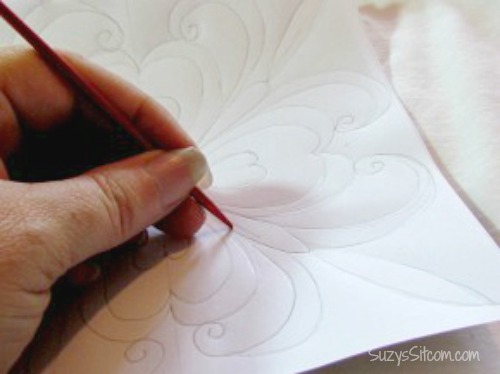
Lay the metal tile on top of a folded towel and use a knitting needle to press the design into the metal. For your convenience, you can download the free patterns from my pattern page. Here the metal tile is shown with the pattern scored into it.
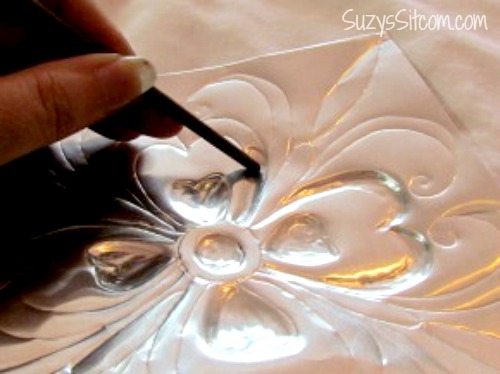
Keeping the tile on the folded towel, then use the end of a paintbrush handle to gently rub indentations into the metal where you want them. The more you rub, the deeper they can be, just be careful not to use a ton of force as the aluminum is very thin metal.
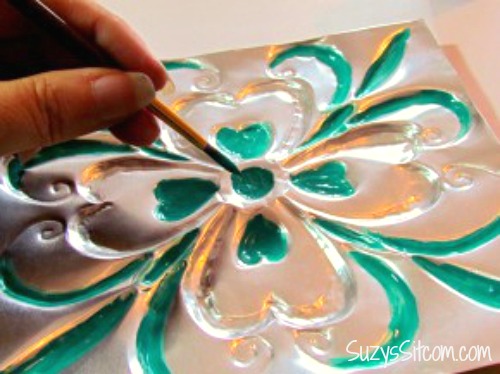
Once the piece is indented to your satisfaction, it is time to paint it. You could certainly leave it unpainted at this stage, but I’m all about color. Lightly spray each piece with a layer of primer. Once it is dry, begin painting the indented areas using metallic acrylic paint.
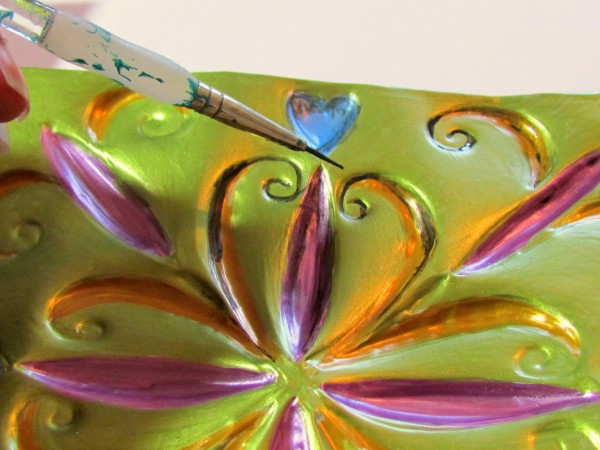
Once all the indentions are painted, add a base color to the raised areas. Add details by watering down some metallic acrylic black paint and adding it to lines and edges of the indentations, giving it an antiqued look.
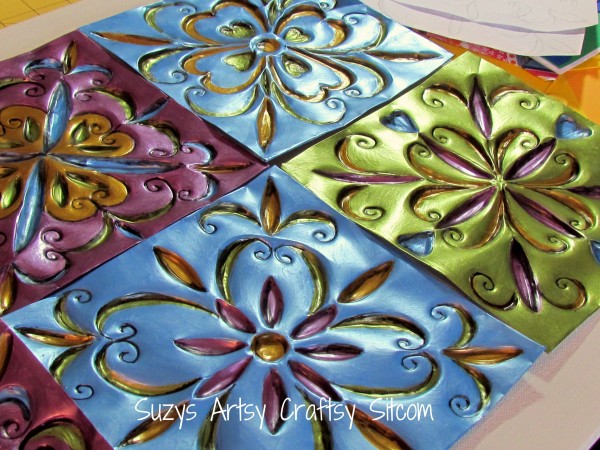
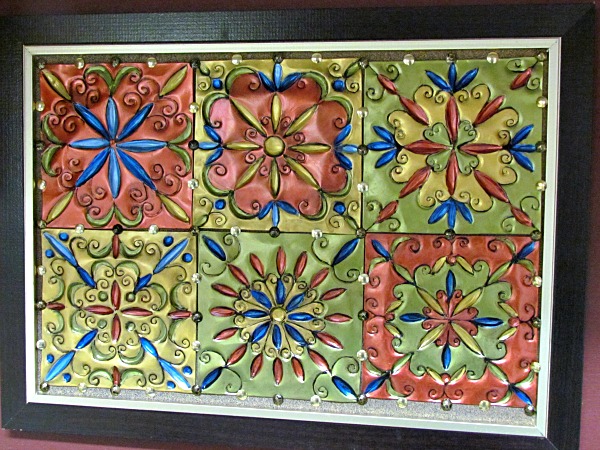
I used the same color scheme for each tile, so that they all worked together.
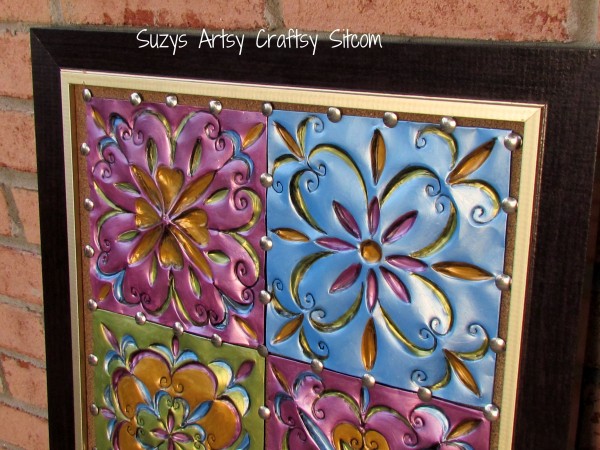
There are many ways to display your finished tiles. I chose to use a cork bulletin board and lined them up carefully, pinning them down with thumbtacks. This resulted in a great piece of wall art that will definitely surprise anyone when you tell them it started out life as a couple disposable cookie sheets.
For a great video on this embossing technique, look here!
Want to know what other great patterns and ideas you can make with this technique? Here is another example of a different color scheme using a different set of patterns. All twelve patterns are available FREE here!
Other disposable cookie sheet ideas include:

Faux Punched Tin
Enchanted Fish
Sleeping Mermaid
And if you love free patterns, I’m currently offering 5 other popular patterns from the Sitcom for new subscribers.

Never miss a project from the Sitcom, and get free patterns too!
Are you new to the Sitcom? Be sure to check out my Frequently Asked Questions Page!
For over 200 crafty tutorials for all ages, visit my Tutorial Page!

Where do you buy the patterns to roll the tin over to get the design
Thank you, Debbie! I simply use a little windex and a sponge to clean mine. If you are going to use it as a backsplash, just be sure to add a coating of clear sealant on top of the paint.
suzy
If using as back splash behind stove what would you use to clean it with? Your talent is amazing….thank you!
Hi Paula!
Thanks! I’ll look into changing that link. I found on later projects that you get a whole different look by spraying the project with a black primer before beginning. Either way works well.
suzy
I had the same question about the spray primer because the link is to spray sealer which I don’t think it would allow paint to adhere. I did see a clear primer on walmart site. The acrylic paint should be just craft paint. Matte or metallic color would just be a personal choice.
as a back splash around the stove: will they hold their shape when cleaning?
Just joined. Very excited to try your styrofoam no sew quilting. Everything looks like so much fun. You are lucky to be very talented. Thank you for sharing.
Hi Rose!
Yes, this idea can be used as a backsplash. I have several readers who have done this. The metal is surprisingly sturdy when embellished and can be wiped down without damaging it. Would love to see what you come up with!
suzy
Hi Annamarie,
Thank you so much for your kind words!
suzy
Hi there from South Africa, you are truly blessed to be so gifted, you are
such an inspiration to me I am definitely going to try some of your wonderful creations. May God Bless you for being willing to share your
talent to other non talented. Love
I would like to know this also. I am moving into a new apt with no back splash and this is lovely.
Hi Teri,
Once embossed, the aluminum is surprisingly sturdy. Cleaning the backsplash is not a problem.
suzy
Wouldn’t the pressure from cleaning your backsplash ruin the pattern?
Fabulous!!!! Could you do a whole slew of these and paste them on your wall for a back splash? Would they be durable enough???
Hi Hilary!
I love that idea!!! Would love to see what you come up with! Thank you so much for the kind words!
suzy
Have just stumbled on your site while looking for some new crafting ideas – and this is just brilliant, your tiles are beautiful!! I was thinking of using one square in Christmas colours to make the centre of a card… I’ll let you know if it works! Thank you so much for sharing!
Hi!
Thank you so much! Would love to see what you make! And maybe we will meet on the road sometime. It is definitely a small world out there!
suzy
Just happened upon your site. Love the “camper” potholders! Will have to make them for our 5th wheel. Also loved your “pupper” placemat as my German Shorthair is pretty sloppy with her water bowl, so perfect for the RV as well. Thank you!
Hi! Thank you for the kind words! I’m so glad you are enjoying my tutorials! Would love to see what you come up with!
suzy
Just found your site, having searched & found the Faux Bronze Clock craft as inspiration for upcycling the toilet paper rolls & sundry cardboard tubes that my boys & I have been saving for a summer craft project. I LOVE this faux tin project as well!
Thanks for sharing your talent & letting your light shine to the world.
Foil would be too thin.
Girl this is just plain cooell!!! I will be following you from here on. This was genius thanks so much .
Hi Linda!
Yes! In fact that is what I used mine for. I have many readers who have sent me photos of their backsplashes, kickboards on stairs and even ceilings!
Would love to see what you come up with!
suzy
Great idea. Do you think these would be suitable for tiling behind my stove and counter backs?
Thank you for this lovely tutorial. This technique was just what we needed to make a beautiful 18″ doll scale “antique” Chanukah Menorah for our American Girl doll Rebecca.
We posted our YouTube video tutorial of the whole process here: https://youtu.be/Gmfn5xQ5z9Q
And our Newsletter entry with even more details and our free Chanukiya template is here: http://www.leeandpearl.com/2015_11_newsletter.html#chanukiya
Thank you again!!
I’ve finished it, finally! It looks great in my old vintage trailer! How do I get a photo to you? I put it on my pinterest page, on my glamping folder. Thank you so much for posting the instructions! Here’s the link to the photo.
https://www.pinterest.com/pin/33565959700125584/
this is the outside of my trailer:
https://www.pinterest.com/pin/33565959700125566/
I found this blog in pinterest. Loved the illustrations. Last year my son was rehabbing our ancestral house in Toronto, he got a few frames from the Bayview Metals of Ajax. I just wished that I’ve read this blog before a couple of months. Would have been an excellent DIY for me.
This is sooo wonderful! I have a hand made doll house that I am refurbishing and wanted tin ceiling tiles, but have not been able to find them in the right size paterns…Problem solved!! Thsnk you so very much!!
These are awesome and I think I just found my “unique” backsplash for my kitchen! Thanks so much!!!
What a genius idea. We have original tin ceilings in an older home and should we need to replace one in a pinch, this could do nicely. I have a list of crafts to try and this is getting added for sure. I just love the cleverness of making tins out of aluminum trays. Thanks for sharing your patterns. Great job.
Thank-you for all the instructions on the projects.
2 projects I will be working on:
1- the tile (need to make certain small size for our camper)
2- pocket book organizer.(will make a couple for my daughter and sisters.
need and love them both.
Craft on Suzy! You are Amazing!
Hi Linda!
That sounds like a great idea! Would love to see what you come up with!!
suzy
So creative! Daughter & son-in-law rehabbed my parents small home after cleaning layers of cigarette smoke, grime, grease, etc. from previous resident. They used tin to surround the stove corner walls, but have gaps around the two visible switch plates. Have been looking for something to fill in & embellish those spaces. This looks like it could be the solution. Can’t wait to try it out at least. Thanks for sharing the tutorials & patterns.
Hi, Suzy: Sorry for being a pest: can you give me an example of ‘spray primer’ and is the acrylic specifically for painting metal or is it metallic color? Many thanks – you see I am needed to read each and every detail til I get the nerve up – and I will!
This is such an amazing idea and it is beautiful you are very talented.
Saw these over at Gail’s round up! Wow, simply amazing!!!!
Nancy
Can you use aluminum foil instead of aluminum pans
Thank you so much! You will be surprised at how easy it is! Would love to see what you come up with!
suzy
WOW!!!!! This is just stunning, what beautiful work! You are very talented. I am pinning this and one day I may get brave enough to attempt it myself.
Definitely! Just a note-at our dollar tree store, the pans had raised designs on the bottom, so I found mine at Party City.
Oh wow! Would LOVE to see your finished project!
suzy
I just came across your site today, looking for diy tin tile, thank you so much for posting! I looked at two home materials stores and only found fake plastic tiles, this has so much more character! I’ll be trying it tomorrow, to use in my ’72 vintage trailer as a backsplash. Thanks again!
Well, just came across Susie and i think i am in love! I am working on her faux stained glass tutorial and this is next. going to party city to look for “tin” in the morning. haven’t crafted for a while and really miss it. Thanks to Susie, back at it.
Hi Patrice!
Thank you so much for your kind words! You made my day!
suzy
I think I could spend every waking moment creating from all the incredible ideas you have. Thanks for being so willkng to share!!
WOW… these ideas are amazing! Great tutorials…very helpful, thanks so much. I was looking for a timeless craft idea for a Women’s church group, and this was perfect!! I think they will love this, and we can do something with this each year, and still have something made using the same techniques they previously learned, and end up with something different each year. Again, THANKS!!!
Do you sell these? Would love to have some purple ones!!
Greetings from Finland!
Thank you for the tutorial! This is such a lovely idea! I think they would also look lovely on a piece of old wood, like recyckled pallets for example, don’t you think? I used to make little boxes of soda cans, and now I’m definitely going make these tiles – or fail trying. lol Great job! 🙂 And thanks again!
You are very welcome!! Thank you so much for the kind words! Would love to see what you make!
suzy
Hi Suzy!
Just came upon your site today. And I love it!!! I think I can actually do this tin craft!!! Your work is absolutely beautiful and so creative. Just what I’ve been looking for!!! Thank you…thank you…thank you for all of your fabulous ideas and your excellent explainations!
Wow! What an inspiration you are. I love this and the toilet paper roll ideas. Just found your website tonight so I will look around some more. You are a genius!
Hi Sara,
You can find disposable aluminum cookie sheets at any party supply store like Party City. Lately, I’ve been using the disposable lids meant for buffet trays. You can get them at Party City for about 80 cents each.
Hope that helps!
I am so excited to try this. It would look amazing in my kitchen! I am running into a problem. I absolutely cannot find any aluminum cookie sheets. Help!
Hi Johnny,
I used mine for a backsplash behind the stove, but I put mine on a bulletin board. If you like the idea with the thumbtacks, it might work well putting them on the wall that way. Otherwise, for a more permanent hold, you could consider a glue meant for metals.
Whatever you decide, would love to see your finished project!
Just what I’ve been looking for!!! I want to do these as a backsplash on my new kitchen..new house!!! 🙂 what would be a good way to attach to the wall ? can I just put it over existing wall paper?? I’m excited!!! 🙂 thank you!
WOW this rocks! Love the boho look of it for my kitchen backsplash. Thank
you!
Thanks for the update. Now that you mention it, I can see the black outlining on your finished piece. It adds a lot. Then I also looked at your fish aluminum cookie tin project. You clearly show the black in the process there.
I’ll be picking up some primer this week!
Hi Nancy,
You are right. The picture is not correct. This post has been up for over a year and you are the first to mention it. The photo is actually showing my first attempt. The paint peels right off. Primer is totally necessary. I switched to black primer because it fills in all the crevices with black- less outlining needed in the end.
Thank you for pointing that out. I need to go back and find the right photo!
This project is wonderful! I’ve done some painting on metal with various things and have had problems with it staying on. I think your primer idea may be the answer. I see you said you used BLACK Krylon primer for metal. But the pictures don’t look like they have black on them. Will you please confirm about the color primer you used?
Thanks
Lindo seu trabalho, ainda mais porque moro em São Luís, Maranhão, Brasil, cidade colonizada por Portugueses, cujos azulejos dos antigos casarões, são do mesmo padrão. Mas não entendo que folha de alumínio é essa que você fala. Vou nas casas de festas para ver se encontro. No caso, o alumínio das latinhas servem? Beijos e parabéns!
I found this on Pinterest & had to come see how? It’s beautiful, so creative, clever, love it!! TFI 🙂
Sharpies are definitely a good choice, and you are right, you don’t have to use primer for them. I love the look of metallic paints, so in order to add them, it requires primer. Otherwise, they peel right off.
Thanks so much for stopping by! There will be lots of new patterns in the future!
suzy
Hi Sally!
I made some adjustments on the site last night and apparently lost the link to the patterns. I added it back in. You can find them here: https://suzyssitcom.com/faux-tin-tile-patterns
Would love to see what you make from them!
I really like this project!
I’m having some trouble finding the patterns though. The pattern page only links back to this page.
Could you please post a link directly to the patterns?
Oh I do love to work with tin and aluminium! Thank you so very much for taking the time to make such great tutorials.
I was wondering why you prime the tiles and then apply metallic paint? I have been making a lot of Xmas ornaments from soda cans and find that they are just so nice and shiny if I simply use Sharpies or some other permanent marker on them, then spray varnish to seal.
Lis
Thanks for the kind words, Cecilia! You totally made my day!
Hi Deb!
Thank you for your kind words! You totally made my day! The cookie sheet art is my current favorite project.
And I’m so glad you found some things on the Sitcom that you would like to try. Please send photos if you create something based on one of my projects or patterns and I’d love to feature you!
We must have been sisters in another life… 🙂 I got here through a Favecrafts Quilting link for your Windmills at Night pattern and haven’t left… this cookie sheet bit is a source I never thought of for embossed tin/metal art, and I’m usually the one that looks at stuff for ‘not for purpose intended’. D’oh!!!!!!!!!! Wish I would have bought this clue a long time ago… and you do it so well! Kudos dear, and thank you! You do such great stuff!
Susie don’t tell my husband, but I think I just fell in love with you! So many ideas so little time!
This is a brilliant idea, I love when you can recylce an ordinary thing into an extraordinary masterpiece. Thanks for the beautiful step by step tutorial.
Beautiful! I’ve embossed small pieces of aluminum can before, but I just never thought to take it on as a large scale project!
Hi!
The best place to find disposable cookie sheets without patterns in them is Party City or any other party supply store. In fact, lately I’ve been using the disposable aluminum lids that they sell for buffet tables. They are inexpensive at less than 80 cents a piece.
Hope that helps! If your class makes the project, I would love to feature them on the Sitcom!
Suzy Myers
I have looked unsuccesfully in several places for similar cookie sheets. Where did you find these sheets? I think this could be a good lesson for school if I can find some. Budget money is scarce this time of year.
What a cute idea! I need a temporary backsplash since I can’t do any permanent changes to my apartment. I will definitely be giving this a try !
Great idea! I did some projects with soda cans last summer and you can easily cut them with scissors.
Love this look! I’m also thinking of a back splash!
Jan
Excellent tutorial, pinned to several of my boards!
Possibly. I will have to experiment and let you know. Seems that it might be a good solution. Also- color isn’t a necessity. The tiles look great just simply embossed.
Hi,
I wanted to know if sharpies would work instead of the metallic acrylic paint. I am trying to do a project with kids.
varsha
If using for a backsplash, I’d suggest to seal them with varnish/polyurethane to protect them.
Hi Ann!
The brand is Folk Art Metallics Acrylic Paint, colors are:
Blue Opal, Peridot, Plum, and Mica Gold. For lines, I used Folk Art black enamel (watered down a bit)
Would love to see what you make!
Hi susie I keep coming back to this project . So beautiful .
I would love to know the brand & color of the paints you used on this project they would really look wonderful in my Kitchen, I can’t find a Back-splash I like I have the pattern I want to do searching for the colors I like has been more trouble than its worth….
The colors you chose will match and do the project i want to do pop.
Have a good one.Ann/alba
These are amazing. I would like to cover my block fireplace with these to give it some character. Thank you for sharing this idea. I love it!
I have done these using inks for the color. Love them.
Thanks so much for sharing. This is beautiful. You are a brilliant artist!
How clever you are ! I’ll definitely be trying this !
Thank you sooooo very much! You are one of the most creative people I have ever seen! Just amazing! Thank you also for sharing your creative knowledge 🙂
Thank you! I used Krylon black primer for metal. Just a light coat is all you need to ready it for the paint.
These are fabulous! What kind of primer did you use?
This project ROCKS!!!! I would have never thought of this and LOVE the colors….
Jan,
I would absolutely love to see your finished project! Keep in touch!! I bet it will be just beautiful.
suzy
Hi Jan,
The last few projects that I made, I smoothed out the pans. I didn’t think about the texture thing, though. Now you have me thinking in a whole other direction! Thank you so much! I would absolutely love to see your creations when you are done!
suzy
I just wanted to share what I discovered purely by accident. You may already know this, so forgive me if I am repeating. I did not have any plain pans, so I decided to see if I could smooth out the light indentations on the pan I had. I was holding it against the surface of my textured refrigerator, and it took out the indentations, and left the pan textured. Now I am looking all over for textures inside and outside my house. I think it would be beautiful to texture, then add the designs from your templates! And it is handy if you cannot find the plain pans.
these are WONDERFUL!! I have an ugly plywood door to the attic on my bedroom ceiling, and I have been wanting to get some of those old tine tiles to put on there, but they are SO expensive! Now I can duplicate the look, and use my own design for the pattern. Thank you so much for posting this! I will definitely be doing this soon. My husband just bought some of the foil pans at Publix the other day, and I think I already have the colors of paint I need! Yea!!
Lovely work, thanks for thr class
I am so in love with your faux tin tiles, I have so many projects in mind for these, a new headboard for my bed covered in these tiles, kitchen backsplash, plus I have a book that I bought years ago, just cause it’s a beautiful book that has illustrations in it from every era from practically the beginning of time, Morrocan, Roman, Turkish, and I could blow up the illustrations and copy it on tin and have some other design options, although yours are beautiful and I will definitely start there…but I have a question, what kind of primer did you use, was it clear? And what kind of sealer did you use, shouldn’t it be like a polyurethane to make it waterproof, since I will be using it around my sink, and what do you think about glueing the whole “tile” to something, I don’t know what, yet to make it so I don’t need to thumbtacks cause that would leave a gap that water could get behind, I’m thinking in the case of the backsplash! I do hope you answer my questions cause I want to start this now!!! Thankyou!
these are gorgeous. since I am “drawing challenged” I was sondering if you could post your template drawings for us to print. or is there a site for such things. I love this and want to put it as a backsplash in our 125 year old home…it would be perfect for the period. thank you!!!!
Where did you find the metallic acryllic paint in these colors. At Hobby Lobby and Michaels they had very few colors, mainly gold, silver, black, red. None of the pretty colors like you used.
Thanks!
They are surprisingly sturdy. They could handle a cleaning with a sponge, but scrubbing might not be a good thing for them. If I were you, I’d try making just one and testing it out.
Suzy Myers
I love this and want to do it for my back splash. However, wondering if they will hold their design shape during cleaning. On a backsplash you need to rub pretty hard sometimes.
Holeee WOW!
This is DEFINITELY something I’m going to do! Perfect backsplash for my kitchen that I’ve been stumped with for months!!!!! Thank YOU!
These are super cool! Thanks for sharing! Your tutorial is great.
Blessings,
Carrie
I bought mines at Walmart for 5.47 great deal
How very clever! I am wondering how much my hubby would hurt me if I bought a gross of aluminum pans to do the ceiling in my kitchen!! Love this project and idea…I remember doing something like this in art class a long long time ago!
Love this project! Your tiles are gorgeous! Can you tell me where you found disposable cookie sheets with no design on them? Thanks.
You did a wonderful job creating the six patterns. Your tiles are GORGEOUS!
This is amazing and beauiful! I’m thinking of ripping the carpet off my stairs and doing this on the risers (back side of stairs, not flat part). I’m not sure if this is practical for that with shoes surely to hit it, etc. Any thoughts?
Thanks!
Oh we LOVE these! Wanted to stop by to let you know we featured you today.
Thanks for the inspiration!
-Kim
Woman, you frighten me. Really. I haven’t been over here in wayyyyyyy too long, I spot these gorgeous tiles on Pinterest, and to whom does the project belong??? YOU!!! These are gorgeous, and I’m hitting the Dollar Tree today. Period. I have a party over on my blog to hack Z Gallerie, and this is just what I need to create a hack…so I guess it’s a double hack!
If you can’t find plain cookie sheets you can also use the foil lids for the large disposable foil steam pans. The lids are flat and smooth and can be trimmed to size.
Hi Sharon,
I bought mine in the Dollar store around Christmas time. Apparently, they stock certain things at certain times. I went last week and couldn’t find them. However, you can get them anytime from Party City or any other catering store. Here is a link to their website- http://www.partycity.com/category/entertaining+serving/aluminum+pans.do . The steam lids and the cookie sheets would be perfect for this project and they are all under a dollar!
Hope that helps.
suzy
I have not been able to find a plain, flat bottomed disposable cookie sheet. The disposable cookie sheets I have seen (Dollar Tree, Dollar General, Walmart & KMart) have a design imprinted into the bottom, or has holes all over it. Where did you find the flat bottomed pans? I really like your idea and want to do some for my kitchen. Thanks for any help.
Can these be painted with “Gallery Glass” paint? That would be beautiful!
Hi Nicole!
These are disposable aluminum pans – you can find them at the grocery store, or dollar store, or Target, or Walmart. They are the kind of pans meant for one use and then throw them away. Some of my readers are having problems finding them without a pattern on the bottom. If you can only locate ones with patterns, choose one with a light pattern. The embossing will remove any sign of the previous pattern. Hope that helps!
suzy
These are fantastic and Id love to give it a go…but I don’t know what these disposable sheets are…they clearly aren’t ez foil! Where can I find them?!?
Sa-weet idea! how did you ever think to do this? Love you crafty dollar store folks 🙂
Awesome – beautiful!! We had just looked at the tiles at the box store and thought about them for a back splash – now I’m going to go to our local dollar store and try your idea!!! Thanks for sharing your “how to”!!
My local Dollar Tree carries the plain kind. I had featured another project earlier this year using the plain cookie sheets and a few of the readers had to look hard for them. I’m told that Target carries them and be sure to check out your various dollar stores. They come in packs of three for …a dollar!
Hi Lin!
They are made out of aluminum pans. No screeching involved, I promise! Thanks so much for your kind words!
I love it! What a Fabulous idea! I could not do that.
The thought of the knitting needle screeching on the tin!
I think you should sell them.
I’ll buy! Lol 🙂
thx Lin
These look great, but where do you find cookie sheets that are plain? The ones that I have seen have some sort of logo or design stamped in them.
love…Love…LOVE! Thank you so much for sharing this.
Suzy, this is just glorious! Thanks for such a beautiful tutorial!
Yes you can! In fact, that is where mine now are! Would love to see your finished project!
Yes you can! In fact, that is where mine now are! Would love to see your finished project!
Hi Lori,
Waterproof for sure. Fade proof- I think so. I used metallic acrylic paint. You could add a coat of UV protectant if you wanted to help ensure no fading. I’m glad you enjoyed the project! I would love to see what you make of it!
Is the finished product waterproof and fade proof? Wondering about different places to display…I have some fun ideas, using your idea, for finishing some yard projects! This is also an easy project to do with a 10 year old…always looking for ways to keep the creativity flowing on rainy days!
OMG These are Awesome… Hummmmmmm Could I do this & use them as a Back-splash in the Kitchen ? I could use my Celtic designs….
LOVE LOVE LOVE them.
Hi Shannon,
The bulletin board was purchased at Michael’s craft store. I used a coupon and got it for $7.00. Thrift stores are also a great place to find larger cork boards. And the frame was already on it. I’d love to see your project after you complete it! I bet it will be beautiful!
You are so creative, I love this! I was wondering where you got the cork bulletin board? Did it come with the frame around it or did you make that as well? I’d like to attemp to make this using Moroccan style patterns for my bedroom. Thanks ; )
This is amazing! I love the colors that you used, so beautiful. Thanks for sharing such a wonderful idea!
GORGEOUS Suzy!
I think so! In fact, that is where mine are now. 🙂
I love what you did with these cookie sheets. Do you think they would hold up as backsplash behind a stove?
Thank you, Carolyn!! You make me blush! And thank you so much for stopping by!
Hi Holly!
Thanks! It was surprising simple to make. The aluminum pans are easy to cut and bend. Thanks so much for stopping by!!
It turned out fantastic!
Well this is certainly ingenious! I love it, but wow did you go to some work! I might try this with dies that do the cutting for me. Fabulous and creative idea!
Oooohhhhh!!!!!!!!
I love it. For a long time I am thinking of similar things. But I tried tincans an aluminiumfolie (swedish word for it). The result is sometimes acceptable but not enogh. (bad english but anyway). I did not know what pait for example. Bu now you gave me an exelent tutorial. Using my evening reading it and tomorrow try your way. Thank you.
I am always following your blog and you give so much inspiration.
Marianne
Suzy , your friends above have said it all! Amazing! You have given me much
crafting to do once i get settled in my new home! Hugs! deb
Thanks for another great project. I cant wait to try!
Suzy, Suzy, Suzy…You are still queen of the crafting world. It is slightly unfair to the rest of us that you received more than your share of creative genes, but I guess God balanced it out by giving you more than your share of generosity. Thanks for sharing this awesome idea and it is beyond kind that you shared your pdf too. I love tin tiles. This is being pinned and if I could lend my kids to a traveling circus for a month or so, I would put this on the top of my to-make list.
Its really very beautiful. My mom does this type of work , but she uses a bit thicker aluminium sheet and for the embossed effect, she uses the wooden clay tools .
Love this, Suzy!
wow this is beautiful, love how you painted it!!!!!!
This is AWESOME dear..I really like the way how you have painted the design ..well done dear 🙂 keep sharing your beautiful creations & tutorials
Thanks ~