How to paint a Faux Marble Ceiling!
One thing that I love to experiment with is faux finish painting. My most popular project by far, is my Faux Stained Glass technique using paint and glue. I’ve also created some cool looks with a Faux Textured Chair Rail and Faux Carved Wainscoting using textured wallpaper. This week, I tackled a whole new Faux project- How to paint a Faux Marble Ceiling!

Our new house was a vast landscape of white walls and I really wanted to start infusing some color. The master bedroom had a great trey ceiling. Trey ceilings fascinate me as there are so many things you can do with them.
Well, it just had to happen. I got out the paints and brushes and created a new look for the bedroom!
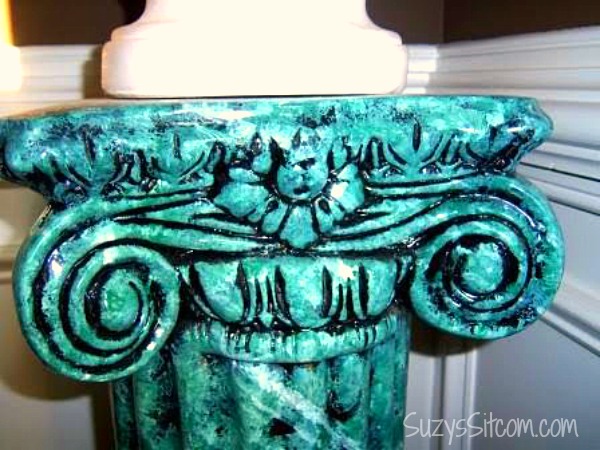
It all started with some pedestals. I had some artwork that needed pedestal displays in my dining room. So I purchased a couple plaster pedestals for about $10 each at the local craft store. They look great in white, but in order to show off my white statues, I thought green marble would work better.
After successfully recreating the look of marble, I decided to branch out and take on the ceiling!
For the ceiling, I used:
1 gallon can of dark forest green paint (latex)
Acrylic paint in wicker white
2 sponges
feather (optional)
I started by painting the walls a dark olive green, keeping the trim work white. Then I painted the trey part of the ceiling a deep dark forest green. I allowed it to dry and then went to the next step.
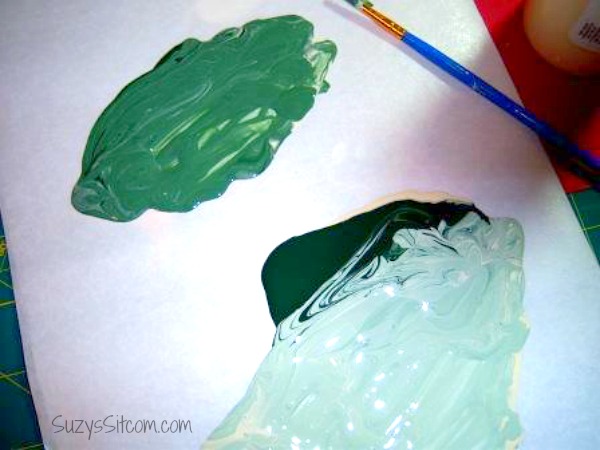
Taking the leftover paint, I mixed up two different lighter shades of green by adding different amounts of wicker white acrylic paint. You can find this type of paint at any craft supply store.
I made one batch of color in the medium green family and one in the lighter green family. Use a palette or even in this case a paint tray to put a bit of each color in separate areas. Add a bit of water to thin the consistency of the paint. You will work with both colors at the same time, using two different sponges.
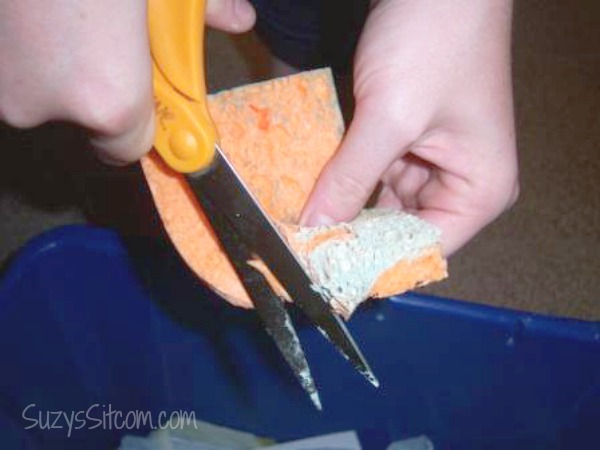
Take your sponges and cut pieces out of them to create an uneven texture to the sponge. Cut holes in the center and make the edges uneven. You could use a sea sponge for this project, but I found that the uneven texture created this way gave it a better look.
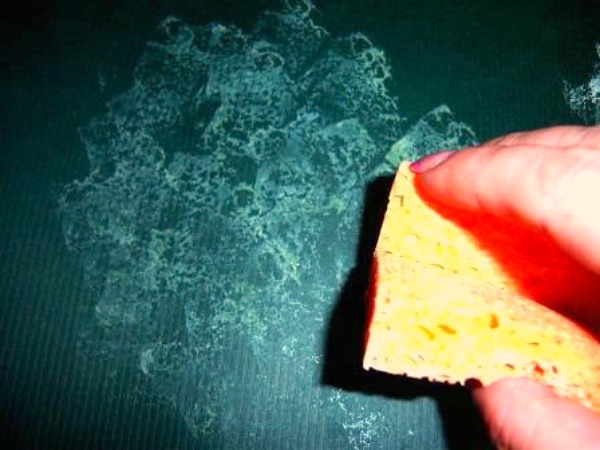
Dampen the sponges, and squeeze them out so that you have pliable sponges to work with. Start with the medium green. Dab your sponge lightly into the green, pat it on a paper towel to get rid of excess paint and then dab onto the ceiling.
Lightly cover an area of about 1 ft. x 1 ft., turning the sponge with each application so that the pattern is not repeated over and over.
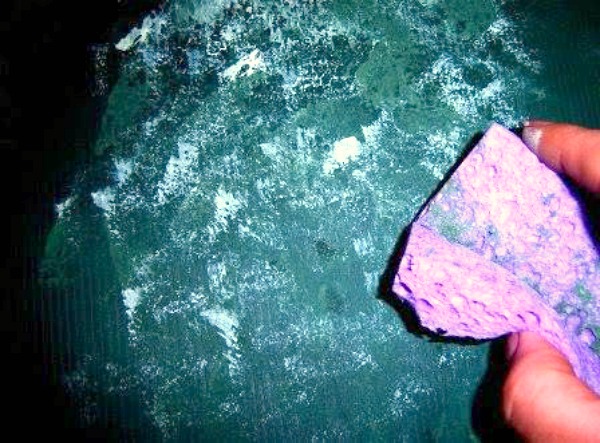
Then switch to the light green, dabbing that sponge and lightly placing that color over the other one. In some places, it will blend the two colors together, in others, they will stand out as separate colors. Be sure not to cover up all of the dark green.
Several tips that I found out the hard way:
1- Do not have someone else help you apply the colors. You will establish your own technique shortly into this project and if someone else is working from the other side of the room, the difference will be obvious. Kind of a bummer, I know, but look at it this way- at least you can say that you did it all by yourself!
2- Working on the ceiling can be hard on your neck and your back. And I also discovered that it is at least 10 degrees warmer up there than it is on ground level. Being a short person, I’m not used to the thin air up there. 🙂 Seriously, though, work on it in sections and take a break now and then. It gave me even more respect for poor Michelangelo, who spent four long years painting the ceiling of the Sistine Chapel.
3- Be sure to anchor your paint tray to the top of the ladder. Paint is very hard to get out of carpet. Not that I would know anything about that…just saying…
As a final touch, you can mix up a small batch of very light green (almost white), add water to thin it. Dip the side of a feather into the thinned paint and use it to create “veins” in the marble. I used this technique on the faux marble columns and it came out great.

To finish this project, I added an inexpensive ceiling fan medallion. I painted it white and then detailed some of the trim with metallic gold paint.
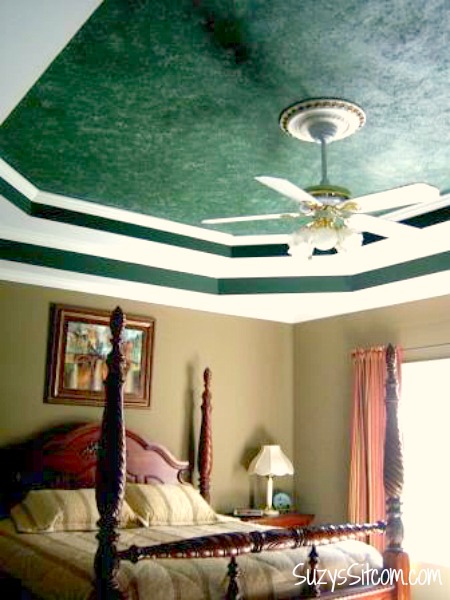
Total redo for this bedroom was a little under $50 and we have a distinctive new look. A major crick in my neck, but definitely a new look. Granted, this look may not be for everyone, but when we went to sell this house, it was loved by the new buyer!
Love to paint and craft? You can get 5 free patterns just by signing up to get Suzy’s Sitcom in your email!

Love to Craft?


You might also enjoy my 7 DIY Suncatchers post and my Sitcom Handmade Gift Guide with tons of free and original craft ideas!


Are you new to the Sitcom? Be sure to check out my Frequently Asked Questions Page!
For over 200 crafty tutorials for all ages, visit my Tutorial Page!

Hi Ruth!
Thank you so much! Any horizontal stripes (to make it look even more like marble) can be accomplished with a feather. Dip the feather lightly in the paint and add horizontal lines very sparingly.
suzy
Looks absolutely wonderful.
I notice you did not mention the horizontal stripes. Could you elaborate on that please?
Gaw-juss. I wouldn't have thought a dark green marble ceiling would look so lovely. Maybe you should pick up a neck brace to wear when working over your head for a long periods. I bet Michelangelo would have finished in 2 years with that! Thanks for sharing!
Ooh, if you like green marble, you'll LOVE the faux malachite look!
http://www.paintinganddecoratingconcourse.com/articles/malachite.html
I did a bunch of theatrical faux finishes when I was in theatre school… never had a place of my own to apply them to, though (sadly).
This is really creative and unique! Great! Thanks for sharing the post!
What a fun project! I love the finished look! Thanks for linking up to Hoo's got talent!
Very nice. I've tried faux painting and mine just comes out messy looking. I admire people who can do this and have it look so nice.
WOW… what a dramatic ceiling you created… thanks for sharing with us at the PoPP.
Love it!
Thanks for linking up!
~Liz
Wow! I've faux painted a ceiling before, and it was only one quick coat. I can't imagine the kind of patience that took. It looks amazingly realistic!
Thanks for linking up at Craftastical!
This looks fabulous! I wasn't sure about the dark colors but I think it looks great in your bedroom. Thanks for the tip about needing to do it by yourself. I can see how that might definitely be a problem if someone else was helping.
WOW! It looks great! It turned out so well. Thanks for coming to link up to Topsy Turvy Tuesdays!
I just wanted to stop by and let you know that I linked to this post today from the new Home & Garden channel at Craft Gossip. 🙂 My hope is to share many of the fabulous projects I see everyday with the vast CG audience. I hope you will not only stop by and subscribe to CG, but will tell your friends about the new category! Hope you see some traffic from it!
Your feature will appear in the main Craft Gossip RSS feed, on the main home page and can be found directly here
http://homeandgarden.craftgossip.com/faux-marble-ceiling/
If you would like a "featured by" button, you can grab one here!
http://homeandgarden.craftgossip.com/grab-a-craft-gossip-button/
ooh, that looks so regal and dignified! What a gorgeous bedroom.
Very cool. You must have some fun ideas for wrapping gifts, too! I hope you'll stop by my PRETTY PACKAGES PARTY and share some of your talent! Be sure to grab a button for a reminder!
http://blackberryvine.blogspot.com/2010/08/first-ever-pretty-packages-party.html
smiles!
That looks very elegant and expensive!
Love crafty people…following through New friend Fridays…come follow me back……
http://www.beaderbubbe.blogspot.com