Feature Friday- Faux Wood Inlay

The week I was snowed in, I got very adventurous and decided to finally do something about the little sewing table that sits in my hallway. It is one of those tables that folds up and hides a Singer Sewing machine. Not what you would exactly call antique, but definitely an older model. The top of the table is marred and for the past 20 years, I’ve kept a doily on top of it to disguise it. Out of sight, out of mind.
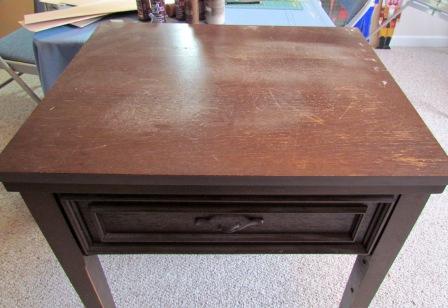
But here I had some time to kill and I looked at that table and decided I would do a little faux wood inlay work on it. And I have to tell you that this particular project kicked my butt. I started it over numerous times before I finally found a system that worked for me. In the end, everything finally came together.
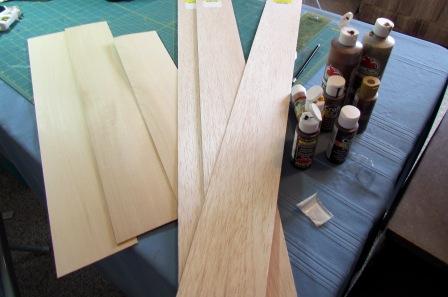
For this project I used:
1/16″ thick sheets of balsa wood (enough to cover table top)
Elmers Glue
Polyurethane (clear gloss)
Acrylic paints
Sandpaper
Craft Knife
Knitting Needle
I began by laying the balsa wood across the table and gluing them down, butting them up as closely as possible with each other. (You can find these thin sheets of balsa wood at most craft supply stores for about $3.00 a piece).
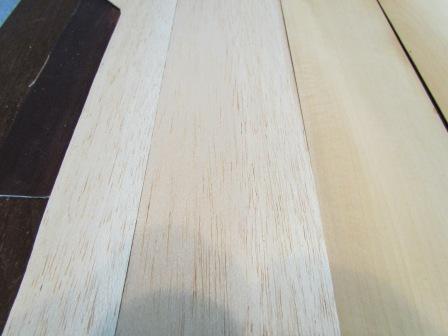
Here, I discovered that not only is balsa wood thin and pliable, but it soaks up glue like a bandit. It became necessary to place heavy objects on top of the table in order to keep the balsa wood from warping. So have heavy objects available. Allow this to dry overnight.
To prepare the wood for the next step, neatly trim it to meet the edge of the table top and then sand it all down with medium grit sandpaper.
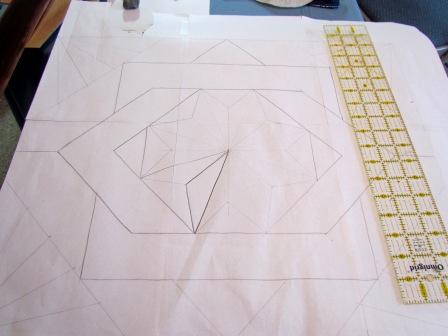
Draw out your inlay pattern on a piece of paper the same size as your tabletop. I looked around on the internet and found a few inlay ideas that I combined in order to fit the size of my table top.
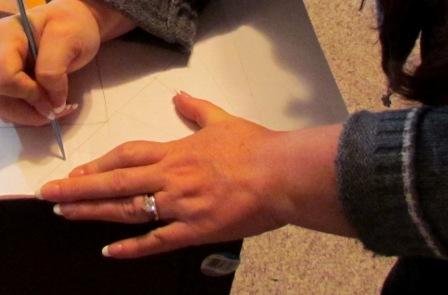
Now lay the pattern on top of the table and use a knitting needle to draw along your pattern lines, pressing into the soft balsa wood underneath. You don’t have to press incredibly hard here, just enough to put the pattern on the wood.
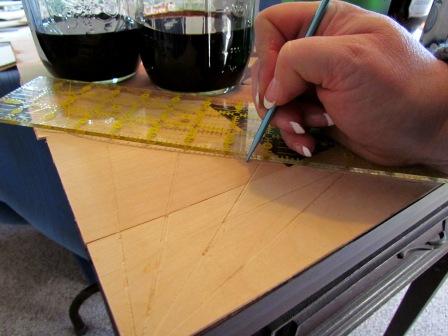
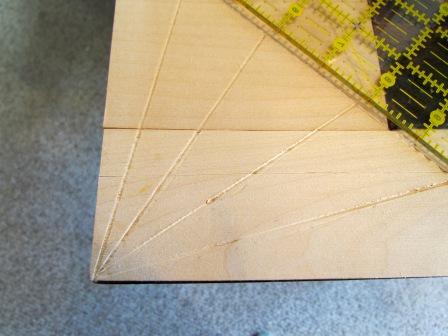
Once the pattern has been transferred to the wood, use a ruler and your knitting needle to press harder along the lines to create a good groove. Sand everything down once again and then wipe any dust off with a dry towel.
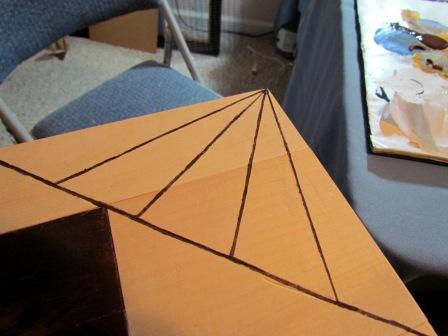
I used dark brown acrylic paint and a small brush to paint in the grooves, creating a look of joined wood.
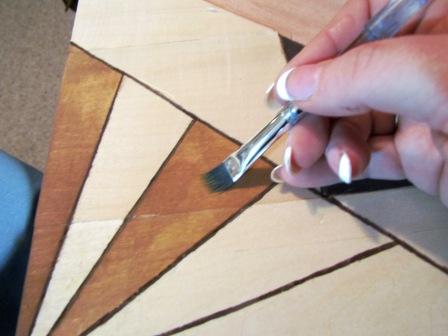
Then use various browns to paint the different sections. I found that if I add water to my acrylic paint, it gives the effect of wood stain.


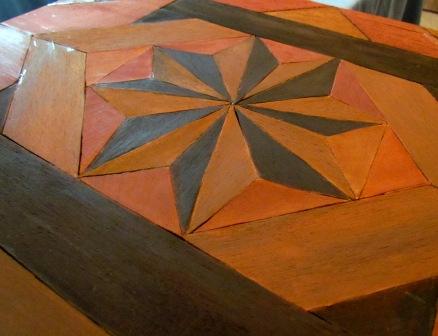
Paint each section separately and in a different direction from the one next to it, to give the look of inlayed sections of wood.
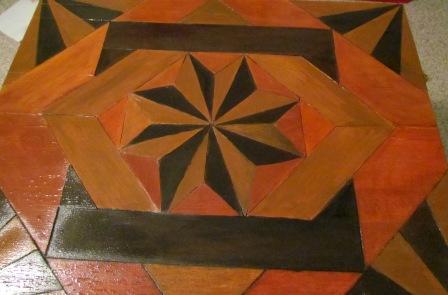
The final step is to coat the top in several thick coats of clear gloss polyurethane. Allow it to thoroughly dry in between coats, lightly sand it and add another coat of polyurethane. This step is necessary in order to protect and harden the soft wood below.

My little table has a whole new look!
If you enjoyed this tutorial, you might like some of my other faux look tutorials:
Faux Carved Wainscoting– Using textured wallpaper and trim to create a carved look.
Faux Stained Glass– Using white glue and acrylic paint to create a stained glass work of art for pennies.
Faux Metal Wall Art– Everyone will be totally surprised when you tell them what this project is made of…

You’re so interesting! I do not think I’ve truly
read through a single thing like that before. So great to find somebody with a
few genuine thoughts on this subject matter. Seriously.. thanks for starting this up.
This website is something that is required on the web, someone with some originality!
Fabulous idea! Would it work to sand the table top down to bare wood and then follow your process, drawing the pattern and painting directly on the table top (eliminating the balsa wood)? I can’t wait to look at your other tutorials.
I have just spent a couple hours looking over your tutorials. You are totally amazing! I cannot wait to make a few of the things you showed…now I just need to get the word out to collect toilet paper tubes (I won't tell too many people though 🙂
This tutorial has been selected as the Tutorial of the Day on The Crafty Artisan! We have posted a photo and a link directing our readers to your web site.
http://wiserunning.com/blog/?p=431
This is an absolutely amazing idea. I like to redo odd/discarded/old pieces of furniture. I will definitely try this technique. Thanks for the idea.
it turned out just amazing. I'm featuring this tonight at Topsy Turvy Tuesday'! Thanks so much for sharing!
WOW! That is amazing! It ruely looks like inlayed wood! Great job!
Thanks for linking up to Making It With Allie! I can't wait to see what you have for next week!
AllieMakes.Blogspot.com
Oh that looks fabulous! When I saw the picture first I thought it was marquetry (??) where all the wood is cut into shapes then placed together! But no! how sneakily great!
Thanks for linking to a Round Tuit this week!
Hope you have a great weekend!
Jill @ Creating my way to Success
http://www.jembellish.blogspot.com/
I am so impressed! I Stumbled your post because the world should see your craftiness!
How pretty!
All that I can say is Wow.
Chantell – South Africa
That is GORGEOUS!!!!!!!!!!!!! Thanks so much for linking it up to gettin' crafty on hump day! I really appreciate you all sticking with me with the new text linky 🙂
That is amazing!!!
I lived in Italy for 2 years and inlaid wood is very popular there. (Or I guess I should say was 16 years ago…YIKES, has it really been that long.) 😉
Oh, wow! That is really amazing! I think I have the same sewing table! Great job and thanks for linking up to Gettin' Krafty With It!
Hop on over to the Party! Would love for you to link-up @
http://thetreasurista.blogspot.com/p/treasuristas-thursday-treasures-come.html
The Treasurista
Finding and Creating FUN things…
Such a fun idea. Thanks for linking up over at Giggles, Glitz & Glam!
Be sure to check out this excellent giveaway: http://www.tinyurl.com/froggygirl
That's great. I'm definitely bookmarking for future reference. I love that look!
wow, that's amazing! I guess a lot of snow is good for something! Thanks so much for sharing on Craft Schooling Sunday!
Cool! Thanks for linking. 🙂
This looks really good. Please stop by my blog for my giveaway.
WOW, that is amazing and beautiful!
This is so clever and it turned out beautiful!
That is AWESOME!! What a great idea and it turned out fabulous!! wow.
Hi Shimauuuma,
I like to work with what I have. I had balsa wood, so that is what I used. It may not look as real as wood veneers, but I enjoyed making it anyway.
suzy
Wow I am so impressed! It looks wonderful and sooo intricate! Thanks for linking up 🙂
Why you didn't use wood veneers? Its better, easier and looks much more natural wood than that.. T_T
http://www.countyfloors.net/store/listing_image.php?productid=16808 theres one example pic what has been done with wood veneers. (that techique is called intarsia)
Wow, this is awesome! Thanks for sharing! 🙂
Wow Suzy! Ambitious and beautiful. I love it.
Wonderful ideas as always…..I just thought that you can also take that balsa wood do the same treatment to it and use it as a wall hanging…..you are very talented….very !!
HOw in the world do you come up with things like this? You are amazing! I am featuring this at somedaycrafts.blogspot.com
Awesome – as usual. This looks great!
You're amazing! That looks awesome! The grooves you put in the wood absolutely sell the look!
Oooh what a great idea!! It looks totally awesome… I never would have known it was "faux"! 🙂
Wow! That looks awesome. You are so talented!
it's amazing!!!You are great!