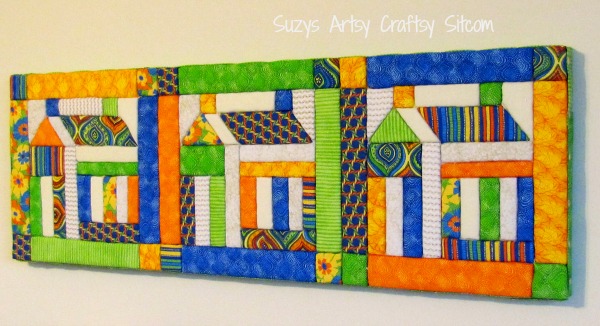
Faux Quilting- With Styrofoam!
Create a unique quilted look that involves absolutely no sewing at all! This Faux Quilted Bulletin Board is made with foam and fabric scraps and is a beautiful focal piece for your room! My tutorial even includes a free pattern for you to download!
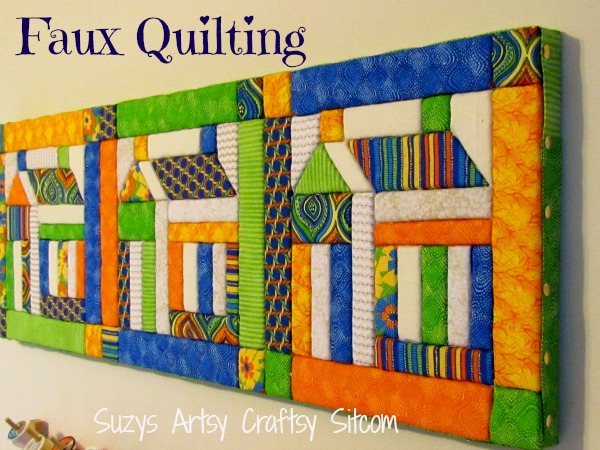
The husband works for a company that gets large parts in daily and they are packaged with styrofoam around them for protection. So, of course I confiscated some. I am a huge fan of creating crafts from recycled materials. I decided to create a bulletin board that gives the look of quilting, but is actually incredibly easy to do. It is a colorful addition to my sewing room! Want to know how to make your own?
For this project I used:
One sheet of styrofoam packing material (36″ x 12″ x 1/2″) If you do not have access to packing material, your local craft store sells it in similar size sheets.
Assorted fabrics, cut in strips for easy handling
Ruler
Sharpie Pen
Craft Knife
Butter knife or credit card for pushing fabric into the styrofoam
Sheet of foam board
Thumb tacks


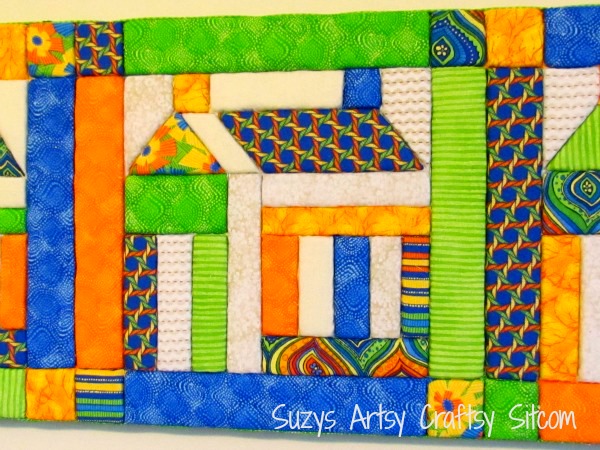
I enlarged the pattern to 12″ square, so I was able to make three repeats of it across the width of the styrofoam sheet.

Use a pencil and ruler to mark it out, and then use a sharpie pen to darken the lines.


Once the pattern is complete, choose a variety of fabrics to use. My original plan was to go with a wintery look, but after searching through my fabric stash, I was drawn to the warm summery colors.

Choose about 8 different coordinating fabrics, and then cut them in 2- 1/2″ wide strips for easier handling.

Choose a place to begin and cut a piece of fabric big enough to overlap all four sides of the area by about 1/2″.


Use the craft knife to cut into the styrofoam along the line. Be careful not to cut entirely through the styrofoam sheet. You want to go about half way through.


Use a butter knife or credit card to push the edges of the fabric down into the styrofoam along the cut lines.

Choose your fabrics as you go and repeat the above steps, pushing the extra fabric into the cracks.


On the edges, simply overlap the fabric over the edge and push into the crevices made by your craft knife.

Because the sheet of styrofoam has been compromised, it is a bit weak. To ensure that it does not break, cut a piece of foam board big enough to glue to the back of the styrofoam using low temp hot glue.

Cut strips of fabric about 2- 1/2″ wide to use as the edging fabric. Use the low temp hot glue gun to glue the strip along the edges of the back.

Fold the strip of fabric over the side of the project, fold the edge where it meets the front, and press in place with a thumbtack.

If your thumbtack will not stay in place, use a dot of hot glue on the tip of it before you punch it in.
And there you have it. A sunny, colorful bulletin board with the look of a fancy quilt. A perfect decoration for any room.

Do you like recycled craft projects? Then be sure to check out the following!
Faux Metal Wall Art from toilet paper tubes
Faux Tin Tiles from a disposable cookie sheet
Paper Reed Frames from recycled magazines
For over 200 more tutorials for all ages, be sure to visit my Tutorial Page!
Are you new to the Sitcom? Be sure to check out my Frequently Asked Questions Page!
For over 150 crafty tutorials for all ages, visit my Tutorial Page!

You have so many unique crafts on your blog! This one is super cute!!
Blessings,
Edye | http://gracefulcoffee.wordpress.com
This is amazing! And no sewing is required! Wow!
Navy Wifey Peters @ The Submarine Sunday Link Party
I have had these same print fabrics in my stash for a number of years!! I have used them for some projects, but still have quite a bit left from my original purchase. To see familiar fabrics being used this way was really fun. Luckily I can duplicate your colors and get the same great burst of sunshine for my craft room. Thank you, thank you, thank you.
Hi!
You know, that pattern needs an update. Apparently, I did something weird with the software because it comes out small for me too!
The block is 12″ square. The outside border is 1.5″ wide. The rectangles running vertically in the house are 1″ wide. The first three to the left are 4.5″ x 1″. The rectangle above them is 3″ x 2″. Hope that helps get you started. The other option would be to enlarge the pattern to the size that you would like using a copier.
suzy
Hi. Thank you for this tutorial. I am trying to do a 1-12″ block craft with a group, but when I went to print out your pattern, it is teeny tiny and doesn’t give me any idea of actual piece size for the 12″ block. Can you please tell us what size the pieces are drawn out on the pattern? I get that you cut the fabric pieces larger, but what I’m trying to figure out and it’s not coming easy to me, is how to lay the foam block out properly to score the lines. Please help. It appears you have 2 sizes of squares, 1 triangle, 2 sizes of larger rectangles, 1 size of a smaller rectangle, and 2 sizes of parallograms, is that correct? Can you share piece size please? Thank you so very much!!
This is absolutely brilliant! Thank you for sharing.
Hi Linda!
Thanks for showing me your wonderful no-sew quilts! They turned out beautiful!
suzy
Suzy, love the tutorial and house quilts. I just love “no-sew” quilt pictures. Back in 2008 I bought several pattern kits from a small company called “Picture It With Fabric” in Minnesota that used this same concept for “no-sew” quilting and a specially treated foam board, fabric, and kitchen knife. I was so intrigued with this concept I decided I had to try it. I made several quilt pictures and inserted mine into wood shadowbox frames that my husband and I made. I posted about what I made here – http://lindawalshoriginals.blogspot.com/2010/05/quilted-pictures-wonderful-concept.html
Very creative and very fun!
Oh, and a tip – if you actually intend to use as a bulletin board, take a moment to trace your cuts with Aleene’s foam glue, so that when you push the fabric into the lines they adhere to the foam.
Otherwise your fabric strips will pull out when you *remove* anything you’ve pinned.
I like your idea thank u very much
Deneyeceğim güzel bir çalışma
Sevgiler
İt is amazing 🙂
Bayıldım çok güzel bir çalışma, tebrik ederim. Sevgiler … 🙂
This is such a great way to use up fabric scraps. Nice job!
that is so cool! I’m fixin to go look for Styrofoam out in the shipping dept. haha
This is amazing! 🙂
I love it! I’m adding this project to my list.
i’ve seen this before, but not with your incredible stash!!! tell me you would not realllllly stick pins in it for a bull/board….. NonnyK
This so incredibly smart and creative. I pinned and shared on facebook. I need more time in my life. I would love to try this one!!!
What a neat idea! Pinning from the pinterest party at online blogcon!
This is so unique! I love this!!!
this is awesome, at first thought it was pieces you had to glue together, this would be easy to do, thanks !!!!
This is such a great idea!
Love it! Great project, great job!!
I love this! Great project for using up small fabric scraps too. Thanks for the inspiration!
What a totally awesome project. Terrific job! Athena