Creating Mosaics the easy way!
Creating Mosaics using glass pieces can be difficult. But I found a great stick on adhesive, and using broken dollar store plates, I was able to revive a boring lazy susan! Want to know how?
At your local home store, you can find ceramic adhesive that is similar to double stick tape. You peel off the back layer, press it down, and then peel off the top layer to add your tiles, effectively eliminating the need for tile glue. No more waiting for glue to dry! You can tile and grout in the same day!
So I decided to create a mosaic project to try out this new product.
For this project I used:
A wooden Lazy Susan from the thrift store
A bunch of colorful plates from the Dollar Store
BONDERA 16-in Countertop Tile Mat Set
Sandless Grout
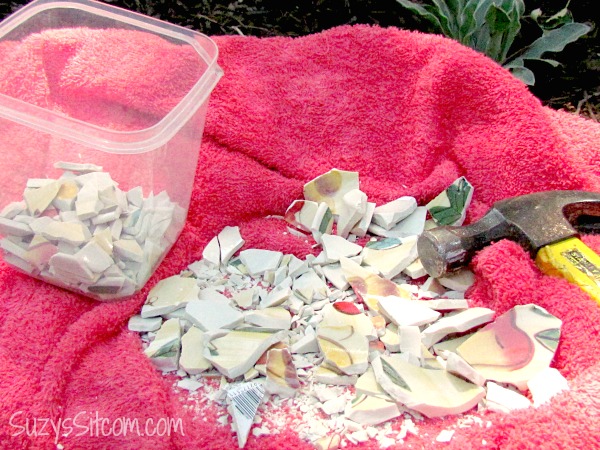
I went to the Dollar Store and bought some colorful plates. I’m frankly too cheap to buy mosaic tiles, so this is my thrifty solution. It was simple enough to wrap them in a towel and hammer them to death, creating great little pieces of colorful tile.

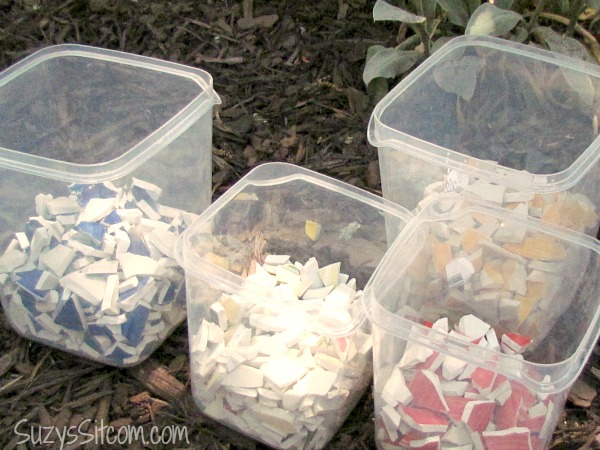
Just be sure to wear protective eye wear and keep curious pets and children away. In the end, I have enough tile for several other projects.
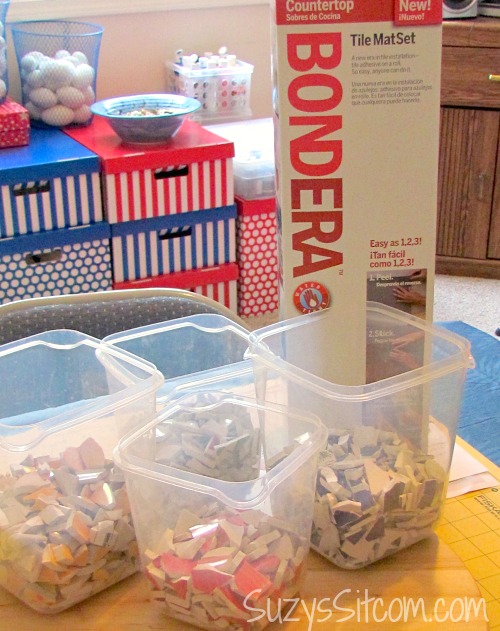
The adhesive comes in a nice roll. It is easy enough to unroll a bit and cut it to size to fit the top of my Lazy Susan.
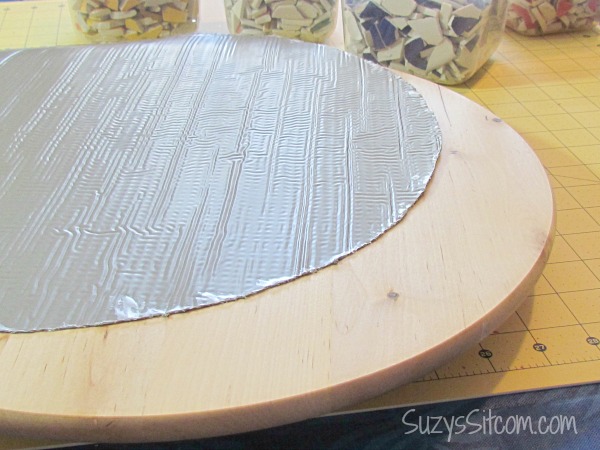
I used scissors for this, but be sure to use scissors that you aren’t real fond of. The glue in the adhesive is very strong.
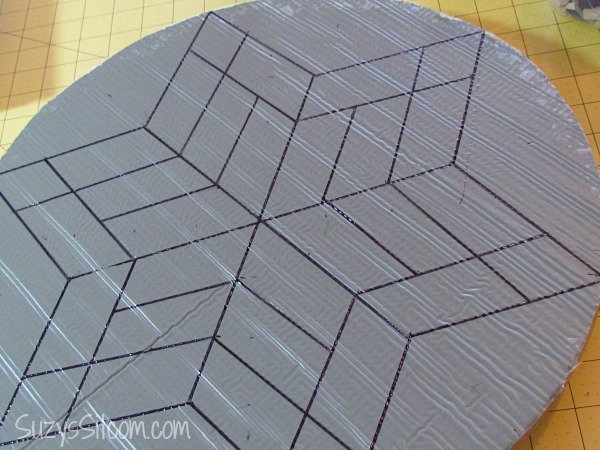
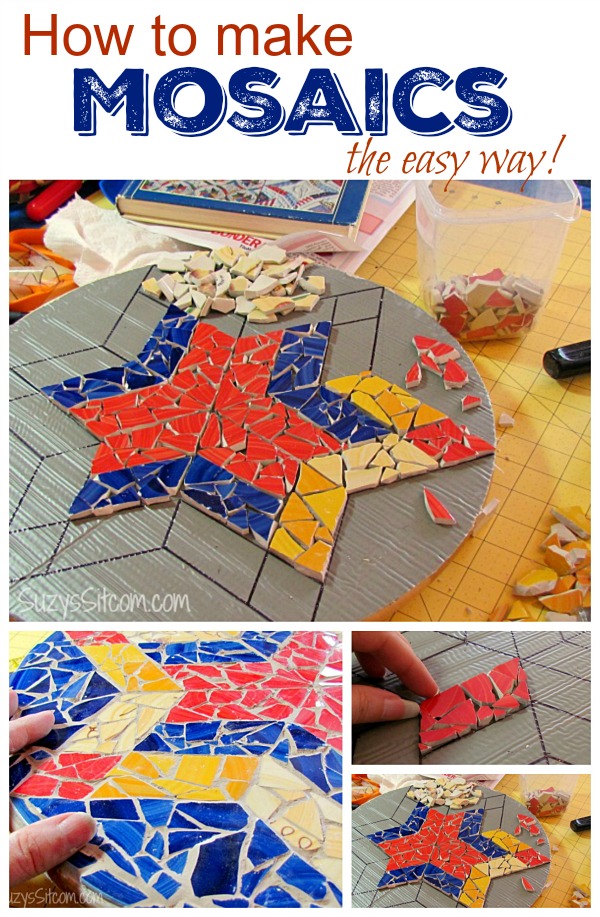
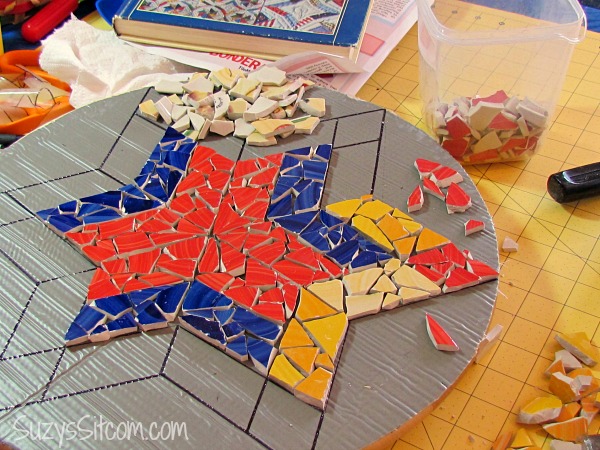
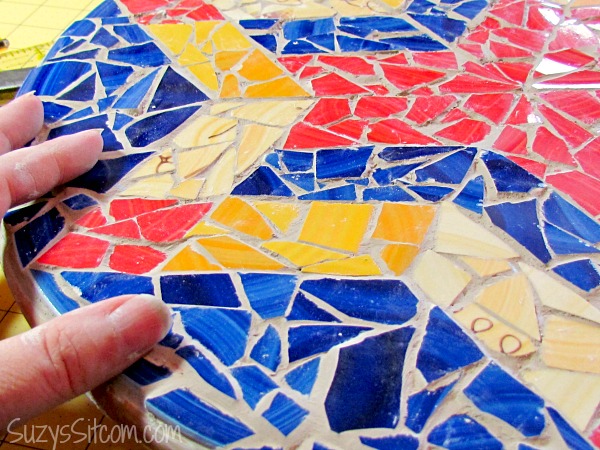
I peeled off the back layer of the adhesive and glued it down on top of the Lazy Susan. I then used a sharpie pen to draw my design onto the top layer of the adhesive. I decided to go with one of my favorite quilt block patterns.
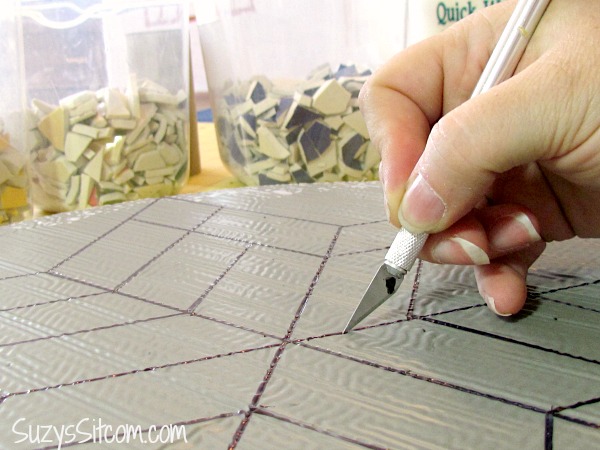
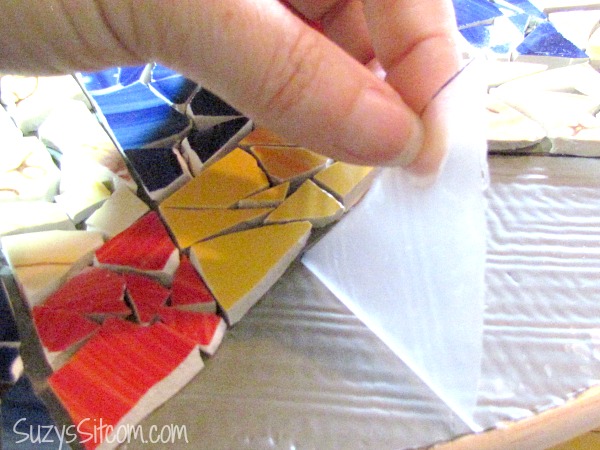
I used a craft knife to cut away the top layer of the section that I was working on, and then peeled that section up to reveal the adhesive underneath.
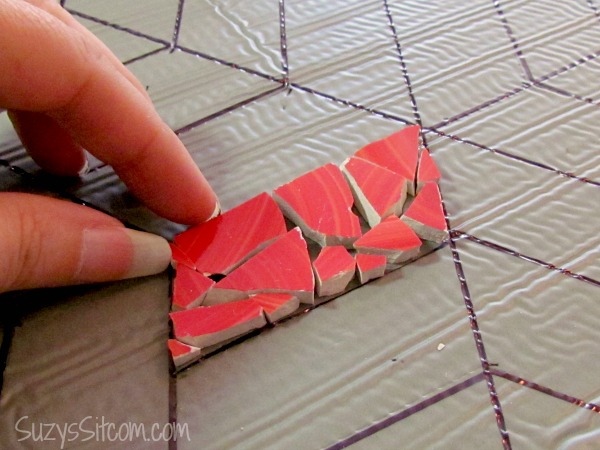
Then choosing my tiles, I just pressed them into the adhesive where I wanted them. The adhesive creates a good strong bond.
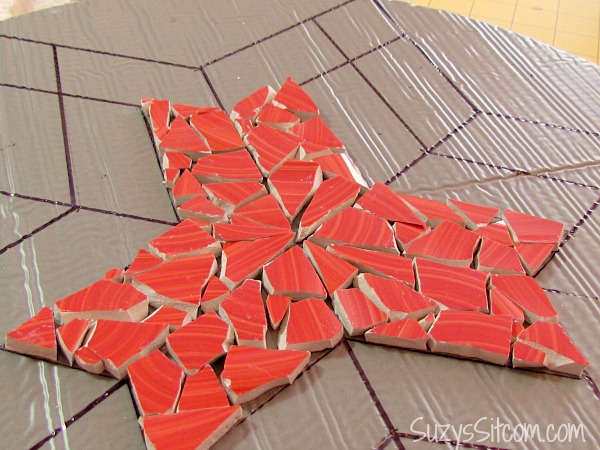
I just went from section to section, peeling off the top layer of the adhesive as I went.
What is great about this process is that I could take my time and didn’t have to worry about getting everything on there before glue dried.
Grouting
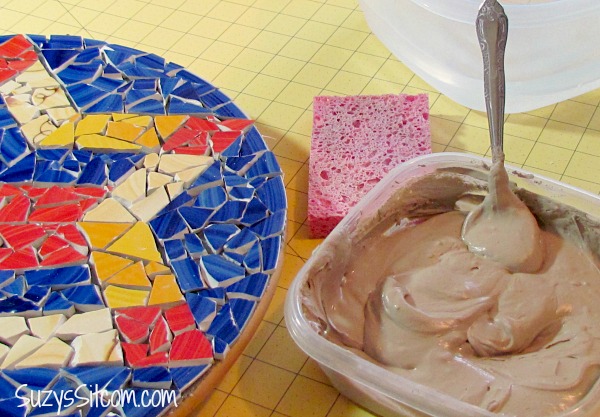
As soon as you have completed tiling, you can move to the next step of grouting. You don’t have to wait for the glue to cure. I used sandless grout that I purchased at the hardware store, mixing up several cups of the powdered grout with enough water to make it a thick consistency.
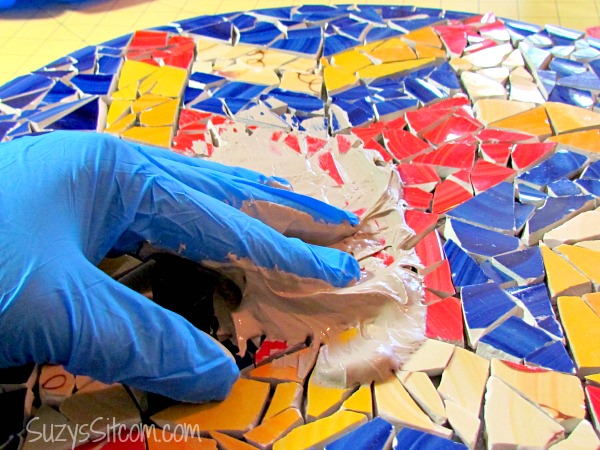
I then added it by spoonful on top of my project, pushing it into the cracks with my fingers.
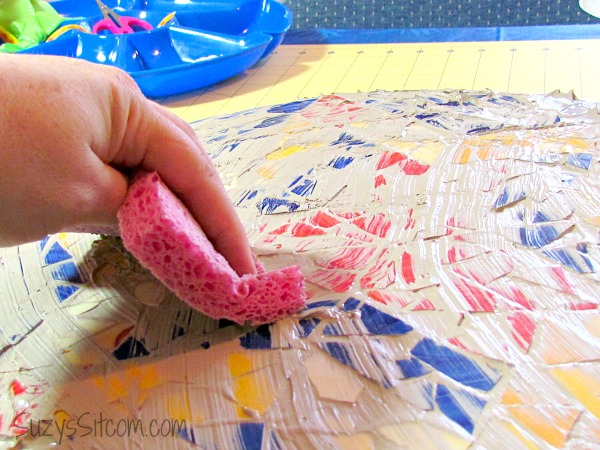
I used a sponge to wipe off the excess grout, rinsing it repeatedly in a bucket of water.
The grout takes about 2 hours to dry and then use a washcloth or a bit of cheese cloth to buff each of the tiles in order to remove any haze left from the grout.

I love how my Lazy Susan turned out. It matches my kitchen perfectly!

I drew the pattern on with a sharpie.
suzy
I was wondering how you get your pattern on to the of adhesive
I would check out Pinterest. They have every idea you can think of!
Hi Cheryl!
Thanks so much! I used several glass plates for this project, breaking them into small pieces. I only used the flat pieces to make the mosaic. I had lots of curved ones left over. Hope that helps!
suzy
Love this project and the tutorial you created. Have a question about the plates you used. Did you use only the flat parts of the plate? Did you nip away the heavy round part that the plate sits on? I can’t quite figure out how to get the project fairly flat using plates. Thank you so much for any help you can give about this.
I teach the Arts and Craft class at the Senior Center. I am always looking for inexpensive ideas. this fits the bill wonderfully. Will be collecting the materials soon. Love the idea. Thanks
Cool project and so easy! I found the “tile set mats” on Amazon, under a few different brand names. It isn’t incredibly cheap but I’m always willing to spend a little extra to save time. Thanks for sharing!
Hi Kelly!
Yes, it has held up beautifully! When we moved full time into our RV, I gave it to my daughter who still uses it daily. As for outside, the product does not recommend it. I believe you might be able to find similar products for outside use. Check your local Home Depot or Lowes and see what they might offer for outside use. Would love to see what you make!
suzy
Hi Suzy, It has been a few years since you posted this, I am just wondering how it has held up? Would you recommend this product to use outside? Thank you. Love the project.
What would be a good design for the top of a chest of drawers?
Where would I find patterns for top?
Hi Judi,
It would definitely show through the glass. I wouldn’t recommend it for
that type of project.
suzy
Can this be used with stained glass mosaics or would it show through the glass?
Hi Stephanie!
In the list of items needed for this project, it is called BONDERA 16-in Countertop Tile Mat Set . You can find it and other similar brands at your local Home Depot or Lowes. Hope that helps.
suzy
I give up, I can’t find where you mentioned what the adhesive you used is named. Looks like something great and I do like how your mosaic turned out.
Please share the name and perhaps where to purchase that adhesive by the roll
Where can i purchase that adhesive? Its sure a good product but cant find it anywhere ???? x
Such patience!! Great idea. Around here you could grab a senior citizen and go to the Salvation Army on Monday, senior day, when everything is half price for seniors and do it even more cheaply! LOL!!!
Where I live in central New Hampshire. Craig’s List has lots of free dishes & glasses & bottles and lots & lots of wooden items/furniture. I check out the “FREE” listings everyday & only consider free stuff in towns near me. The great shape/almost new stuff people are giving away in NH is mind boggling, you will be able to find great stuff where you are.
Great and easy way!!
Thanks for linking up with Welcome Home Wednesdays! Live every Wednesday at 7AM CT.
liz @ j for joiner
Hi Leslie!
Thanks for the tip! That may be a great idea to try! I will definitely try it with my next mosaic piece to see if it works. This one is actually
not really sharp on the edges. I tried to use edge pieces of my broken plates for the outside edges. But I do have to say that it was pretty sharp until I added the grout.
Hope you are having a wonderful summer, and thanks so much for the tip!
suzy
Hi Pat!
Thank you so much! You always have a way of brightening my day! This mosaic lazy susan is one of my favorite pieces and I love
how easy it way to create. I bet your cousin’s kitchen island is amazing. Things like that are priceless!
Hope you are having a wonderful summer.
suzy
Hi Nancy Grace!
You are very welcome! Would love to see what you come up with! The fun part is the smashing of dishes. Just saying. LOL!
Hope you are having a fabulous summer!
suzy
Hi Grambo!
So great to hear from you again! Hope you are doing well! If you decide to try this project, I’d love to see what you come up with!
Take care of yourself and thank you for putting a smile in my day!
suzy
Aren’t you clever? It looks great! Visiting from The DIY Collective and pinning…
so nice to fallow
Suzy, can’t wait to find this adhesive to try this. Thanks for taking the time to research all the great products for us. Wishing you and your family the best (fur kids too) hugs, Grambo (Scarlett and Clara’s Great- grandma)
The Sitcom comes thru for me again! I have been saving my cracked stoneware for a number of years for just such an idea, but hadn’t figured out the glue part yet. Thanks for forging ahead and blazing the trail–and all those other folksy/outdoorsy metaphors.
And continuing with the imagery, let me just say:
YOU ROCK!
Suzy … this is great way to do a mosaic … i tried one years ago but got discouraged with the adhesive … i had to stop mid way and problems happened so i had to chunk the whole thing. Using the adhesive stuff and being able to cut and peel as you need to makes putting it on hold, if necessary, more doable.
BTW .. I have a cousin that did an entire top of their kitchen island. It was about 4×6. Each of the family had a special place they did. And their last name is in the center. It is really a beautiful special piece.
Keep posting great stuff … love your posts!!!
pat
OOPs forgot to enter my name 😡
Susan, I read the whole tutorial and when I got to the last picture I saw that the edge of the whole round mosaic was a bit rough. I am wondering if you got some SPLINE the tubing you mend screens with and glued it to the edge if it would be some protection for the mosaic, your hands because of the sharpness of the edges of the pieces and it would maybe give a smoother finished look??? Just an idea. 🙂
Hi, nice idea about the double stick mat. Joanns’ has a double stick Archival Film that I am wondering might work and much less expensive.
What a fun project! You have such a great eye to fit all of those odd shaped tile bits so perfectly into each colored area. And I love your tip about the adhesive!
I love your idea for mosaic tiles! Not only is it more frugal, but I love the random shapes and, hey, banging it with a hammer would just be fun, lol!
I’ve never heard of that product, it looks pretty cool. Thanks for sharing at #HomeMattersparty
I love the way you created this mosaic. Thanks for sharing at Merry Monday! I am visiting from http://www.twelveonmain.com. Have a great week!
What a beautiful craft! Love the finished product 🙂
Blessings,
Edye | http://gracefulcoffee.wordpress.com
Yes, it would work fine outside. Would love to see what you come up with! suzy
Is this adhesive product waterproof? Would you use this to adhere the glass to a cement stepping stone that goes outdoors in the garden?
The hamering is the best part. Thanks for posting. Hello from Busy Monday.
This is a great project. I love that it was done with thrift store and dollar store items. I think I may even be able to do this with your great tutorial. Thank you so much for sharing with Share It One More Time. Cathy
We used Bondera to tile the backsplash in our kitchen. It turned out great and was so much easier to use than traditional methods. I had some left over and will try this on some things around the house. Great ideas…great blog. Thanks for sharing!
Amazing! And gorgeous of course.. I just love this idea.. it would make an awesome table too!
Thanks so much for sharing with the Pink Hippo.. can’t wait to see what you share next!
xoxo
Amie @ Pinkapotamus
This is so beautiful! We loved having you link up to our “Strut Your Stuff Saturday.” Hope to see you back soon! -The Sisters
Fantastic project ! very colorful and love the design.
JoAnn
Nicely done. Saw your project over at Hope Studios Link Party.
Gosh that stuff looks amazing Suzy! Love your new lazy susan too!
Thanks for linking to a Round Tuit!
Hope you have a fabulous week!
Jill @ Creating my way to Success
http://www.jembellish.blogspot.com/
I love how this turned out! I’ve always wanted to do a mosaic but really had no idea how to do it–thanks for the great tutorial. Maybe I’ll give it a try!
great project as usual Suzy, and love how with the bondera you can simply work on one section at a time! thanks so much for sharing on Craft Schooling Sunday!
Hi Debbie,
I don’t see why not! Just remember that it does have some weight when you put all that glass down. Be sure that the table will be able to support that.
suzy
oh my.. I’ve always wanted to try a mosaic.. You’ve made this look super easy.. And the colours you’ve used.. and patter.. is simply PERFECT..
Awesome work.. wow!! wow!! Thanks for linking into Colours dekor.. 🙂
Love this! It turned out beautiful. This might be something I could actually do…tee hee.
Suzy this is so awesome! I saw it earlier in the week when I linked up to your blog party. I can’t believe this was done on a lazy Susan. Oh btw does it annoy you that it is called Lazy Susan? I’m a Susan and you are, too and I know we aren’t lazy 🙂
We would LOVE for you to stop over and link this up in our Crafty Saturday Showcase. It is just our 2nd week. Your blog is awesome and we stop in at least once a week. I love the name of your blog, too!
Thank you!
Susie @Bowdabra
http://bowdabrablog.com/2012/05/12/saturday-showcase-craft-projects/
You made this look so easy. It’s fantastic and what a fun yet practical piece.
Can you use this on a laminated table? I like the table, but it is stained.
awesome.. I love it! I just shared it on Pinterest! Thanks for linking up at friday fun party..
That is just beautiful! I love how you used plates from the Dollar Store! Great idea. Megan
Wow, that turned out great and looks relatively easy. You could also save favorite pieces that get broken in daily use and incorporate them into a tray or picture or something. You rock!
LOVE IT LOVE IT LOVE IT!!!
A: love the quilt block
B: love the colors
C: love the product
D: LOVE THE WHOLE PROJECT!
Oh and love your blog….hehehe
This is awesome..Perfect with useful tips..
Thanks dear 🙂