Summer Jewels Beginner Quilt Pattern Series- Lesson Two
Want to learn how to make a beautiful quilt? This simple quilt pattern is easy enough for beginners! What an amazing gift! This is lesson number two: How to sew the top together. You can also refer to lesson number one: Cutting and Piecing the Quilt Blocks.

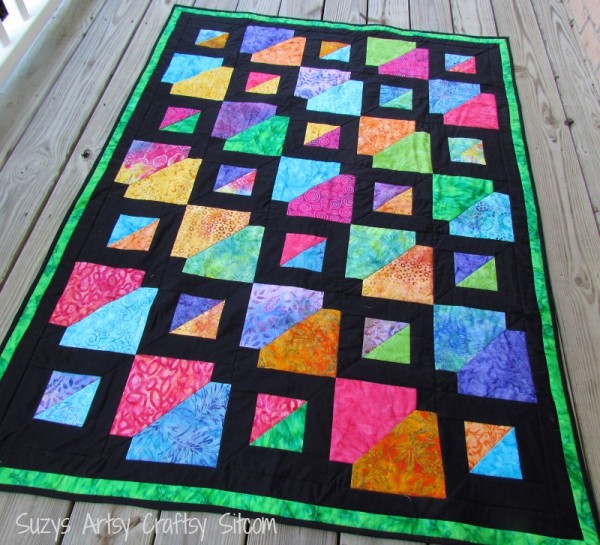
Summer Jewels Quilt
Lesson 2- Sewing the top together
(Please follow this link for Lesson 1)


As you can see, just by turning your blocks at different angles, you can come up with all kinds of ways of putting them together. For Summer Jewels Quilt©, we are putting the blocks together as shown in the first photo.
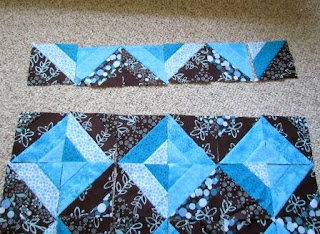

Begin with the first row of blocks, sewing them with right sides together and matching the seams, piece the first row.
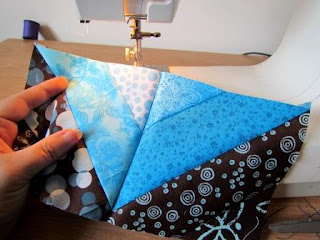

Sew each row, matching the seams as best as you can. Press each row with a hot iron, pressing the seams to one side.

Then sew each row together, right sides together, matching the seams. Press.


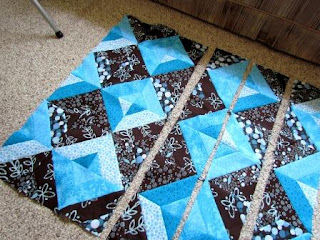
For the sashing: With right sides together, sew one strip to each side of the quilt top. Add your strips one at a time, pressing the seam out and then clipping off the excess fabric. Then adding on the next strip.

The quilt top is now complete! You have graduated from the piecing of the top and are ready for the next step. Quilting!
Follow this link to Lesson Four!
Be sure to check out some of my other quilt patterns!
Sleeping Puppies Baby Quilt or Twin Size Quilt

Batiks Gone Wild and Windmills at Night

The material for Summer Jewels sold out about a year ago. You can find kits for Summer Jewels at http://discountsewingsupply.com (using a different fabric selection). Hope that helps.
suzy
where would I buy the material used here?? I have been scouring the internet but I am not sure of the name of the material either….HELP
Unfortunately, when I went to use the last 2 layouts for the top, where the diagonals appear to continue from one block to the next, once I out the 1/4″ seam in the diagonals are off by 1/4″… Works ok if in a pinwheel layout or diamond, but doesn’t seem to work for the diagonals. Had to re-invent my layout plan and put smashing between blocks so you couldn’t tell they didn’t line up.
Hi Stepheni!
You would have to purchase at least one extra jelly roll. Each jelly roll package will make approximately (45) 5 ” finished blocks. This lap quilt uses 42 blocks. Simply decide how large you want your quilt to be and then figure out how many 5″ blocks it would take.
Keep in mind that you will need extra fabric for the backing and sashing. If I want to enlarge a quilt, I draw it out on paper first to get an idea of the amount of fabric needed.
Hope that helps!
Love this tutorial and love the colors. I wanted to know how would you increase the size if you wanted to make it larger than a lap size?
I love how this goes together so quickly. Thank you for sharing. After I cut my first 5 1/2 square, I made a template. It made it go even faster.
Beautiful! Makes me wish I could sew.
S
xo
Oh, this is so helpful! I want to make a quilt but am a bit scared. I'll definitely stay tuned for the next lesson!
This is great! I love all the different combinations, but the one you used is my favorite.
My squares came out smaller (my own fault), so my quilt is almost perfectly baby-sized. I'm finished with the main part of the piecing, but now I have to select my sashing fabric.
Thanks for a great, clear tutorial! I may be doing another one of these with my sister later this week. 🙂
So many combinations! Love the color combo too!
This is amazing..love the detail & step by step images, well i will wait for the next lesson!!this is a very smart combination..you are such a skilled person..i always love to visit your blog..lovely friend keep rocking with awesome stuff..